# Welcome to the Documentation Portal
Welcome to the Emporix Documentation Portal.
We’re glad you’re here!
This is your complete guide to getting the most out of Emporix products. Whether you’re just getting started or looking to dive deeper, you’ll find everything you need — from quick start guides and tutorials to detailed technical references and troubleshooting tips.
At its core, this documentation focuses on the **Autonomous Commerce Execution (ACE)** platform, which integrates the **Commerce Engine (CE)**, **Orchestration Engine (OE)**, **Value Stream Modeller (VSM), Agentic Commerce Intelligence (ACI)** and **B2B Commerce Frontend** into one cohesive, powerful commerce solution.
Use the navigation menu to explore the topics. You can also search for specific information or use the AI-powered search to ask questions and get instant answers.
Let's get started!
The Emporix architecture is a sophisticated, modular platform designed to support modern digital commerce, focusing heavily on central control, intelligent automation, data unification, and seamless integration. The design comprises several core components that work together to create an autonomous and efficient ecommerce environment.
Learn more about the core and supporting components that enable you to build smart and powerful ecommerce solution.
Join our Discourse community to share ideas and exchange experiences. Or, get in touch with our Support Team to report an issue and get immediate help.
Cover image
:comments:
Emporix Community Portal
Join our community to post questions, get help, and share resources with others.
# Emporix Components Overview
Emporix is a sophisticated, modular platform designed to support modern digital commerce, focusing heavily on central control, intelligent automation, data unification, and seamless integration.
The architecture comprises several core components that work together to create an autonomous and efficient ecommerce environment.
Emporix components overview
**Core Architectural Components**
* **Commerce Orchestration** - This layer serves as the central control mechanism for all business processes within the platform. Its purpose is to centrally control critical operations, ranging from managing orders to handling promotional processes. Commerce Orchestration embraces functionalities of [Commerce Engine - CE](https://developer.emporix.io/ce/) and [Orchestration Engine - OE](https://developer.emporix.io/oe/), powered by explicit APIs.
* **Agentic Commerce Intelligence** - This is the layer that leverages AI agents to introduce intelligent automation. The layer enables smart decisions that accelerate processes and reduce operational costs. It allows the platform to function without the need for human intervention in many routine or time-consuming tasks, driving operational efficiency and extensibility. Agentic comes with a library of AI agents and space to create custom agents using different tools and resources.
* **Semantic Commerce Data Layer** - This layer addresses data consistency and accessibility across the platform. Its role is to provide a unified, understandable database. It connects systems, processes, and teams, which enables consistent decisions across the entire organization.
* **Embedded Integration Layer** - This component is responsible for ensuring the seamless connection and embedding of various external systems. It integrates critical services such as ERP (Enterprise Resource Planning), PIM (Product Information Management), and other third-party systems. This layer is designed to eliminate the need for complex interface projects.
**Supporting and Functional Layers**
In addition to the core structural components, the architecture also includes:
* **Value Stream Library** - The [Value Stream Modeller- VSM](https://developer.emporix.io/value-stream-modeller/) library offers ready-made process templates for all core commerce processes. These templates are designed to be customizable and available for immediate use.
* **Journey Aware Frontend** - This component is focused on the customer experience. It helps merchants to better understand the customer experience and design it appropriately.
# Glossary
Look through the glossary of Emporix terms.
## access control
A combination of user's roles and resources determining what a user can do on a particular entity.
## add-on
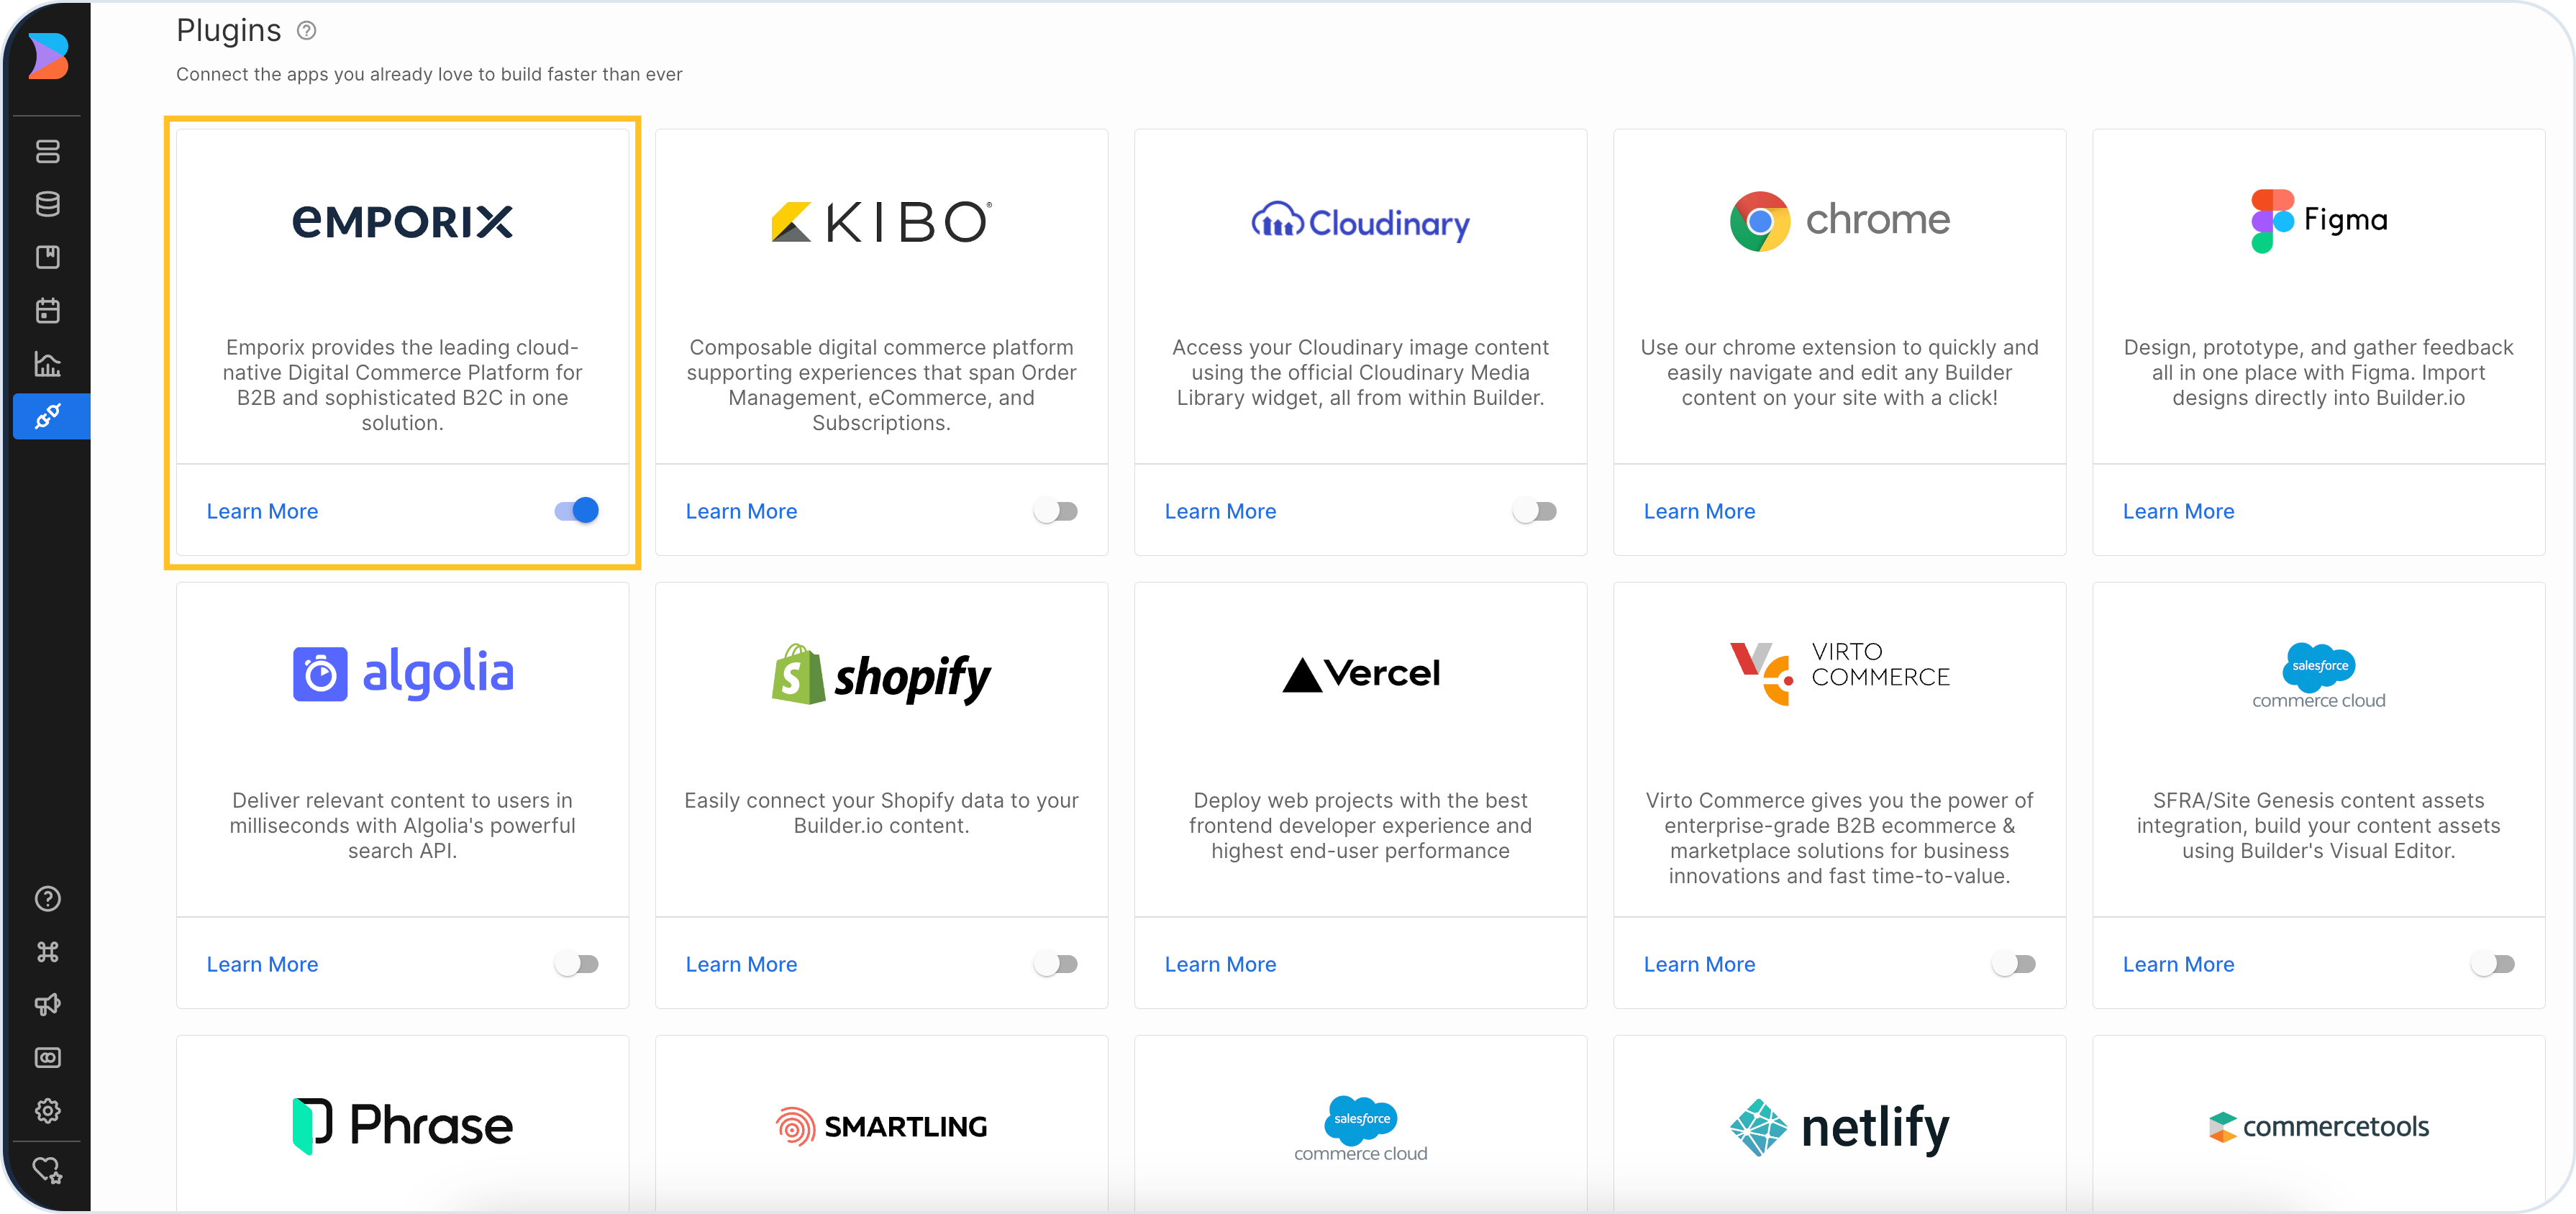
An add-on, or plugin, is a software component that adds a specific feature or functionality to the Emporix platform. An add-on is usually more focused and contained within the external host application to extend the capabilities without altering its fundamental structure. Usually, it's pre-built and ready to use with minimal setup but can allow some customization or configuration. For example, there are a few Emporix add-ons dedicated to external CMSs or support systems.
## agentic AI
A functionality delivered within Emporix platform that introduces AI-powered agents that automate ecommerce workflows. These agents react to system events and execute tasks automatically, reducing manual work. Agentic AI comes with the predefined agents library (for example, Complaint, Anti‑Fraud, or Support) but also allows you to build custom agents with the chosen LLM, tools, and MCP capabilities.
## AI agent
An automated assistant, fueled by AI LLM capabilities, that executes ecommerce tasks and workflows. In Emporix, agents react to system events or API triggers and carry out actions to reduce manual effort. You can use predefined agents for common needs, or build custom ones by choosing the LLM, attaching tools, and enabling MCP capabilities.
## AI agent library
A catalog of ready-to-use Emporix AI agents for common ecommerce tasks. The library includes predefined agents like Complaint, Anti‑Fraud, Support, and Translation Agent. These agents run in the background and integrate into workflows to handle complaints, flag fraud, assist in communication, and more. You enable one by selecting it from the library, adding relevant configuration, and then activating it from "My agents" view.
## AI MCP server
AI MCP lets Emporix agents securely connect to external systems through MCP servers. Emporix includes built‑in MCP servers for common ecommerce operations. You can also add custom MCP servers so agents can talk to ERPs, CRMs, or other services (for example, fetch product availability). AI MCP Server allows for calling specified MCP tools they expose.
## AI token
A securely stored secret used to connect Emporix AI to external services. You create and manage tokens centrally, then reference them in agents, custom MCP servers, or LLM providers. Tokens secrets are encrypted and immutable after saving, never returned by APIs.
## AI tool
An AI tool extends an agent by connecting it to third‑party platforms for actions or data. In Emporix, tools let agents operate inside external systems. Today, the supported AI tool is Slack. The Slack tool installs the Emporix Support Agent bot in the chosen Slack workspace, so that teams can make queries about Emporix events directly in Slack.
## AI logs
A dashboard view that lets you monitor and control everything related to AI Agents enabled in your tenant. AI logs provide visual tools to measure agent efficiency, track session handling, and analyze errors. The logs are grouped into requests, jobs, and sessions, with each entry marked with a severity level (info, warning, or error). You can use AI logs to inspect agent behavior, troubleshoot issues, and iterate on your agents with confidence.
## API
An API, or Application Programming Interface, is a set of rules, protocols and tools that allow different software applications and systems to communicate and interact with each other. Emporix services expose public REST API that enable communication with external systems and allow you to easily manage your business resources.
## authentication
A process of verifying the identity of a user, system, or entity to ensure that they are who or what they claim to be. It's a first-line defense mechanism before granting access to a system or application.
## authorization
A process of determining and granting permissions and access controls for a user to perform specific actions or access particular resources. Authorization enhances security of the application by restricting access and ensuring that actions are performed by users with the appropriate level of permission.
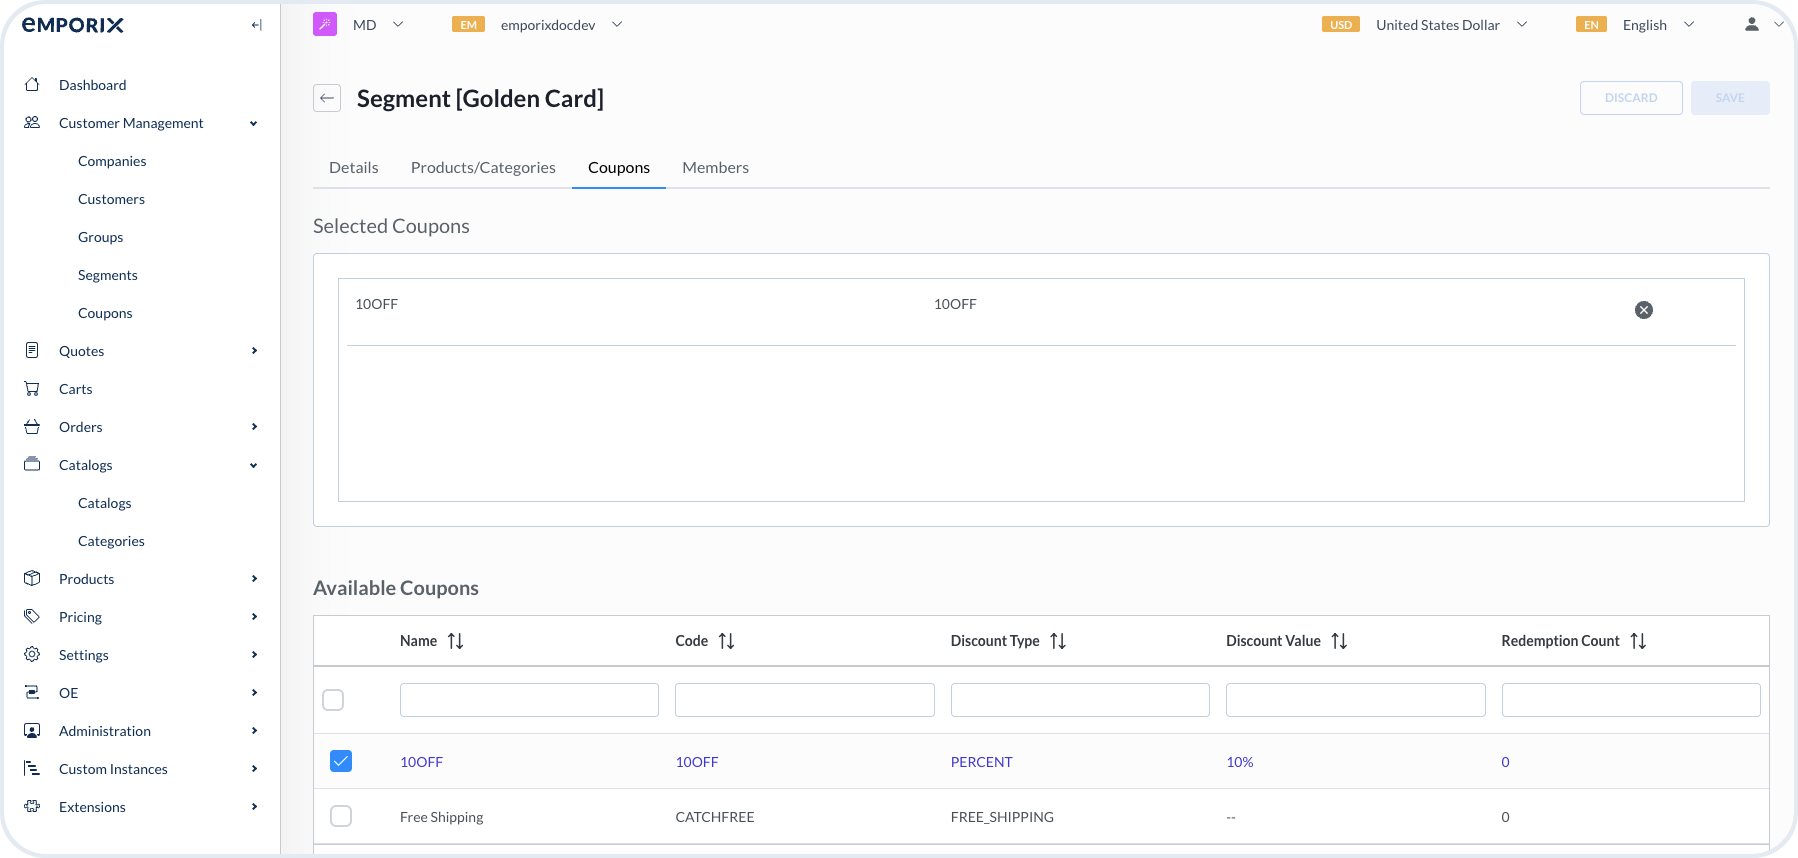
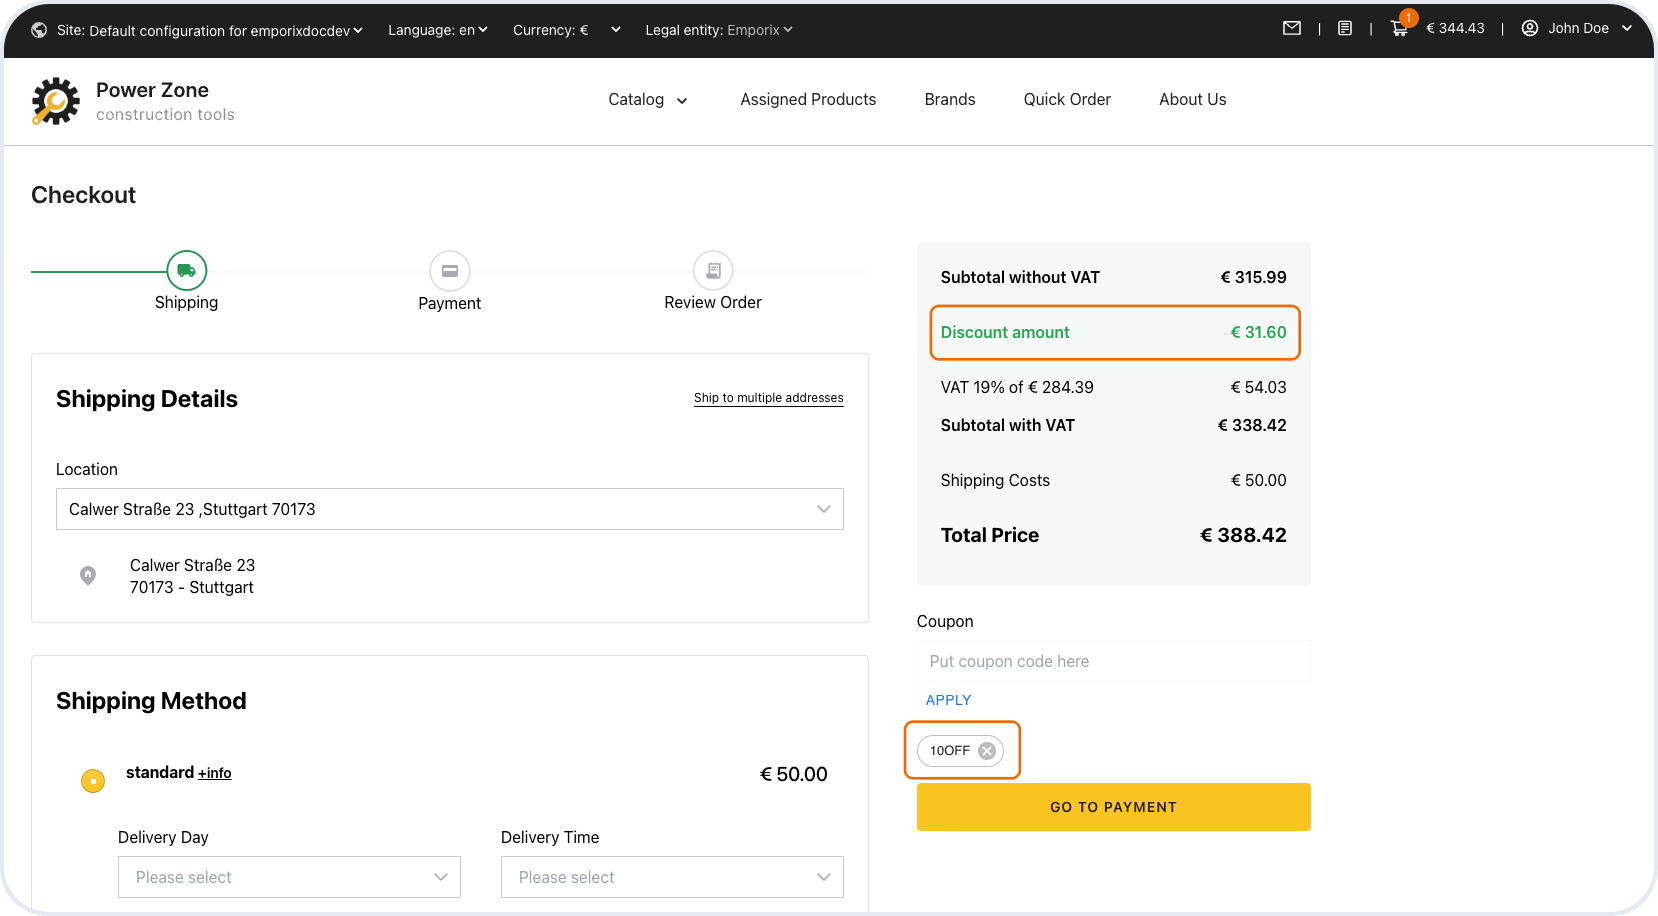
## calculationType
An attribute of the `totalDiscount` parameter. It indicates whether discounts were applied to net or gross values.\
The discount is applied to either `price.grossValue`, when `includesTax=true`, or `price.netValue`, when `includesTax=false`. Based on this, the corresponding net or gross value is recalculated using the tax rate.\
The calculation method used is indicated in `totalDiscount.calculationType`, which can be either `ApplyDiscountAfterTax` or `ApplyDiscountBeforeTax`.
## CE
Commerce Engine is a MACH digital commerce platform combining B2B and B2C features that provides end-to-end commerce solution. Previously, it was known as Digital Commerce Platform.
## Commerce Engine
See the [CE](#ce).
## Commerce Orchestration Platform
Emporix solution that enables you to digitalize your sales end-to-end. It embraces Commerce Engine and Orchestration Engine that together can help you revolutionize the ways you sell your goods and operate more efficiently within your company.
## data retention policy
Standard practice of storing and maintaining data for a specified period to meet legal, regulatory, business, or other requirements. The policy takes into account factors such as purpose, compliance, and security. The data retention in Emporix refers to data collected by value streams.
## discountedPrice
The attribute used to calculate a relevant price on an item level or on a cart level.
On an item level, it's the price of the line item calculated as unit price multiplied by quantity, with any applied discounts.\
The attribute is included in the cart response if a discount is applied to at least one line item.\
Depending on the tax configuration for a site, it can be either net or gross.\
The calculation method that was used is indicated in `totalDiscount.calculationType`, which can be either `ApplyDiscountAfterTax` or `ApplyDiscountBeforeTax`.
On a cart level, it's the sum of all line item prices after discounts. This attribute is included in the cart response if at least one line item has a discounted price. It represents the total of discounted prices for line items with discounts applied, or the regular prices for line items without discounts. Ultimately, it reflects the total cost of all line items after discounts.
## domain
A unique name that identifies your website or online store.
## effectiveValue
The result of the price matching calculations for a product or SKU item, included in an order. The value includes discounts if any apply. The value is a gross or net price depending on the `includesTax` setting value. See also [originalValue](#originalvalue).
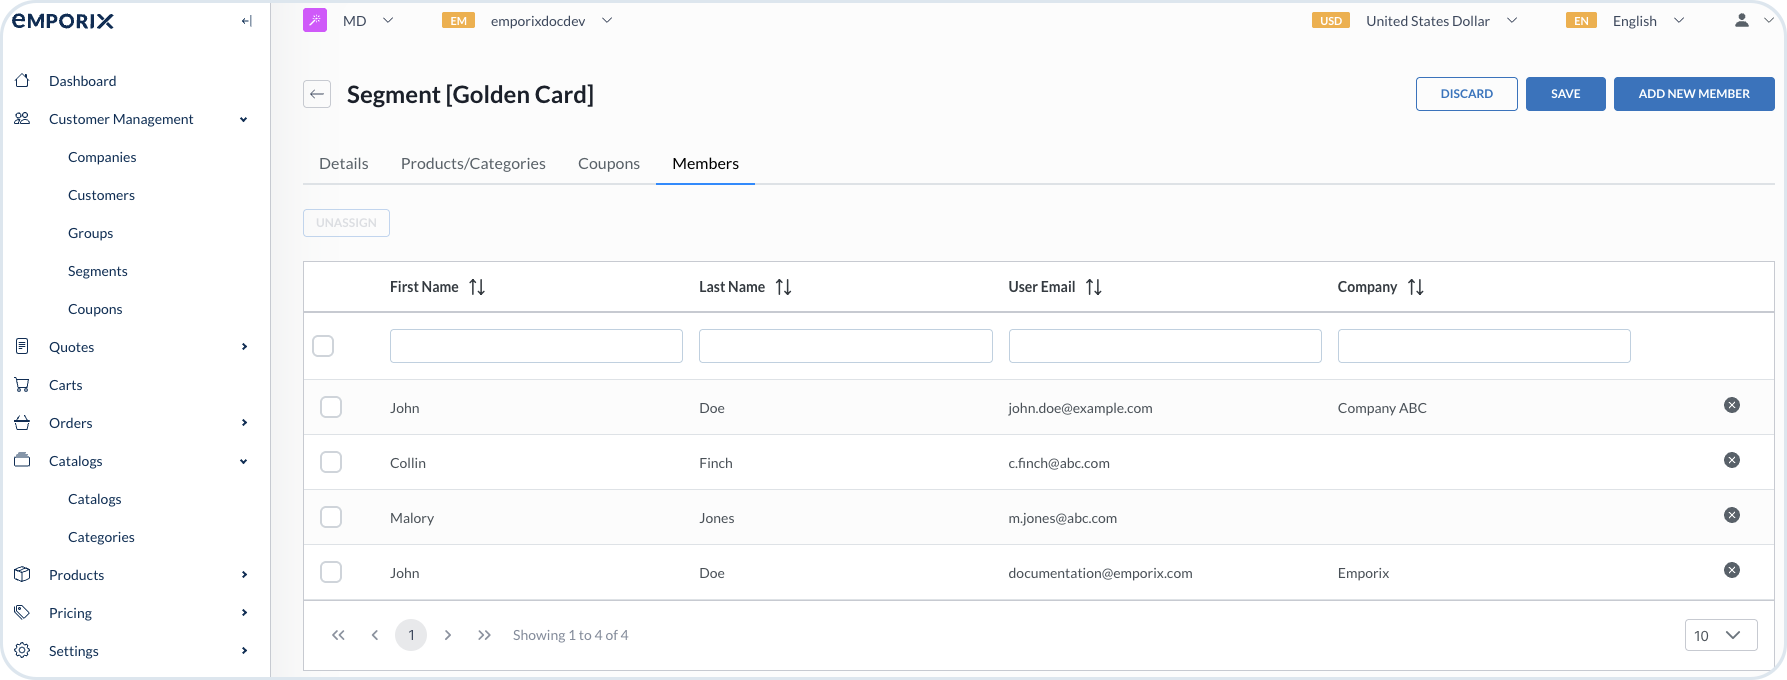
## employee group
An aggregation of tenant employees that share the same access control within a particular service and resource. By assigning an employee to a particular group, you grant them access to a specific access control level.
## event log
A record of an important action or incident in a system or network, for example, an error or a user activity, in relation to a value stream. You can check the event logs in the Management Dashboard under **OE -> Events -> Event Log**.
## event registry
A list of all events configured in a tenant as triggers for the value streams. The Event Registry is available in\
the Management Dashboard under **OE -> Events -> Event Registry**.
## extension
A custom module that contains custom logic and functionality that you can build separately and embed to the Management Dashboard. An extension has to contain the appropriate dependency to the Management Dashboard to be able to read contextual information.
## finalPrice
The final price calculation on an item level or on a cart level.
On an item level, it's the sum of the `discountedPrice` or the original price, depending on whether any discounts were applied to the line item, and the `totalFee`, which includes all fees applied to the line item.
On a cart level, it means the sum of all the items' final prices, total shipping cost and fees included in the cart.
## IAM
Identity and Access Management (IAM) Service is responsible for granting access rights and permissions for different groups and users in the Emporix system.
## includesTax
The setting defined at the site or price model level. It is used in the price matching algorithm by the Price Service to calculate product prices. The setting determines if the algorithm returns net or gross prices.
## integration
Integration involves connecting two or more systems, applications, or services so that they can work together and exchange data between each other. For example, you can integrate a payment gateway system or CRM software. Implementation can involve APIs, middleware, or webhooks to enable communication.
## legal entity
A distinct legal entity in the Emporix system that represents a company or subsidiary with associated legal information, such as legal name, registration details, tax registration number, and country of registration. Legal entities can be of type COMPANY or SUBSIDIARY, where subsidiaries can be linked to a parent company. Each legal entity can have multiple addresses, customer groups, approval groups, and account limits associated with it.
## MCP tools
System operations, exposed by MCP servers, that you can call with AI agents. The MCP tools map APIs and business logic into tool calls that an agent can invoke over the Streamable HTTP protocol. In Emporix, you can use the MCP tools exposed by Emporix MCP Servers, related to the commerce platform, and you can also enable external MCP tools exposed by custom MCP Servers.
Emporix MCP tools are grouped by domain (product, order, customer, extensibility) and are available only if your MCP token has the required scopes. Examples: product tools like `get-product`, `upsert-product`; order tools like `get-order`, `create-return`; customer tools like `upsert-customer`. You can also restrict available tools by the parameter appended to the protocol URL, for example, `...?tools=get-label`. The custom MCP tools depend on the provider and your setup.
## mixin
Mixins are custom attributes that you can add to the Emporix system to extend the data model of different entities, such as, for example, products, catalogs, or customers. Mixins functionality supports creating a custom fields schema that validates if the associated data is correct.
## OAuth
OAuth (Open Authorization) is an open-standard framework for granting user's or third-party application access to the application without exposing their credentials. OAuth uses authorization tokens to grant relevant limited access based on user's permissions. OAuth Service in the Emporix system allows you to generate the following token types: anonymous, SaaS (customer), and service access tokens. Anonymous token is used on a storefront to access public resources with a read scope to allow customers to browse products with prices, and add products to cart. SaaS token works similarly, but it's associated with a specific customer when they log in. The Service access token is required to access the Emporix services to manage and manipulate data, such as products, categories, prices, and others.
## OE
Orchestration Engine is the application that allows you to digitalize and optimize the company's processes and workflows. OE introduces real-time, end-to-end process intelligence to enable creation of value streams that orchestrate people and systems across your business, and even outside of it.\
Previously, it was known as Commerce Execution Platform.
## Orchestration Engine
See the [OE](#oe).
## originalValue
The original base or default value of a product or SKU item included in an order. The originalValue is taken into account in the [price matching](#price-matching) calculation. The value is a gross or net price depending on the `includesTax` setting value. See also [effectiveValue](#effectivevalue).
## permission
A mechanism for controlling and limiting what actions a user can perform on specified resources.
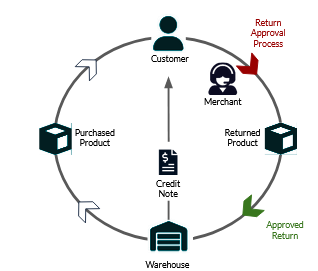
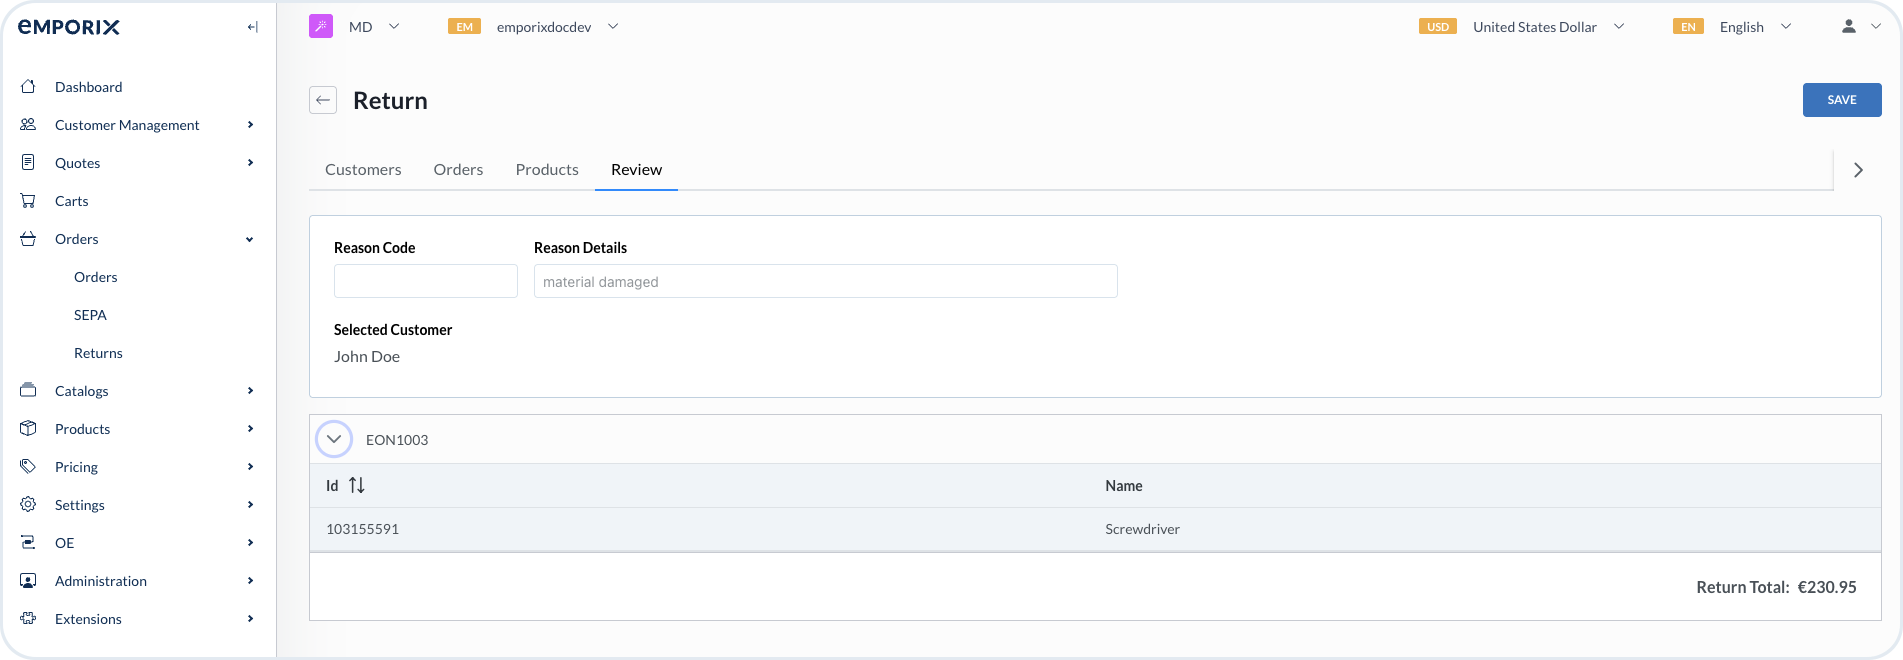
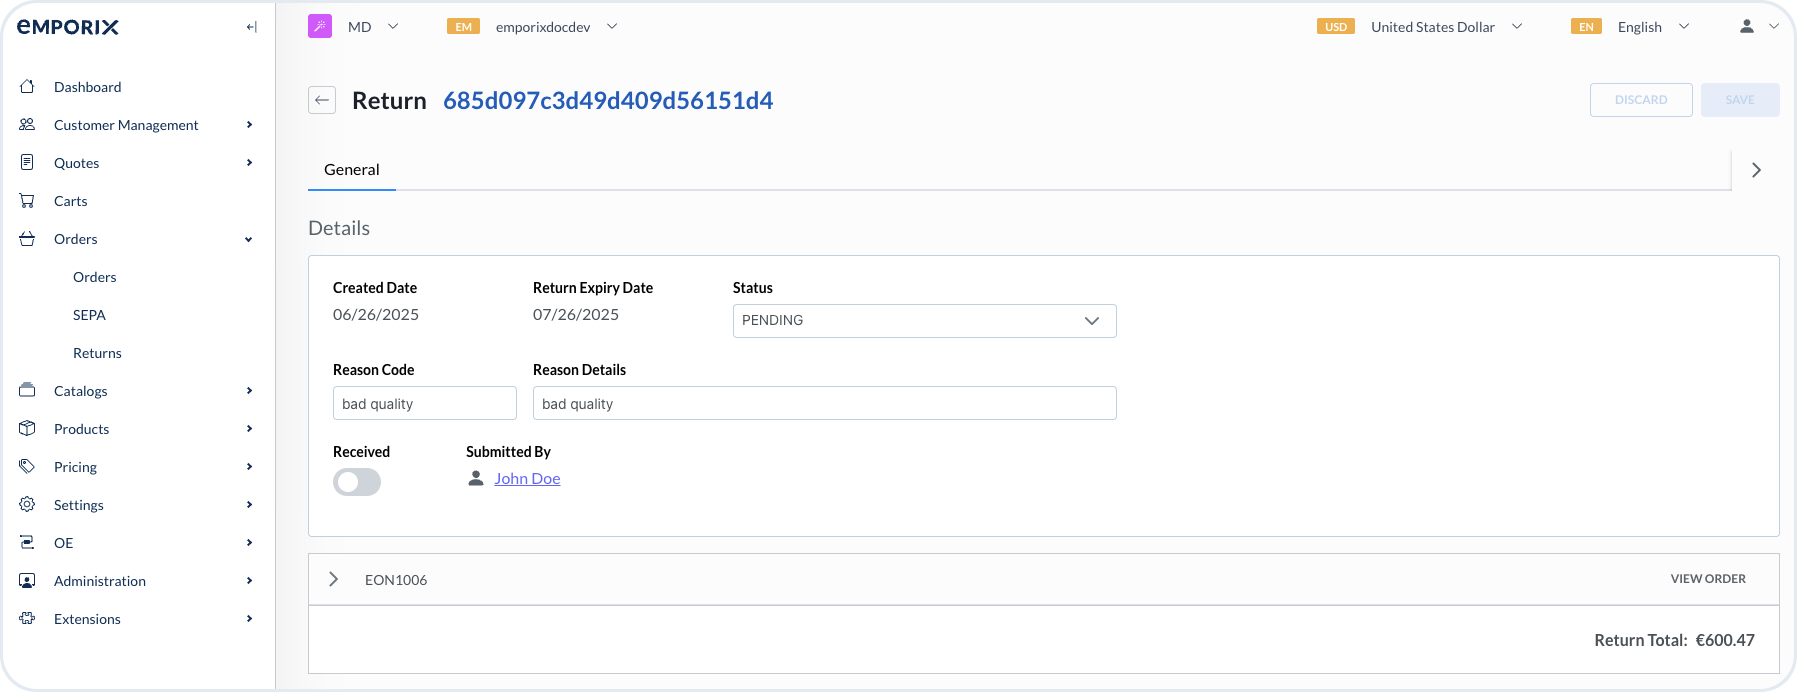
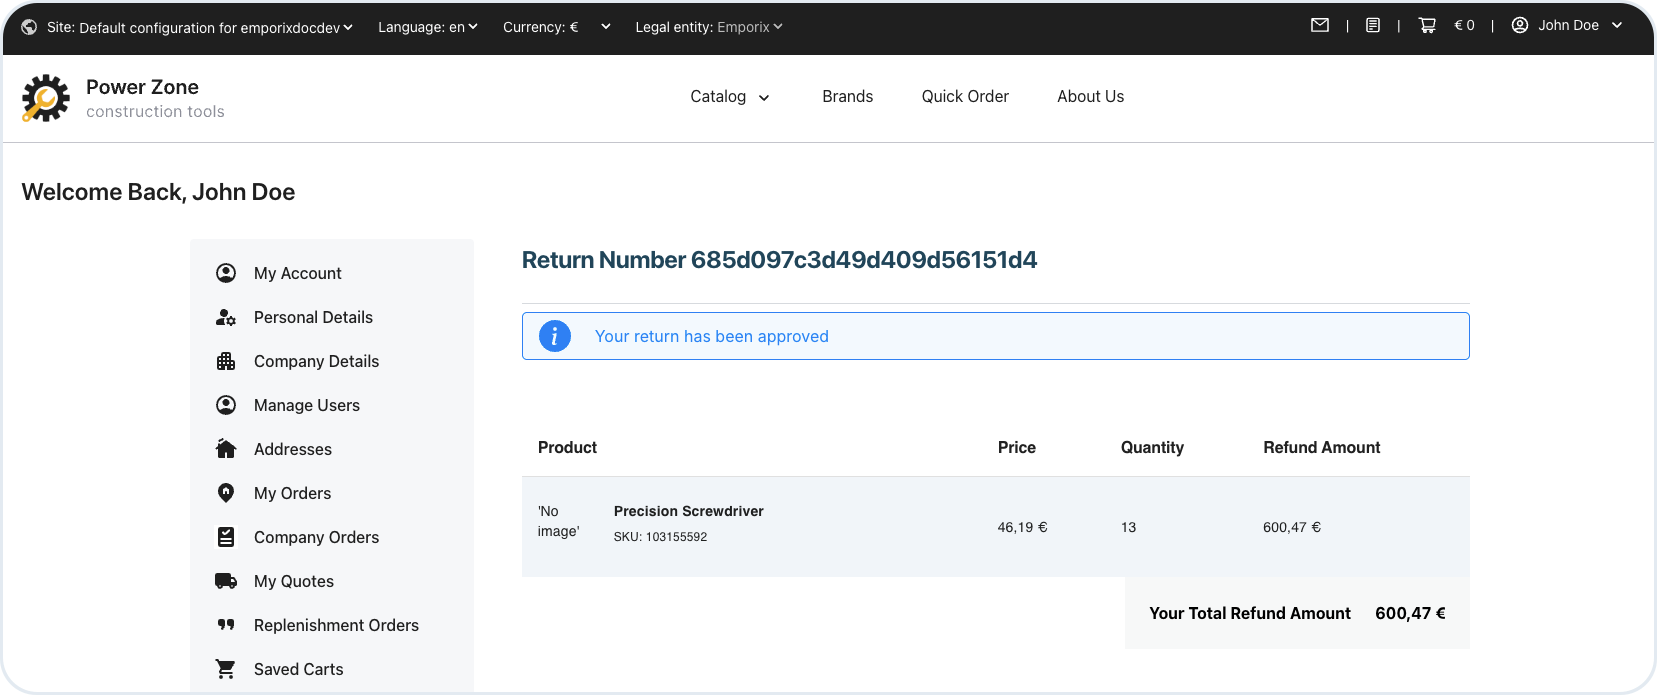
## Pick-Pack
The Pick-Pack service facilitates management of picking and packing processes in-store and in a warehouse.
## predefined AI agent
An AI agent delivered by Emporix within the AI Agent Library. It's a ready-to-use AI-powered automation solution that you need to only configure and enable in your tenant.
## price
A unit price assigned to a product at price matching operation. It's multiplied by the item quantity.
At cart level, the term means a sum of all line item prices without discounts.
## price matching
A price matching algorithm that finds the best price for products based on specified criteria such as site, currency, location, customer, and quantity. The algorithm fetches all matching prices, calculates a unified original value for each, and returns the price with the lowest effective value. Price matching can handle currency conversion using exchange rates, location-based pricing using tax classes, and can return prices as gross or net values based on the site or price model settings.
## price searching
The functionality of querying and retrieving prices from the Price Service API based on various filtering criteria such as product, site, currency, location, customer, customer group, date range, and price list. Price searching allows you to find and retrieve specific prices that match your business requirements, enabling efficient price management and retrieval for products across different contexts and configurations.
## restriction
The `restriction` property serves as the tool of access control to limit the visibility of restriction-aware (or site-aware) entities for different user groups. By default, restriction is associated with site permissions separation, by reading the associated `siteCode`. However, the restrictions can be extended by defining the custom restriction values. Restrictions affect the following entities: company (legal entity), customer, cart, order, and quote. See also [site permissions](#site-permissions).
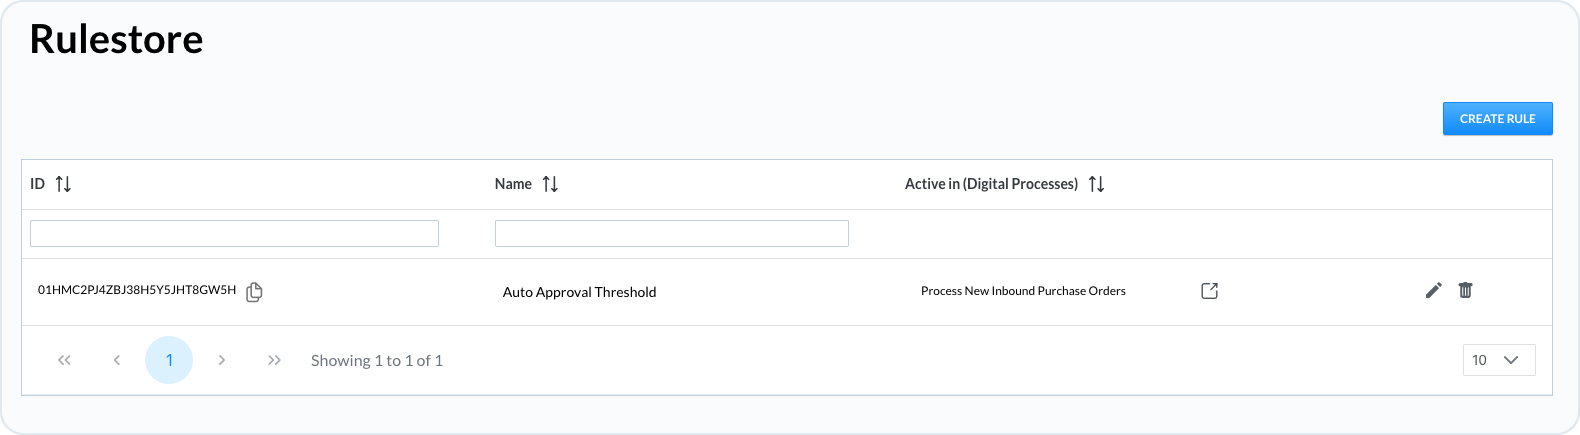
## rulestore
A place where you can define, configure, and store business rules that you can use in a value stream as a filter logic for a step or a scenario. For example, a rule that allows approving product return requests only for damaged products, based on the return reasons. The rulestore keeps the rules so that you can easily reuse them in multiple value streams. The rules remain inactive until they are referenced by a specific process.
## schema
Schema Service allows you to manage and validate mixin fields for different entities.
## scope
A constraint or filter applied to API endpoints to determine what a user can do with a service.
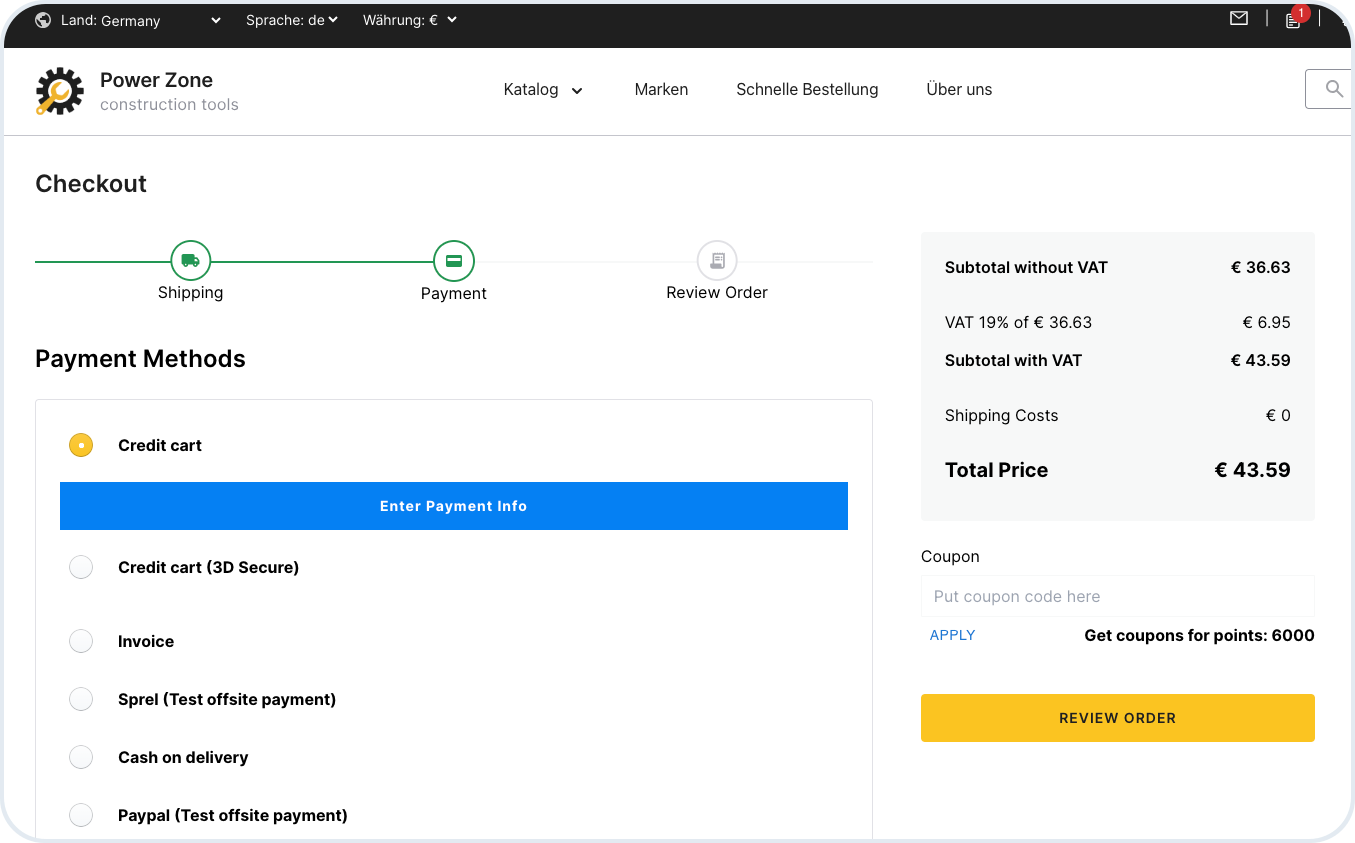
## SEPA
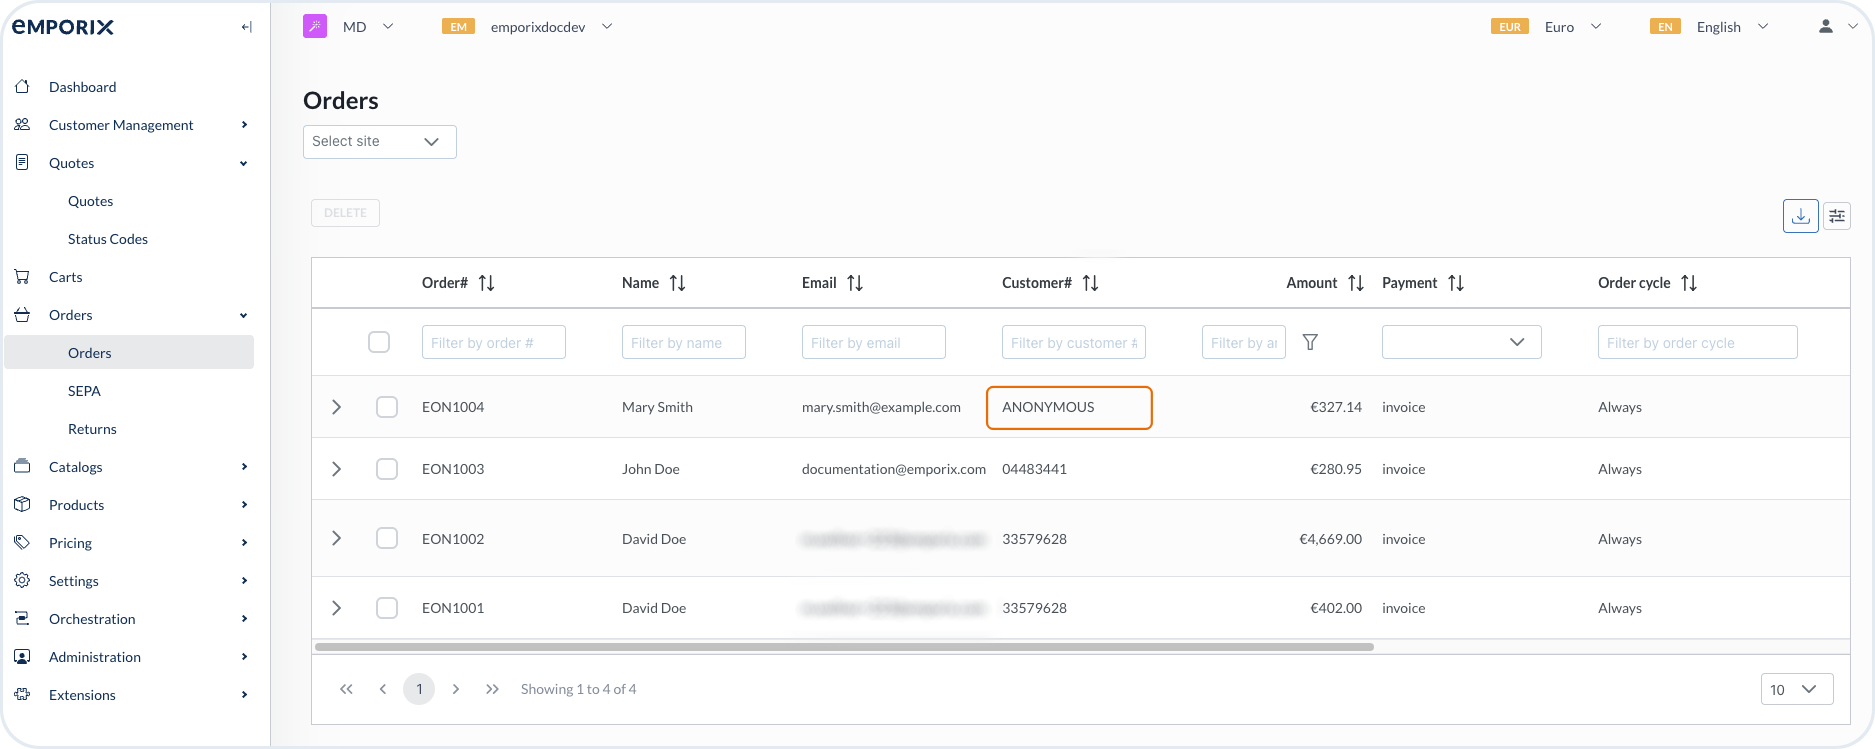
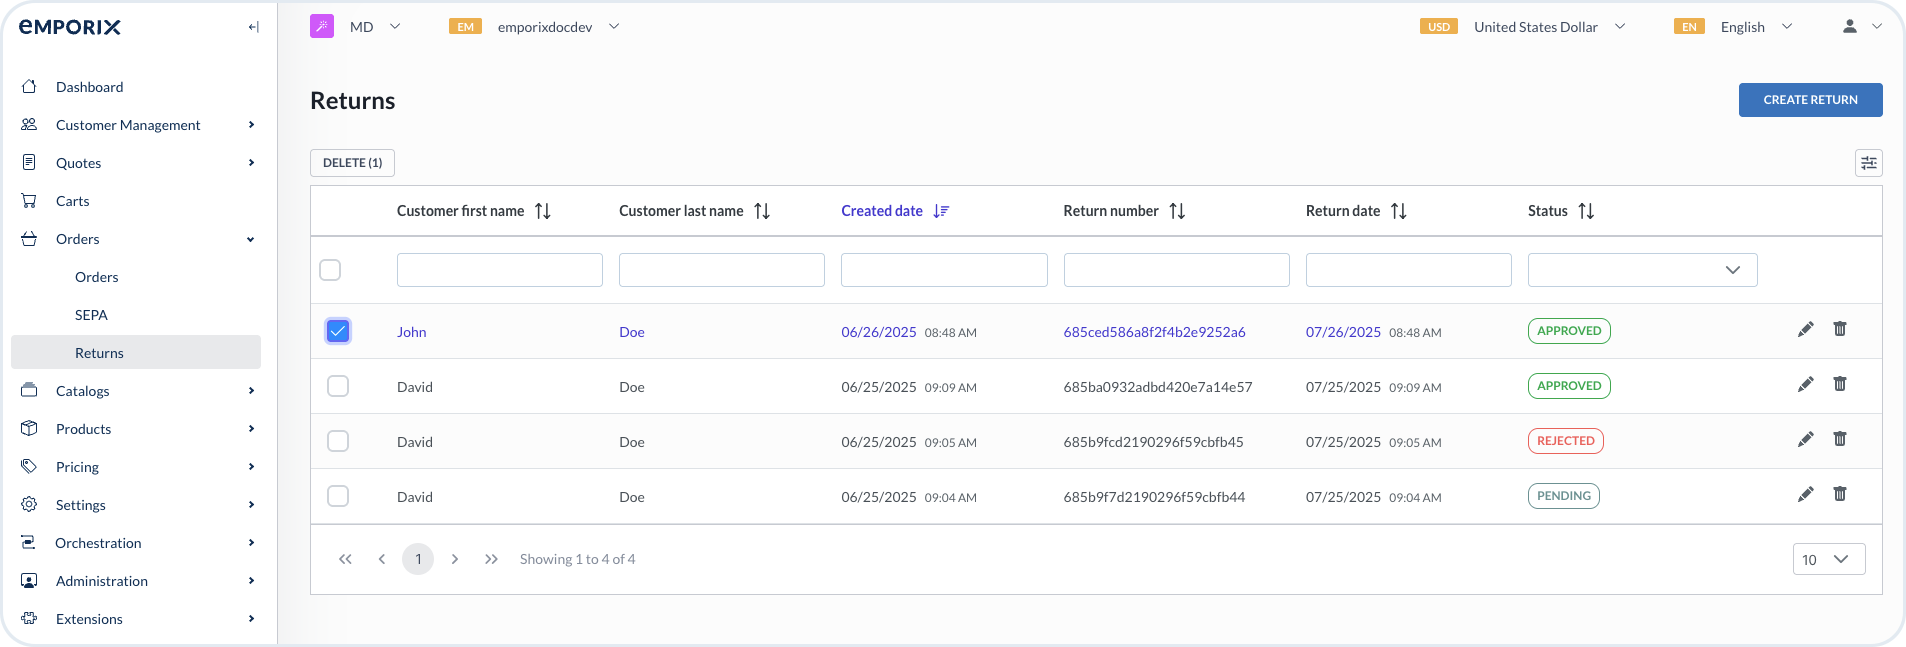
Single Euro Payments Area (SEPA) allows cashless transactions in Euro within the European Union and some non-EU countries. In the Management Dashboard, you can generate SEPA-XML file for all orders with `INVOICE` status and payment set to `DIRECT DEBIT`.
## service
An independent, self-contained unit that is responsible for a specific function and communicates with other services through APIs. Emporix uses microservices architecture.
## site
A site represents a specific shop, warehouse or another independent facility. You can have multiple sites depending on the specific business needs. For example, if you have multiple locations and have to handle different delivery areas for each location, the taxes vary between locations, or there are different delivery options available.
## site-aware
The ability of the system, application or a process to recognize and adapt to the specific site-related configurations or characteristics. In Emporix, there are the following site-aware resources: carts, delivery methods, delivery times, delivery zones, fees, orders, payment methods, picklists, packlists, pickup points, product availabilities, product locations, promotions, stock levels, prices, tax rates, and shipping.
## site code
A unique identifier of a site for your online store. For example, it can be associated with a country where you operate. You define the site code in the **Settings -> Sites** in the Management Dashboard.
## site permissions
Site permissions extend the existing permission management framework, to more precisely and granularly control access rights for user groups. They allow to define access rights per site (or store) not just globally, and therefore separate responsibilities across multiple sites, markets, or brands to reduce the risk of unauthorized changes. Site permissions affect the following site-aware entities: company (legal entity), customer, cart, order, and quote.
## subsidiary
A type of legal entity that represents a subsidiary company linked to a parent vendor or company entity. Subsidiaries enable hierarchical management for vendors operating multiple legal entities, allowing them to organize and manage related companies under a main entity while maintaining separate legal information and registration details for each subsidiary.
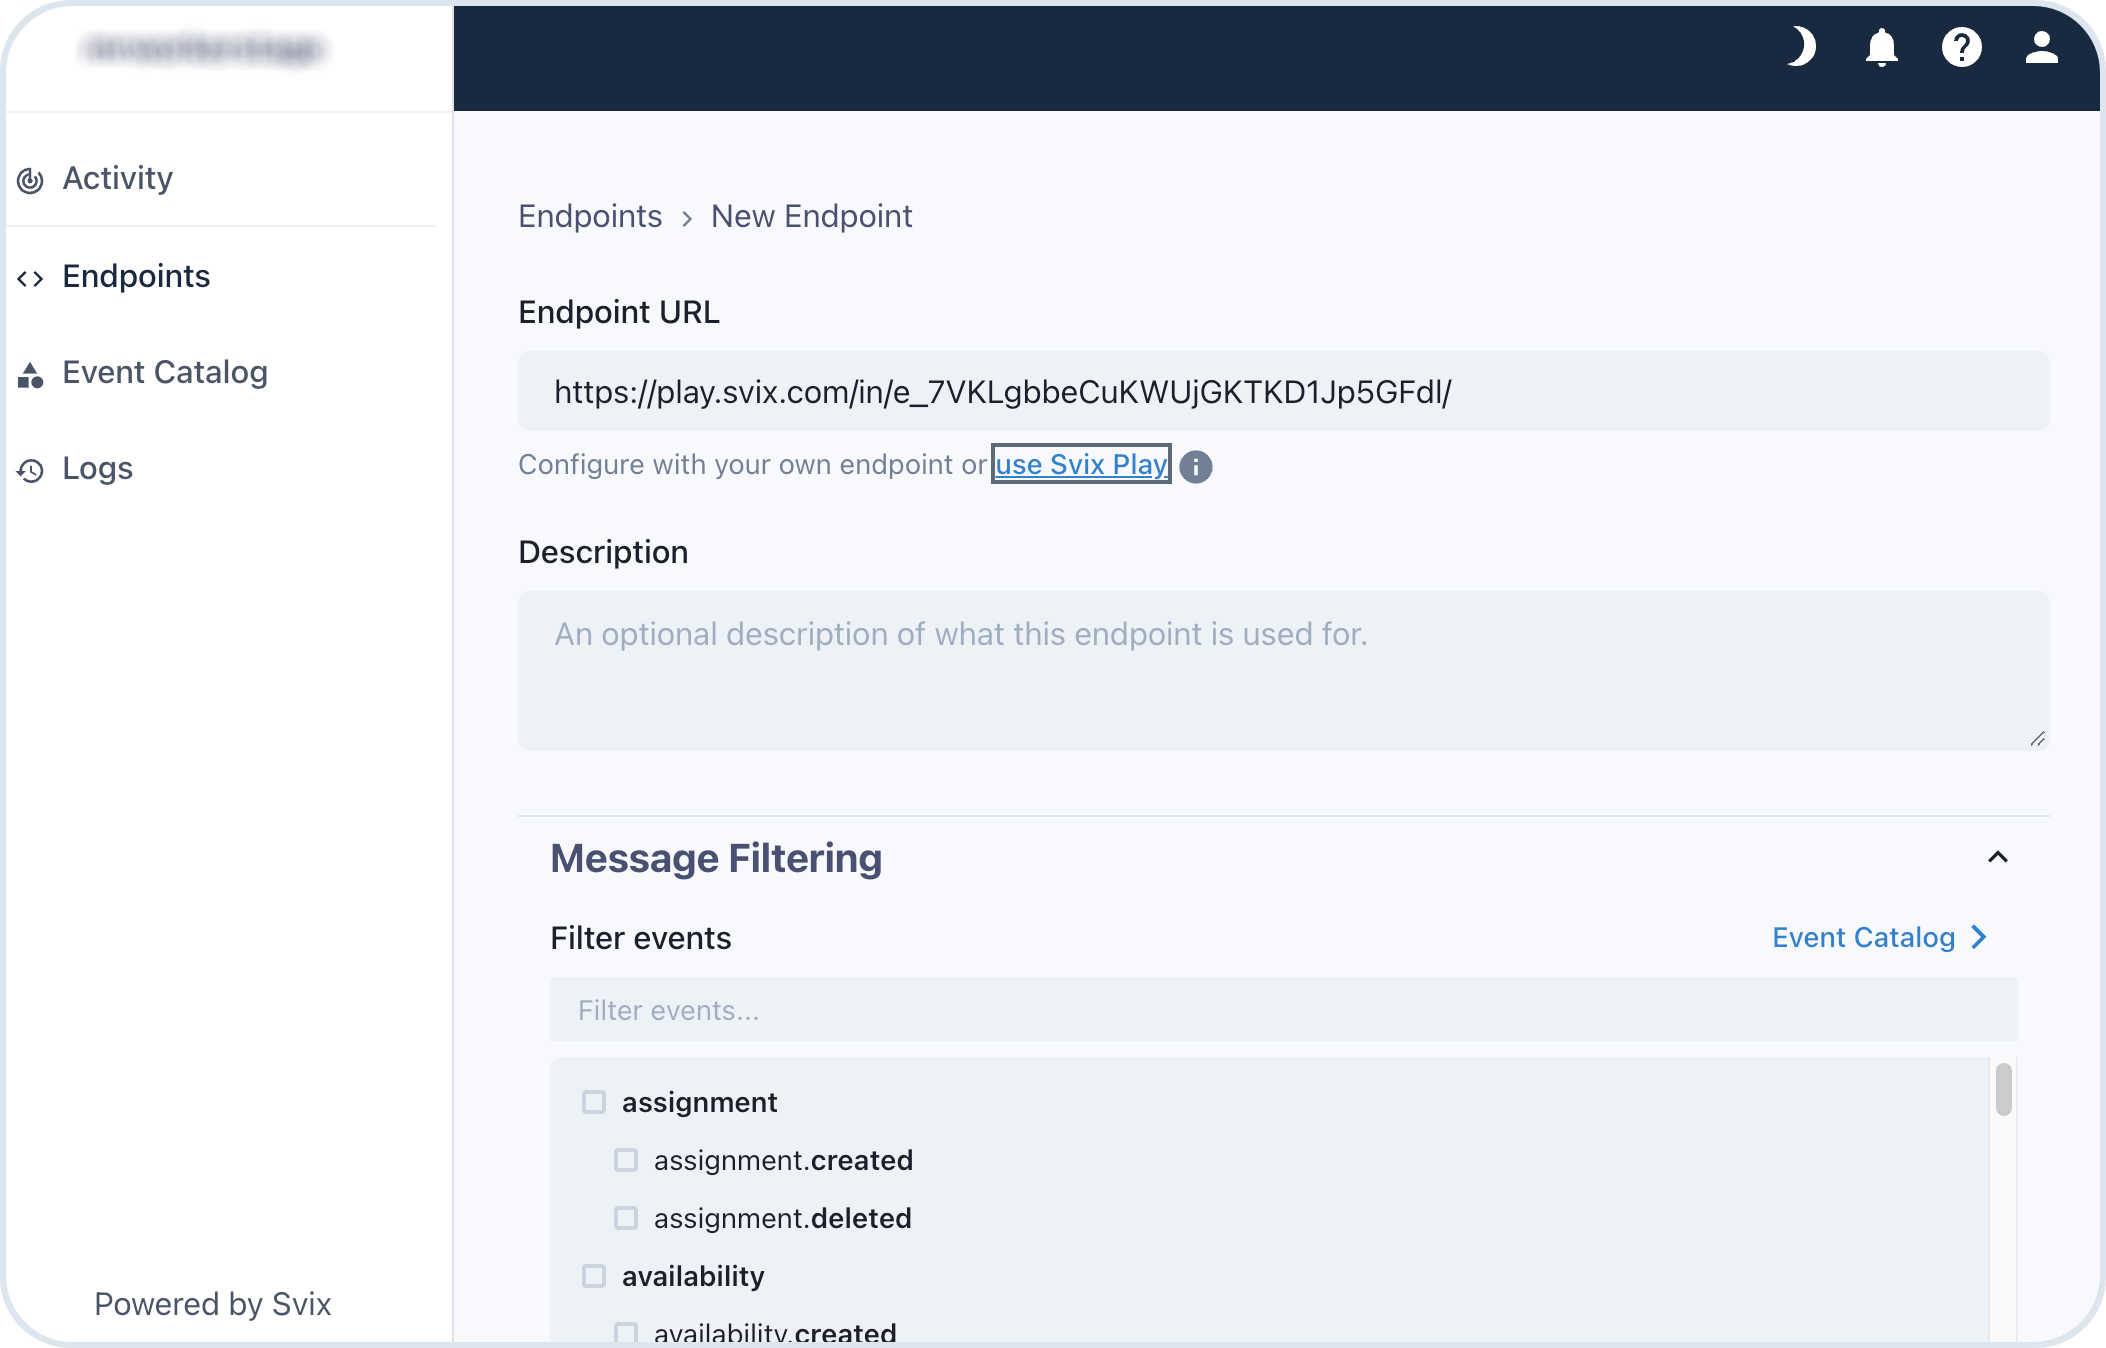
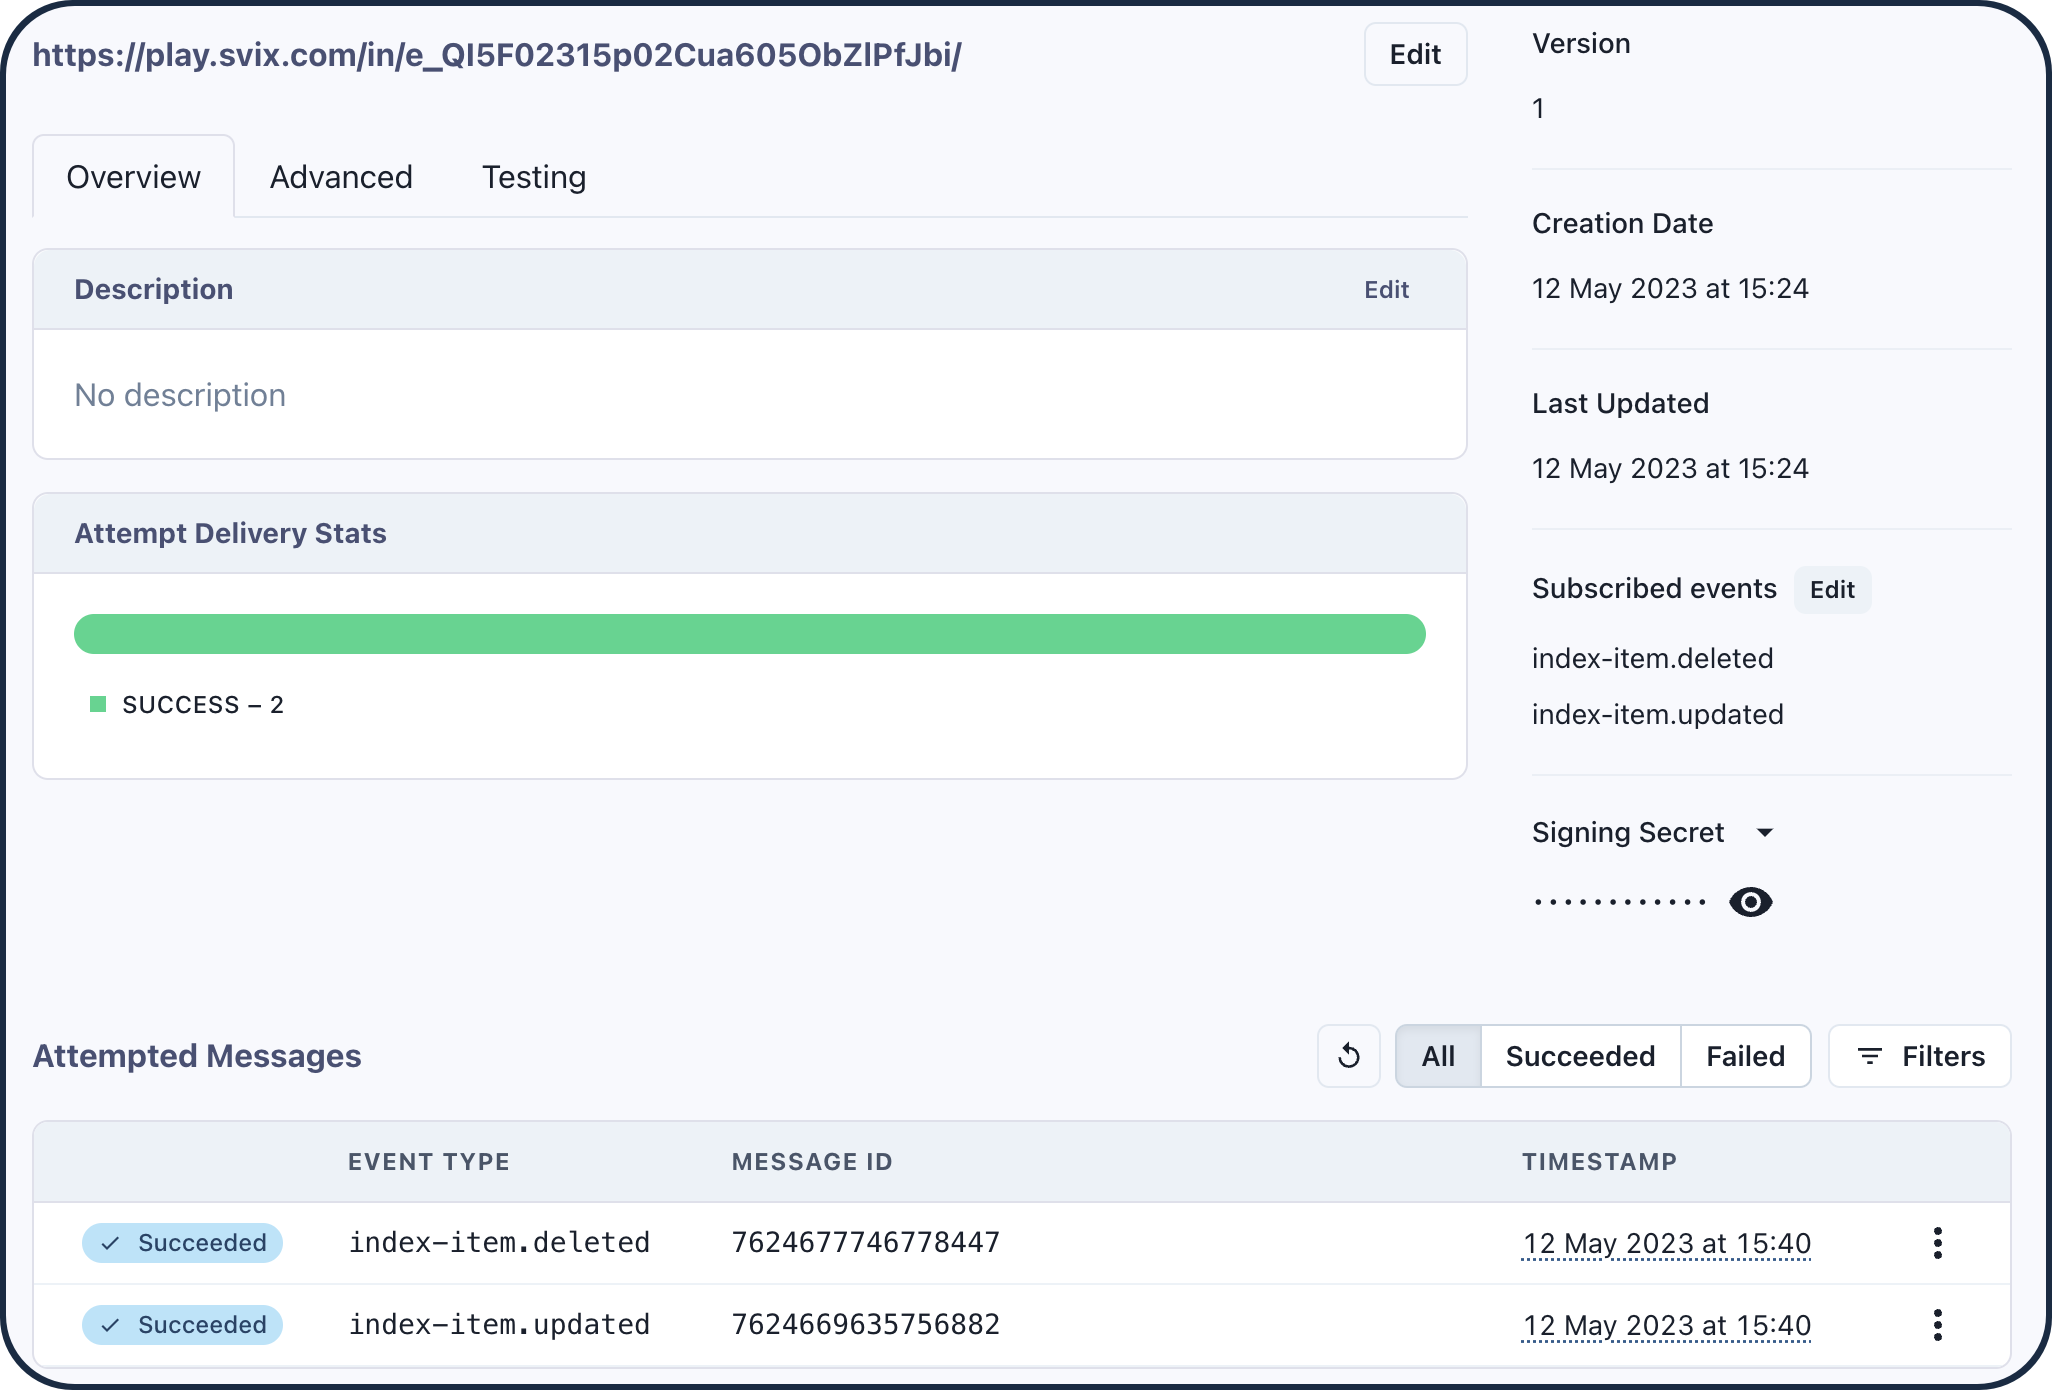
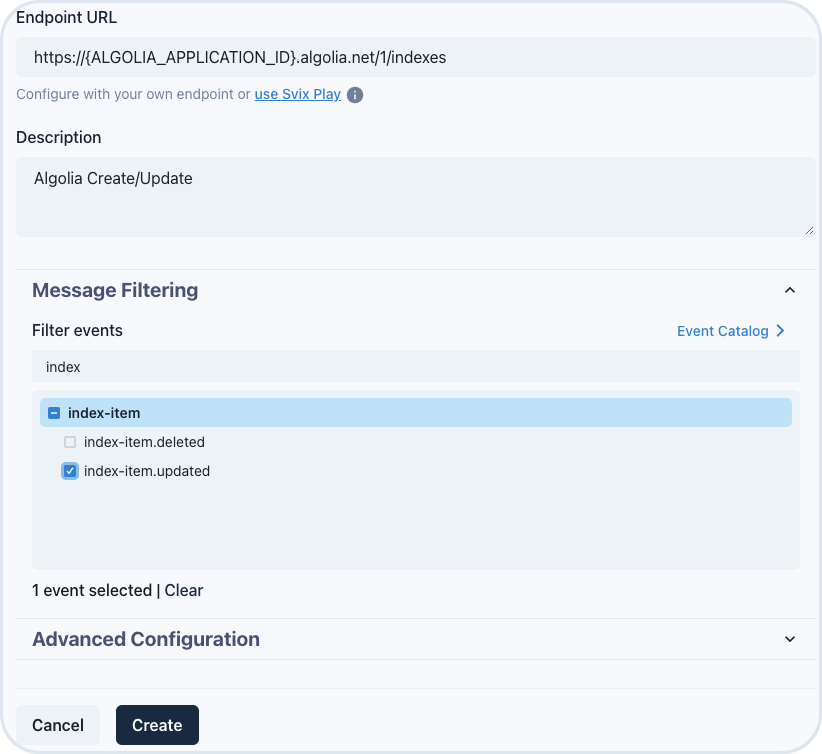
## Svix
Svix is the third-party webhook service provider supported in Emporix platform. You can use shared limited account or connect your own Svix licence to manage webhooks on the events taking place in the system, or use an alternative solution.
## targetCurrency
The parameter used by the Price Service in price matching operation. The `targetCurrency` means the code of the currency in which the prices should be matched, as defined in the Currency Service. If the matched price is defined in another currency, the service uses the currency exchange algorithm, but only if exchange rates between the two currencies have been defined beforehand.
## taxAggregate
A list of tax values grouped by `taxCode` and `taxRate`.\
It includes the sum of the following calculations:
* `item[].calculatedPrice.discountedPrice` or `item[].calculatedPrice.price`,
* `item[].calculatedPrice.fees[].discountedPrice` or `item[].calculatedPrice.fees[].price`,
* `calculatedPrice.totalShipping`
* `calculatedPrice.paymentFees`
## tenant
An instance of Emporix Commerce Orchestration Platform that is made available for a particular company or organization as Emporix is a multi-tenant SaaS solution. Each tenant has a separate and isolated access to the data, configuration and other resources, and can be managed individually, as if it was running on its own. Even though, all the Emporix tenants share the same hardware and software infrastructure.
## totalValue
A total value of all the units of a product or SKU item included in an order, based on the item's `effectiveValue` price, that is, including a discount if applicable.
## totalDiscount
The cart attribute indicating the calculated discounts on an item level and on a cart level.
On an item level, it means a summary of all discounts applied to the line, including discounts on both the line item's price and its fees.
On a cart level, it means a sum of all applied lines discounts and shipping discounts.
## totalFee
Sum of all fees applied to the line item.\
It's calculated by summarizing all the fees and any discounts applied to the fees.
## totalShipping
The calculated shipping cost of the cart items.
## upliftValue
An additional amount authorized for payment to cover potential price adjustments during packing of weight-based products.\
There are two conditions to have this value for an item line in a cart:
* The item is added to the cart with the `weightDependent":true` attribute. It means that the quantity may vary during packaging, as some items, for example a case of bananas, cannot be divided to precisely match a given weight.
* The site has the percentage uplift defined - `authorizedAmountUplift`, for example 0,1=10%. If the item `price.netValue=12`, the `upliftValue.netValue=1,2` with the 10% uplift configured.
## user group
A group of users who share some common characteristics, like performing a similar job. A user group defines access controls for the users assigned to it.
## value stream
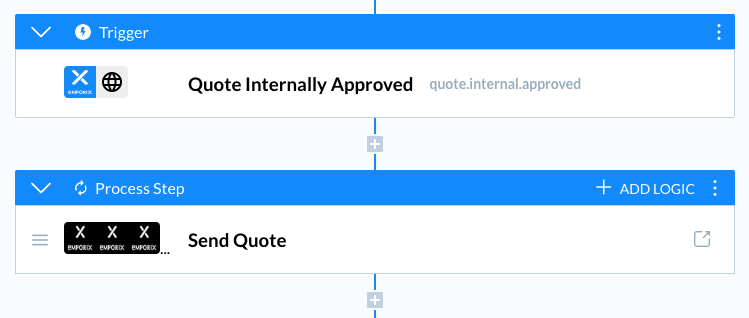
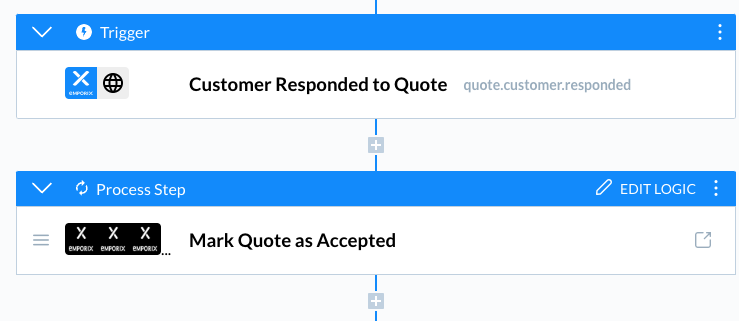
A configurable, automated process designed to work for your organization. You define a trigger that launches the process in response to events in the system, and the process then executes a sequence of steps that may call out to different systems or services. Value streams are designed to ensure that key business outcomes (for example, new customer onboarding, order fulfillment) are delivered in a consistent, efficient, and traceable way. Process steps can include scenarios, subflows (other value streams), or AI agents.
## value stream library
A collection of pre-built templates that serve as a foundation for creating automated processes. These templates provide complete end-to-end process flows that you can customize by configuring your connections and adjusting them to fit your specific business needs.
## value stream modeller
A tool within the Commerce Orchestration that enables you to define and monitor value streams that react to business events in real time. It provides a visual interface for creating processes composed of triggers and sequential steps that execute to achieve specific business outcomes.
## value stream trigger
An element that initiates a value stream by starting a new process instance or resuming a previously paused one. Triggers can be commerce events (CE events), custom events configured for your tenant, or timer events that schedule process execution at specific times or intervals.
## vendor
A supplier that operates as an independent entity within the Emporix platform. Vendors can securely access and manage their own products, orders, and analytics without visibility into other vendors data. Each vendor is represented as a distinct legal entity in the system and can have multiple locations and users associated with their account.
## vendor group
A set of user groups automatically created when a vendor is created. Four vendor groups are created for each vendor: product manager, product viewer, order manager, and order viewer. Each group has specific access rights configured automatically, allowing vendors to manage their products and orders with appropriate permissions.
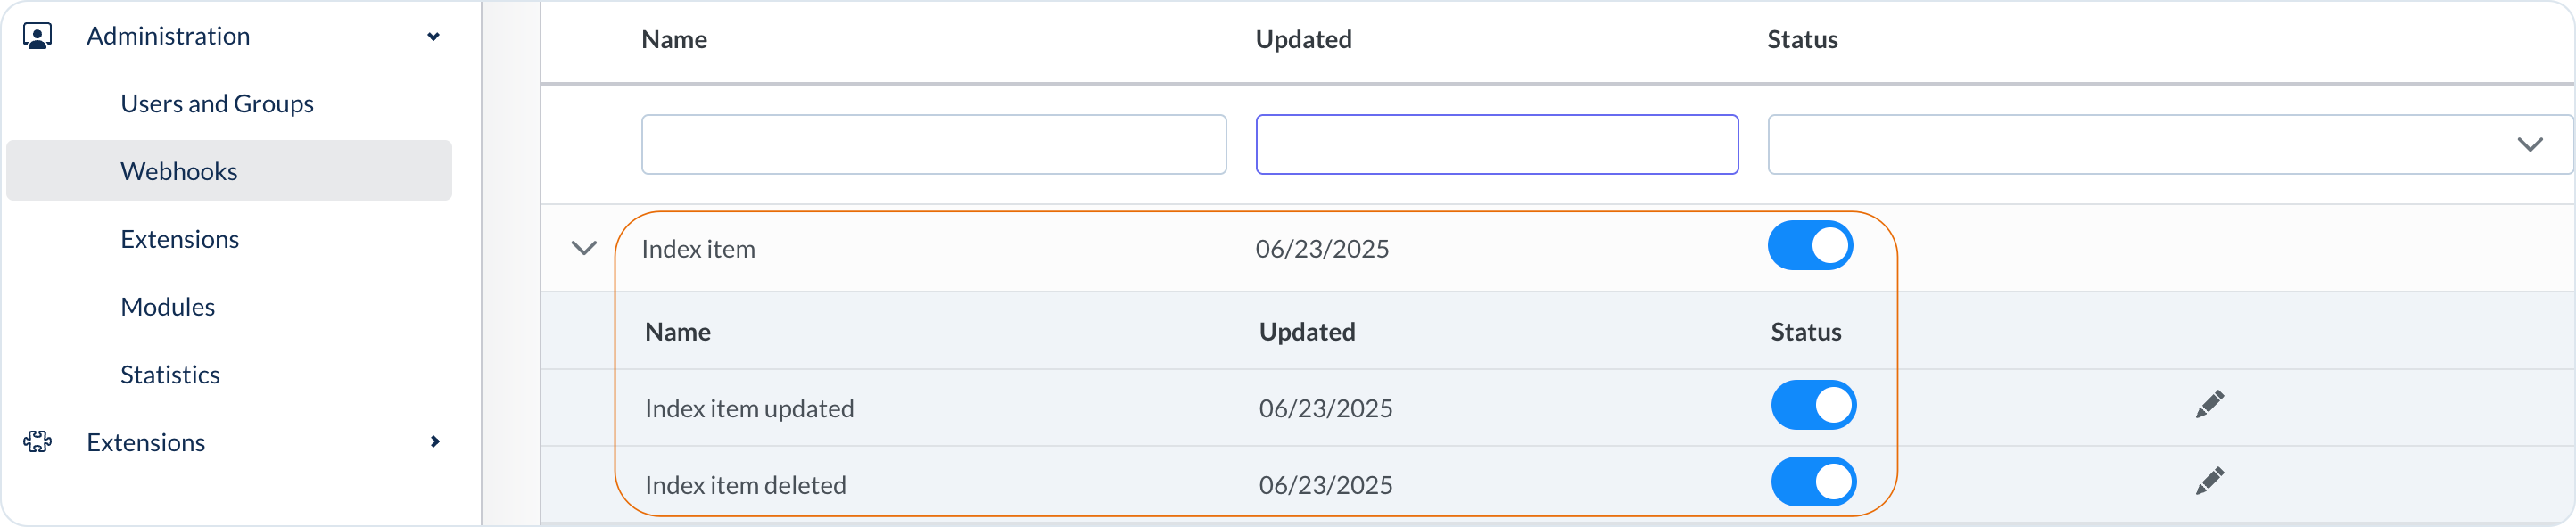
## webhook
A webhook is a user-defined callback mechanism that allows an application to send real-time data to another application when a specific event occurs. Applications or services can communicate with each other automatically when a certain action or event takes place in a system and send data to a specified URL endpoint. You can use webhooks for smooth API communication, automation of workflows, and notifications.
## weight-dependency
A product is designated as weight-dependent when its final sale price is calculated based on its actual weight after packaging. This designation is crucial for accurate payment authorization, as the initially estimated price may differ from the final price.
# Videos
See the video tutorials in relation to Emporix products.
We invite you to explore the [Emporix YouTube channel](https://www.youtube.com/playlist?list=PLGNZ6o-_JZ7qd2q2AuQZgNbceBCxYIMyh), where we’ve gathered our user guide videos along with a selection of other helpful resources. Check it out to learn more about using our platform.
{% embed url="" %}
# Emporix Community
Join the Emporix networking community to find quick answers, share good practices, ideas and more.
Emporix is committed to fostering a thriving community of commerce professionals. We invite you to join our dedicated space where you can connect with peers, learn from industry experts, and share your own experiences with the Emporix platform.
What's there for you:
* **Collaboration**: Network with fellow users, exchange ideas, and solve challenges together.
* **Expert Insights**: Gain valuable knowledge from Emporix specialists and experienced users.
* **Best Practices**: Discover tips and tricks to maximize the benefits of your Emporix solution.
* **Support & Resources**: Find answers to your questions and access helpful links.
Sign up today and contribute your unique perspective to the [Emporix community](https://community.emporix.io/)!
# Developer Policy
Effective from September 30, 2021.
This Developer Policy ("Policy") provides rules and guidelines that govern access to or use by our developers (“you” or “your”) of the Emporix API, websites (“Site”), dashboards, related tools, and other products or services (collectively, the "Service") provided by Emporix AG (“Emporix”, “we”, “our”, and “us”). Any violation of this Policy may result in suspension or termination of your access to the Service.
By accessing and using the Service, you agree to comply with all the terms of this Policy. This Policy will apply each time you access or use the Service. If you are agreeing to the terms of this Policy on behalf of an organization or entity, you represent and warrant that you are so authorized to agree on behalf of that organization or entity. This Policy is important; please read it carefully.
We may update or change this Policy at any time in our discretion. If we make any changes to this Policy that we deem to be material, we will make a reasonable effort to inform you of such change. If you don’t agree with the change, you are free to reject it; unfortunately, that means you will no longer be able to use the Service. This Developer Policy is an integral part of the [Terms of Use](/policies/terms-of-use).
## Registration
To sign up for the Service, you must create an account ("Account") by registering on our Site and providing true, accurate, and complete information about yourself and your use of the Service. You agree not to misrepresent your identity or any information that you provide for your Account, and to keep your Account information up to date at all times. It is your responsibility to maintain access to your Account; you may never share your Account information, including your Emporix Developer Portal password, as well as your API authentication credentials, including your Client Identification Number (“Client ID”) and secret, with a third party or allow any other application or service to act as you.
## Compliance with Applicable Law
When using the Service, you must abide by all applicable local, state, national, and international laws. You also confirm that you, your business, your employees, your service providers, and any others acting on your behalf adhere to all applicable laws, especially those pertaining to financial data and to data protection, privacy and data security.
In addition, you certify that you, your officers, directors, shareholders, direct and indirect parent entities, subsidiaries, and affiliates:
* are and will remain in compliance with all applicable import, re-import, sanctions, anti-boycott, export, and re-export control laws and regulations (including all such laws and regulations that apply to a U.S. company, such as the Export Administration Regulations, the International Traffic in Arms Regulations, and economic sanctions programs implemented by the Office of Foreign Assets Control (OFAC));
* are not subject to, or owned by parties that are subject to, sanctions or otherwise identified on any sanctions-related list, including but not limited to lists maintained by the United States government (such as the List of Specially Designated Nationals and Blocked Persons, maintained by OFAC, the Entity List maintained by the U.S. Commerce Department’s Bureau of Industry and Security, and the CAATSA section 231(d) list maintained by the U.S. State Department), the United Nations Security Council, the United\
Kingdom, the European Union or its Member States, or other applicable government authority; and
* are not engaging, and will not engage, in activities which may require or permit any applicable government authority to pursue an enforcement action against, or impose economic sanctions on you or us.
The certifications immediately above are not sought, and are not provided, if and to the extent such request or certification would constitute a violation of the EU Blocking Statute, of laws or regulations implementing the EU Blocking Statute in the EU Member States or in the United Kingdom, or any similar anti-boycott, non-discrimination, or blocking provisions foreseen in applicable local laws.
You are solely responsible for ensuring that your use of the Service is in compliance with all laws applicable to you, including without limitation, the rules and guidelines of any system or network that facilitates payments and any security requirements, including under the Payment Card Industry Data Security Standards (PCI-DSS), as may be applicable to you.
## Security
You are responsible for securely maintaining your Emporix Developer Portal username and password, as well as your API authentication credentials, including your Client ID and secret.. If you become aware of any unauthorized use of your Account or any End User Data or any other breach of security, please immediately notify us via email to . You must never publish, distribute, or share your Client ID or secret, and must encrypt this information in storage and during transit.
Your systems and application(s) must handle End User Data securely. With respect to End User Data, you should follow industry best practices but, at a minimum, must perform the following:
* Maintain administrative, technical, and physical safeguards that are designed to ensure the security, privacy, and confidentiality of End User Data.
* Use modern and industry standard cryptography when storing or transmitting any End User Data.
* Maintain reasonable access controls to ensure that only authorized individuals that have a business need have access to any End User Data.
* Monitor your systems for any unauthorized access. Patch vulnerabilities in a timely fashion. Log and review any events suggesting unauthorized access.
* Plan for and respond to security incidents.
* Comply with relevant rules and regulations with regard to the type of data you are handling, such as the FINMA Circular 2018/3 regarding Outsourcing at Banks and Insurance companies.
## Data Storage
Any End User Data in your possession must be stored securely and in accordance with applicable laws.
## Account Deactivation
Once you stop using the Service in accordance with any applicable agreement you may have with us, you may deactivate your Account by following this deactivation instructions. We may also deactivate your Account if you have ceased using the Service for three months; your applicable agreement with us terminates or expires; or as reasonably necessary under applicable law. After your Account deactivation, we will deprovision your access to all End User Data associated with your integration.
Even after your Account deactivation, and to the extent permitted under applicable law, we may still retain any information we collected about you for as long as necessary to fulfill the purposes outlined in our privacy policy/statement, or for a longer retention period if required or permitted under applicable law.
## Prohibited Conduct
You agree not to, and agree not to assist or otherwise enable any third party to:
* sell or rent End User Data to marketers or any other third party;
* access or use the Service or End User Data for any unlawful, infringing, threatening, abusive, obscene, harassing, defamatory, deceptive, or fraudulent purpose;
* use, disclose, or otherwise process any “personal data” (as defined in the Swiss Federal Act on Data Protection) other than in strict compliance with applicable law;
* access or use the Service or access, transmit, process, or store End User Data in violation of any applicable privacy laws or in any manner that would be a breach of contract or agreement with the applicable end user;
* access or use the Service to infringe any patent, trademark, trade secret, copyright, right of publicity, or other right of any person or entity;
* access or use the Service for any purpose other than for which it is provided by us, including for competitive evaluation, spying, creating a substitute or similar service to any of the Service, or other nefarious purpose;
* scan or test (manually or in an automated fashion) the vulnerability of any Emporix infrastructure without express prior written permission from Emporix;
* breach, disable, interfere with, or otherwise circumvent any security or authentication measures or any other aspect of the Service;
* overload, flood, or spam any part of the Service;
* create developer accounts for the Service by any means other than our publicly-supported interfaces (e.g., creating developer accounts in an automated fashion or otherwise in bulk);
* transfer, syndicate, or otherwise distribute the Service or End User Data without express prior written permission from Emporix;
* decipher, decompile, disassemble, copy, reverse engineer, or attempt to derive any source code or underlying ideas or algorithms of any part of the Service, except as permitted by applicable law;
* modify, translate, or otherwise create derivative works of any part of the Service;
* access or use the Service or End User Data in a manner that violates any agreement between you or the end user and Emporix; or
* access or use the Service or End User Data in a manner that violates any applicable law, statute, ordinance, or regulation.
## Suspension and Termination
We reserve the right to withhold, refuse, or terminate access to the Service and/or End User Data in whole or in part where we believe the Service is being accessed or used in violation of this Policy or any other Emporix agreement, including Emporix’s agreements with any third party partners or data sources of Emporix (each, a “Partner”), or where use would pose a risk of harm, including reputational harm, to Emporix, its infrastructure, its data, the Service, an end user, or a Partner.
We will use reasonable efforts to notify you via email or other method when deciding to withhold, refuse, or terminate access to the Service and/or End User Data. We may immediately suspend or terminate access without notice if appropriate under the circumstances, such as when we become aware of activity that is a violation of any applicable law or when we determine, in our sole discretion, that harm is imminent.
Emporix will not be liable for any damages of any nature suffered by you or any third party resulting from Emporix’s exercise of its rights under this Policy or under applicable law.
## Reporting Violations
If any person becomes aware of a violation of this Policy, we request that you immediately notify us via email to . We may take any appropriate action -- including reporting any activity or conduct that we suspect violates the law to appropriate law enforcement officials, regulators, or other appropriate third parties -- in our sole discretion in respect to such violations.
# Terms of Use
Effective from October 14, 2021.
Thanks for your interest in testing out Emporix. These Terms of Use (these “Terms”) are our rules for our sandbox, development and production environments.
By clicking “I agree” (or a similar checkbox or button) or accessing or using the Services, you indicate your assent to be bound by these Terms.\
If you do not agree to these Terms, do not use or access the Services. These Terms contain mandatory arbitration provisions that require the use of arbitration to resolve disputes. Please read it carefully.
These Terms are between Emporix AG, a Switzerland corporation (“Emporix”) and entity or person accessing or using Emporix’s development or sandbox environment (“Client”). If you are accessing or using the Emporix production, development or sandbox environment on behalf of another entity, then that entity is the Client. Emporix may modify these Terms from time to time in accordance with Section 10 (Modifications) below.
## Access Rights; Restrictions
### Access
Subject to the Client’s compliance with the terms and conditions of these Terms, Emporix hereby agrees that during the term of these Terms, the Client has the non-exclusive right to: (i) internally use the package of application programming interface materials provided by Emporix (the “API Package”) solely as necessary to make an application owned and operated by the Client (the “Client Application”) interoperate with the Emporix services described on (collectively with the API Package, the “Services”), (ii) use the Services in such Client Application provided to end users (consumers or businesses) (the “End Users”) solely for internal evaluation of the Services, and (iii) use the End User information and data provided via the Services (the “Output”) solely in such Client Application for such internal evaluation use case. All use of the Services and Output must be only as provided in these Terms, only in accordance with Emporix’s applicable [technical user documentation](/).
### Restrictions
Unless Emporix specifically agrees in writing, Client will not, and will not enable or assist any third-party to: (i) attempt to reverse engineer (except as permitted by law), decompile, disassemble, or otherwise attempt to discover the source code, object code, or underlying structure, ideas, or algorithms of the Services; (ii) modify, translate, or create derivative works based on the Services; (iii) make the Services or Output available to, or use the Services or Output for the benefit of anyone other than Client or End Users; (iv) sell, resell, license, sublicense, distribute, rent or lease any Services or Output to any third-party, or include any Services or Output in a service bureau, time-sharing, or equivalent offering; (v) publicly disseminate information from any source regarding the performance of the Services or Output; or (vi) attempt to create a substitute or similar service through use of, or access to, the Services or Output. Client will use the Services and Output only in compliance with (a) the rights granted hereunder, (b) the Emporix developer policies (available at [Developer Policy](/policies/developer-policy)), and (c) any agreements between Client and End Users (for clarity, including any privacy policy or statement). Notwithstanding anything to the contrary, the Client accepts and assumes all responsibility for complying with all applicable laws and regulations in connection with all of Client’s activities involving any Services, Output, or End User data.
### Ownership
Except for the rights expressly granted under this Section 1, Emporix reserves and retains all right, title, and interest in and to the Services which includes but is not limited to the API Package and any related Output (except for raw End User data, which belongs to the End User), software, products, works, and other intellectual property created, used, or provided by Emporix for the purposes of these Terms. To the extent the Client provides Emporix with any feedback relating to the Services (including, without limitation, feedback related to usability, performance, interactivity, bug reports and test results) (“Feedback”), Emporix will own all right, title and interest in and to such Feedback (and the Client hereby makes all assignments necessary to achieve such ownership).
### Privacy and Authorizations
Before any End User engages with the Client Application in a manner that uses the Services, the Client warrants and will ensure that it provides all notices and obtains all consents required under applicable law to enable Emporix to process End User data in accordance with Emporix’s privacy policy (currently available at ). Client will not (i) make representations or other statements with respect to End User data that are contrary to or otherwise inconsistent with Emporix’s privacy policy or (ii) interfere with any independent efforts by Emporix to provide End User notice or obtain End User consent.
### Permitted Users
Client may permit its employees, agents, contractors and service providers to access the Services and Output on Client’s behalf (“Permitted Users”), provided that Client remains responsible for their compliance with all of the terms and conditions of these Terms (including without limitation terms relating to use of Services and Output) and that any such use of the Output and Services is for the sole benefit of Client. If Client enables any third parties as Permitted Users, Client (and not Emporix) remains solely responsible for its relationships with such third parties and for any related billing matters, technical support, or disputes.
### Permitted transfer of Client data
Client permits Emporix to act on Client’s behalf in terms of providing mandatory opt-ins for any third party integrations or systems used directly or indirectly by the Services. Account Deactivation, termination of the contract or any change to the contract with Emporix will not result in obligation on Emporix to revoke the opt-ins provided on Client’s behalf.
## Development Accounts
Emporix may offer free sandbox or development accounts for the Services ("Development Accounts"). Clients may use Development Accounts solely for internal evaluation of the Services to determine whether to enter into a paid commercial relationship with Emporix, and not for production access or any other purpose. In using Development Accounts, Clients must comply with Emporix's relevant documentation, policies, and instructions, including as relates to the data types and use cases eligible for Development Accounts. Emporix may make available different types of Development Accounts, and each Development Account may have limited functionality and other usage limits. Emporix may modify or disable Development Accounts (and delete related data submitted by Client or provided by Emporix) without notice or liability to Client. Emporix has no support obligations for Development Accounts. Subject to this paragraph, Development Accounts remain subject to the terms and conditions of these Terms, including without limitation Sections - Restrictions through Permitted Users, Compliance Reviews, Warranty; Disclaimer and Limitation of Liability.
## Compliance Reviews
To access or use the Services, Client must successfully pass Emporix's compliance reviews, which may include automated verifications, online questionnaires, and requests for information ("Compliance Reviews"). As part of the Compliance Reviews, Client must provide prompt responses to Emporix's requests for information about Client, the Client Application, Client's business and associated entities, and Client's intended use of the Services. Client represents and warrants that all information it provides to Emporix as part of Compliance Reviews will be accurate and complete, and Client will immediately notify Emporix if any previously provided information is out-of-date or becomes inaccurate. Clients may be required to complete more than one Compliance Review, for instance, to enable Development Accounts or upgrade to production access, or as requested by Emporix based on changes in Client's use of the Services or increased risk factors. Client's passage or failure of any Compliance Review is in Emporix's sole discretion. If Client fails any Compliance Review or fails to provide prompt and complete responses within three business days after Emporix's requests for information (even if Client has passed a previous Compliance Review or received provisional access to the Services), Emporix may suspend, revoke, or terminate Client's access to the Services, without notice or liability to Client.
## Term; Termination
These Terms will commence on the Effective Date and will continue in effect unless terminated in accordance with these Terms. Either party may terminate these Terms in the event the other party materially breaches the terms of these Terms and fails to cure such breach within ten (10) days from receipt of written notice thereof. In addition, Emporix may immediately suspend the Services in the event it determines or believes that (a) there is unauthorized access to the Services via Client’s account, (b) continued provision of the Services may do material harm to Emporix or its networks or systems or reputation or subject Emporix to liability, or (c) Client materially breached Section 1 of these Terms. Emporix may terminate these Terms for any reason and without cause upon written notice to Client. But for Section Access, all provisions of these Terms will remain in force in the event of termination.
## Confidentiality
During the term of these Terms, each party (a “Disclosing Party”) may disclose, under these Terms, the other party (a “Receiving Party”) with confidential and/or proprietary materials and information of the first party (“Confidential Information”). All materials and information disclosed by Disclosing Party to Receiving Party under these Terms and identified at the time of disclosure as “Confidential” or bearing a similar legend, and all such other information that the Receiving Party reasonably should have known was the Confidential Information of the Disclosing Party, will be considered Confidential Information; for the avoidance of doubt, the Service, all pricing information and terms of these Terms, are Confidential Information of Emporix. Receiving Party will maintain the confidentiality of the Confidential Information and will not disclose such information to any third-party without the prior written consent of the Disclosing Party. Receiving Party will only use the Confidential Information internally for the purposes contemplated under these Terms. The obligations in this Section 5 will not apply to any information that: (i) is made generally available to the public without breach of these Terms, (ii) is developed by the Receiving Party independently from the Disclosing Party’s Confidential Information, (iii) is disclosed to Receiving Party by a third-party without restriction, or (iv) was in the Receiving Party’s lawful possession prior to the disclosure to the Receiving Party and was not obtained by the Receiving Party either directly or indirectly from the Disclosing Party. Receiving Party may disclose Confidential Information as required by law or court order; provided that, Receiving Party provides Disclosing Party with prompt written notice thereof and uses its best efforts to limit disclosure. At any time, upon Disclosing Party’s request, Receiving Party will return to Disclosing Party all Disclosing Party’s Confidential Information in its possession, including, without limitation, all copies and extracts thereof. Notwithstanding the foregoing, (a) Receiving Party may disclose Confidential Information to any third-party to the limited extent necessary to exercise its rights, or perform its obligations, under these Terms; provided that, all such third parties are bound in writing by obligations of confidentiality and non-use at least as protective of the Disclosing Party’s Confidential Information as these Terms and (b) all Feedback and the API Package will be solely Emporix’s “Confidential Information.”
## Indemnity
The Client will defend, indemnify and hold Emporix harmless from and against all third-party claims, actions, proceedings, regulatory investigations, damages, losses, judgments, settlements, costs and expenses (including attorneys’ fees), arising from or in connection with: (i) Client’s breach of any laws or regulations (including with respect to privacy); (ii) Client’s or any Permitted User's use of the Services and Output; or (iii) Client’s violation of any agreements it has with any End User.
## Warranty; Disclaimer
THE SERVICES ARE PROVIDED “AS IS.” TO THE FULLEST EXTENT PERMITTED BY LAW, NEITHER EMPORIX NOR ITS AFFILIATES, SUPPLIERS, LICENSORS, AND DISTRIBUTORS MAKE ANY WARRANTY OF ANY KIND, EXPRESS, IMPLIED, STATUTORY OR OTHERWISE, INCLUDING, BUT NOT LIMITED TO, WARRANTIES OF MERCHANTABILITY, FITNESS FOR A PARTICULAR PURPOSE, NONINFRINGEMENT, OR ANY WARRANTY THAT THE SERVICES ARE FREE FROM DEFECTS. EMPORIX DOES NOT MAKE ANY WARRANTY AS TO THE OUTPUT THAT MAY BE OBTAINED FROM USE OF THE SERVICES. CLIENT, IF AN INDIVIDUAL, MAY HAVE OTHER STATUTORY RIGHTS; HOWEVER, TO THE FULLEST EXTENT PERMITTED BY LAW, THE DURATION OF STATUTORILY REQUIRED WARRANTIES, IF ANY, SHALL BE LIMITED TO THE SHORTEST PERIOD PERMITTED BY LAW.
## Limitation of Liability
TO THE FULLEST EXTENT PERMITTED BY LAW, NEITHER EMPORIX NOR ITS AFFILIATES, SUPPLIERS, LICENSORS, AND DISTRIBUTORS WILL BE LIABLE UNDER THESE TERMS FOR ANY: (A) INDIRECT, SPECIAL, INCIDENTAL, CONSEQUENTIAL, EXEMPLARY, OR PUNITIVE DAMAGES; (B) LOSS, ERROR, OR INTERRUPTION OF USE OR DATA (IN EACH CASE, WHETHER DIRECT OR INDIRECT); OR (C) COST OF COVER OR LOSS OF BUSINESS, REVENUES, OR PROFITS (IN EACH CASE WHETHER DIRECT OR INDIRECT), EVEN IF THE PARTY KNEW OR SHOULD HAVE KNOWN THAT SUCH DAMAGES WERE POSSIBLE. TO THE FULLEST EXTENT PERMITTED BY LAW, EMPORIX’S AGGREGATE LIABILITY IN CONNECTION WITH THESE TERMS WILL NOT EXCEED ONE HUNDRED DOLLARS (US$100.00). THE PARTIES AGREE THAT THE WAIVERS AND LIMITATIONS SPECIFIED IN THIS SECTION 8 APPLY REGARDLESS OF THE FORM OF ACTION, WHETHER IN CONTRACT, TORT (INCLUDING NEGLIGENCE), STRICT LIABILITY, OR OTHERWISE AND WILL SURVIVE AND APPLY EVEN IF ANY LIMITED REMEDY SPECIFIED IN THESE TERMS ARE FOUND TO HAVE FAILED OF ITS ESSENTIAL PURPOSE.
## Miscellaneous
If any provision of these Terms are found to be unenforceable or invalid, that provision will be limited or eliminated to the minimum extent necessary so that these Terms will otherwise remain in full force and effect and enforceable.
These Terms are not assignable or transferable by Client except with Emporix’s prior written consent; provided, however, that Client may, upon prior written notice to Emporix, transfer and assign its rights and obligations under these Terms to an affiliate or in connection with a merger, acquisition, corporate reorganization, or sale of all or substantially all of its assets to which these Terms relate. If such a transfer or assignment is made in favor of a direct competitor of Emporix, then Emporix may terminate these Terms upon written notice to Client. Emporix may freely assign these Terms.
These Terms and the documents referenced herein are the complete and exclusive statement of the mutual understanding of the parties and supersedes and cancels all previous written and oral agreements, communications, and other understandings relating to the subject matter of these Terms, and all waivers and modifications must be in a writing signed by both parties, except as otherwise provided herein.
No agency, partnership, joint venture, or employment is created as a result of these Terms.
Any notices in connection with these Terms will be in writing and sent by first class mail, confirmed facsimile or major commercial rapid delivery courier service to the address specified above (or such other address as may be properly specified by written notice hereunder). Email notice will be permitted by Emporix if sent to the Client’s account email address. All notices to Emporix will be sent to: Emporix AG, Fabrikstrasse 5, 6330 Cham, Switzerland, Attn: Emporix Legal.
Any delay in or failure of performance by either party under these Terms will not be considered a breach of these Terms and will be excused to the extent caused by any occurrence beyond the reasonable control of such party including, but not limited to, acts of God, power outages, pandemics/epidemics, governmental actions and requirements, and the acts and omissions of Emporix’s data suppliers.
During the term of these Terms, (a) Client agrees to participate in case studies and other similar marketing efforts reasonably requested by Emporix; (b) Emporix may disclose that Client is a Emporix customer to third parties; and (c) Emporix may include on and in Emporix’s website, case studies, marketing materials, and conference presentations and other speaking opportunities, Client’s testimonials and other feedback regarding the Services, name, website URL, use case, and logo and other marks. Upon request from Client, Emporix will promptly stop making the disclosure and use described in the foregoing sentence except to the extent already included in any then-existing materials.
These Terms will be governed by the substantive laws of Switzerland, without regard to the conflict of law provisions thereof. The application of 1980 United Nations Convention on Contracts for the International Sale of Goods is expressly excluded. With respect to all disputes arising in relation to these Terms, the parties consent to exclusive jurisdiction and venue in the competent courts located at the registered seat of Emporix.
## Modifications
From time to time, Emporix may modify these Terms. Emporix will use commercially reasonable efforts to notify Client of the modifications and the effective date of such modifications through communications via Client’s account, email, or other means. Clients must accept the modifications to continue accessing or using Development Accounts. If Client objects to the modifications, its exclusive remedy is to cease any and all access and use of Development Accounts. Clients may be required to click to accept or otherwise agree to the modified Terms in order to continue accessing or using the Services, and in any event continued access or use of the Services after the modified version of these Terms goes into effect will constitute Client’s acceptance of such modified version.
# Commerce Engine
Commerce Engine lives at the heart of your commerce. Get familiar with the Emporix solution.
Emporix Commerce Engine is a cloud-native, API-first platform that provides all the core building blocks of modern digital commerce — from product catalogs and pricing to carts, orders, and promotions. Designed with a composable, MACH-based architecture, it gives enterprises the flexibility to scale, customize, and integrate commerce into any digital ecosystem. Choose it to power complex B2B and advanced B2C scenarios where agility, extensibility, and customer-specific experiences are critical to growth.
:plane-departure:
Getting Started
Get to now the concepts on which the Emporix e-commerce system is built.
# General Concepts of Emporix
Get an overview of Emporix's main characteristics and features.
{% hint style="info" %}
The **Commerce Orchestration Platform** enables you to digitalize your sales end-to-end. It embraces **Commerce Engine** and **Orchestration Engine** that together can help you revolutionize the ways you sell your goods and operate more efficiently within your company.\
If you're interested in these products, contact the [Sales Team](mailto:sales@emporix.com).
To learn more about Commerce Engine, continue with this documentation, and for more information about Orchestration Engine, see [OE documentation](https://app.gitbook.com/s/8dAaH7DfB59pzZwLxmur/getting-started/what-is-oe).
{% endhint %}
Emporix Commerce Engine is a modern digital commerce platform tailored for B2B businesses and sophisticated B2C, leveraging a composable architecture to enhance flexibility and scalability. Built on MACH principles (Microservices, API-first, Cloud-native, and Headless), it offers a robust infrastructure for various business needs.\
For B2B commerce, Emporix provides a suite of features tailored to enhance business operations and customer experience. These features include:
* **Customer-Specific Pricing**: Manage individual pricing agreements and frame contracts.
* **Bulk Pricing and Discounts**: Support volume-based pricing and discount algorithms.
* **Rebate Schemes**: Create custom rebate programs.
* **Advanced Quoting and Approval Workflows**: Streamline quoting processes and compliance workflows.
* **Flexible Invoicing and Payment Options**: Provide detailed invoicing and support various payment methods.
* **Customer-Specific Catalogs**: Manage tailored catalogs for different customer groups.
Additional Services:
* Authorization
* Artificial Intelligence
* Configuration
* Catalog, Product, and Price
* Users and Permissions
* Company and Customers
* Delivery and Shipping
* Rewards and Promotions
* Quote Management
* Checkout
* Order and Order Fulfillment
* Utilities
* Media Management
* Webhooks
* Integrations
For more details, visit [Getting Started with Emporix API](https://app.gitbook.com/o/z8MNPigQv25NZe33g3AV/s/d4POTWomuSS7d3dnh4Dg/).
Further, CE is integrated with OE to support a wide range of commerce-driven business processes.
## Multi-tenancy
### Site
The Emporix Commerce Engine ensures a seamless and integrated digital commerce experience, supporting various front-end interfaces and delivering high performance, scalability, and future-proofing. The headless commerce architecture allows businesses to choose their front-end presentation layers, providing flexibility in how they engage with customers. Additionally, the cloud-native design ensures high availability and dynamic scalability, allowing businesses to focus on innovation and growth without worrying about underlying infrastructure.
{% hint style="info" %}
To learn more about sites in the Emporix e-commerce system, check out the [Sites guide](https://developer.emporix.io/ce/core-commerce/sites).
{% endhint %}
### Tenants
Emporix is a multi-tenant SaaS solution. All tenants share the same hardware and software infrastructure. They are virtually separated by tenant `IDs` and access tokens.
{% hint style="info" %}
To learn more about how to create a new tenant, follow the [Creating your first tenant](https://developer.emporix.io/ce/getting-started/creating-a-tenant) guide.
{% endhint %}
## API Settings
### Regions
Emporix is hosted on Google Cloud in Europe, Netherlands - Eemshaven.
### API Base URL
`https://api.emporix.io`
{% hint style="danger" %}
We strongly advise you to use the host and domain names in your applications instead of hardcoding any IP address of the API hosts. IP addresses can change any time without prior notice.
{% endhint %}
### Authorization
All requests sent to the Emporix API require authorization with a valid access token. To obtain an access token, you need to know your Emporix API keys. The keys are automatically generated when you create a tenant.
{% hint style="info" %}
To learn more about access tokens in Emporix API, check out the [Authorization and scopes guide](https://developer.emporix.io/ce/getting-started/broken-reference).
{% endhint %}
### JSON
The majority of the HTTP API endpoints consume and produce standard `application/json` payloads. To ensure that payloads are encoded correctly, use `Content-type: application/json` in your HTTP header when sending POST requests.\
When consuming a JSON response, ignore any unrecognized fields in JSON objects of responses, or deal with them such that it does not cause the client application to crash. The API assumes clients behave properly and considers the addition of new fields to be backward-compatible for existing clients. In addition, client applications should not rely on the presence of undocumented fields. Fields returned by an undocumented endpoint can be renamed or removed at any time without prior notice.
### Identifiers
Some resources contain a field named `id` that uniquely identifies a resource. The `id` value is generated by Emporix when a resource is created.\
Some resources contain an additional field named `code` that also uniquely identifies a resource. However, the `code` field needs to be specified in the request body when creating a resource.
## Update guarantees
Different kinds of requests in the Emporix API offer one of two update guarantees as described below.
### Strong consistency (read-after-write consistency)
Whenever a resource is successfully updated or created, it is guaranteed that in a subsequent read (called *read-after-write*), the returned resource contains all the values from the latest successful update.
This type of consistency is usually available for all CRUD endpoints that do not require complex background processing. For example an update to the `Customer.firstName` field will be accessible across the Emporix API immediately.
### Eventual consistency
Eventual consistency guarantee applies to all APIs that require background processing that is conducted in a non-blocking manner, usually through event-based processing or batching. In this scenario, it is guaranteed that all successful updates are processed and reflected by the system as soon as possible (or according to a particular API's detailed specification). However, a read subsequent to a successful write may result in returning non-updated values.\
An example of eventual consistency is the `Product` search API that requires indexing of `Product` data. As this is a costly operation that leverages an integration, the indexing is run asynchronously and may last longer than a subsequent read to a successful write.
## Customer audit logs
You can request customer audit logs from Emporix by reaching out to our [Support Team](mailto:support@emporix.com) and sending the email request.\
The logs are kept for 2 years. You can retrieve information about create, update or delete operations. The records contain information about the tenant, timestamp and the person who performed the actions.
## Free trial
You can try out the Emporix e-commerce features completely free of charge for 14 days. With our free trial, you get full access to the production-ready e-commerce system, together with our storefront [B2B Showcase](https://github.com/emporix/b2b-showcase) and [data importer](https://github.com/emporix/demo-data-importer) so you can test all of functionalities before you decide to become our partner.
{% hint style="success" %}
***What are the differences between a free trial and a paid plan?***
Apart from the free trial being time-limited, there are no differences between free trials and paid plans — both operate in production environments. This approach brings the following benefits:
* Full experience of the Emporix e-commerce system during the free trial.
* Easy migration from a free trial to a paid plan (your data remains in the system).
{% endhint %}
When your free trial ends, the Emporix sales team will contact you to hear about your experience with our products.
# Creating your first tenant
Create your first tenant.
The first step in the e-commerce system is creating a tenant. A tenant represents a business subscription to our services and is required to access the following products:
The first step in the Emporix e-commerce system is creating a tenant. A tenant represents a business subscription to our services and is required to access the following products:
* [Emporix API](https://app.gitbook.com/o/z8MNPigQv25NZe33g3AV/s/d4POTWomuSS7d3dnh4Dg/) — the core of our e-commerce system.
* [Emporix Developer Portal](https://app.emporix.io/) — a platform where you can manage your tenants, team members, and Emporix API access credentials.
* [Emporix Management Dashboard](https://admin.emporix.io/) — a content management system where you can manage your business resources related to product management, marketing, order fulfillment, and more.
{% hint style="info" %}
**Free trial**\
You can try out the e-commerce features completely free of charge for 14 days. With the free trial, you get full access to the production-ready e-commerce system, so you can test all of its functionalities before you decide to become our partner.
***What are the differences between a free trial and a paid plan?***
Apart from the free trial being time-limited, there are no differences between free trials and paid plans — both operate in production environments. This approach brings the following benefits:
* Full experience of the e-commerce system during the free trial.
* Easy migration from a free trial to a paid plan (your data remains in the system).
When your free trial ends, the sales team will contact you to hear about your experience with our products.
{% endhint %}
## Setting up a first tenant
You can create and configure a tenant through the [Emporix Developer Portal](https://app.emporix.io/).
{% stepper %}
{% step %}
**Creating an account**
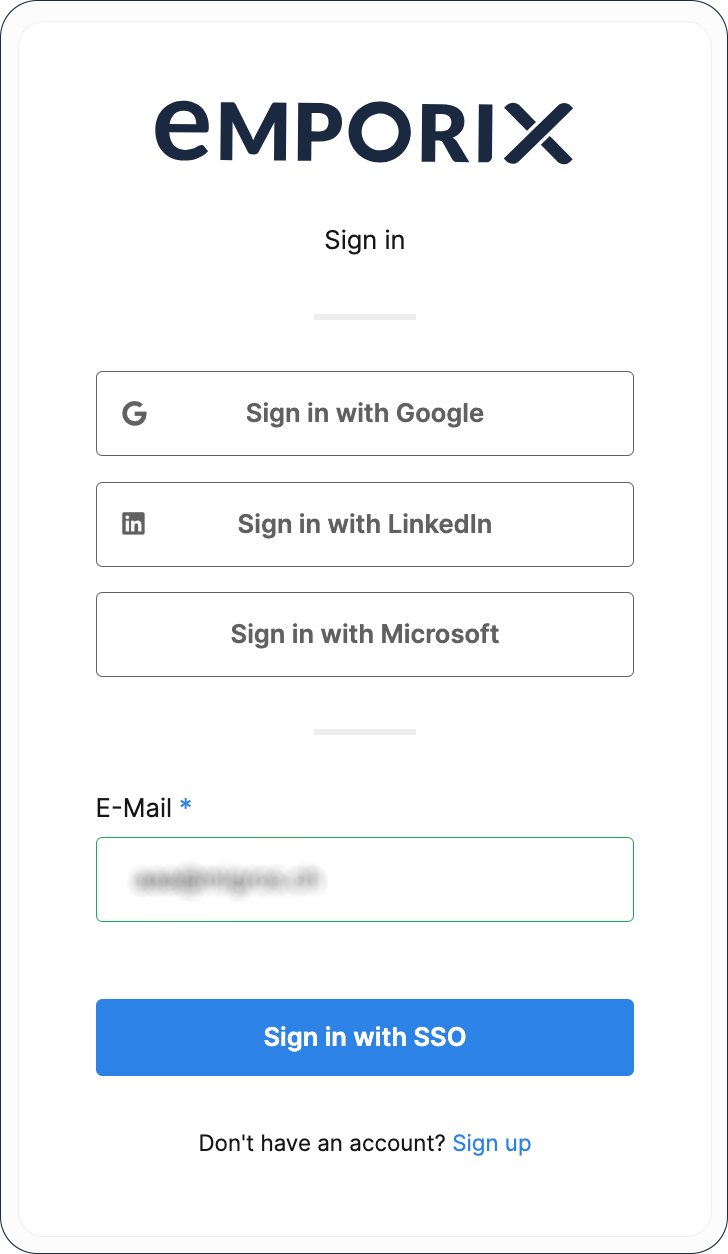
To set up an Emporix tenant, create an account in the Developer Portal. The following registration methods are available:
* Password-based authentication
* Single sign-on (requires additional configuration of an Identity Provider service, to learn more see [Single Sign-On](https://developer.emporix.io/ce/system-management/authentication-and-authorization/authentication/user-authentication/sso))
* Social login with the following platforms:
* Google
* LinkedIn
* Microsoft
{% hint style="danger" %}
When creating an account on the Developer Portal, you need to use a business email address. Email addresses registered to public domains are rejected by the registration form.
{% endhint %}
Registering an account gives you the `ADMIN` permissions in the Developer Portal and in the Management Dashboard.
Once you create an account, you can start creating a tenant straightaway.
{% hint style="warning" %}
**Alert for Unrecognized Browser Logins**
There is a security feature implemented in our system to enhance the protection of your account. Whenever a login attempt is made from an unrecognized browser or device, an alert email is automatically generated and sent to the email address associated with your account.
This alert email is designed to promptly notify you of any login activities that may be unauthorized or suspicious. If you receive such an alert email and you haven't recently logged in or attempted to access your account from a new browser or device, we strongly advise you to take immediate action to secure your account. This includes changing your password and reviewing your account activity, as well as reporting this fact to your organization.
Note that the alert feature works for email and password logins, while for social logins through external platforms, it has to be configured separately by the provider.
{% endhint %}
{% endstep %}
{% step %}
**Choosing a tenant name**
A tenant name is its unique identifier in the Emporix e-commerce system. To call any Emporix API endpoint, you need to pass the tenant name in the form of a path parameter.\
When coming up with a name for your tenant, your business name is usually a good choice.
{% hint style="warning" %}
Your tenant name must fulfill the following criteria:
* It must start with a letter.
* It must be between 3 and 10 characters long.
* It can only contain lowercase letters (without diacritics) and numbers.
{% endhint %}
{% endstep %}
{% step %}
**Selecting a language**
Specify the language in which your business communicates with suppliers and customers.
{% hint style="info" %}
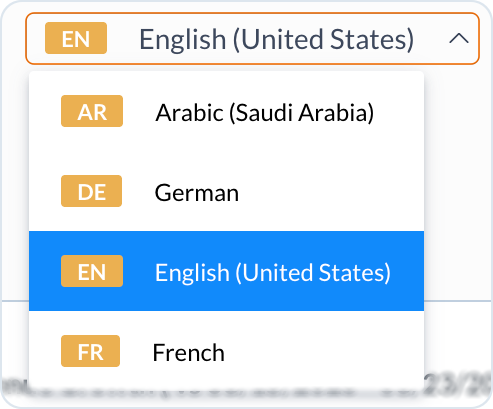
When creating a tenant, you can choose one of the following languages:
* English
* German
{% endhint %}
Select one of the available languages. Once your tenant is ready, you'd be able to change the selected language or add multiple languages for your tenant by using the Emporix API or Management Dashboard.
{% hint style="info" %}
To learn more about language configurations, check out the [Language Configuration guide](https://app.gitbook.com/s/d4POTWomuSS7d3dnh4Dg/api-guides/configuration/configuration-service/language).
{% endhint %}
{% endstep %}
{% step %}
**Selecting a currency**
Your tenant's currency configuration specifies which currencies are accepted by your business.
{% hint style="info" %}
When creating a tenant, you can choose one of the following currencies:
* EUR — Euro
* GBP — Pound sterling
* NOK — Norwegian krone
* USD — United States dollar
{% endhint %}
The currency chooser on the lists the currencies most commonly used by our partners and allows you to select a single currency only. However, you can add any currency or set up multiple currencies for your tenant with the help of Emporix API.
{% hint style="info" %}
To learn more about currency configurations, check out the [Currency guide](https://app.gitbook.com/s/d4POTWomuSS7d3dnh4Dg/api-guides/configuration/currency-service/currency).
{% endhint %}
{% endstep %}
{% step %}
**Including OE**
If you plan to use the OE for automating workflows and business processes, you can select the **Include OE** option to get access to the full potential of Commerce Orchestration Platform.
{% endstep %}
{% step %}
**Subscribing to the newsletter**
Stay up-to-date with the latest news about our products and services.
{% endstep %}
{% step %}
**Creating a tenant**
Creating a tenant view:
Once you fill out the form, choose **Create a tenant** and wait a couple of minutes for your tenant to finish setup. When your tenant is ready, you are redirected to its dashboard on the Emporix Developer Portal. Check your inbox, as you should receive the confirmation email.
{% endstep %}
{% endstepper %}
## Out-of-the-box configuration
Once your tenant is ready, you get immediate access to various resources.
### Emporix API
The Emporix API is the core of the e-commerce system. With the API, you can easily manage your business resources.
To prevent unauthorized access to your business sensitive data, your tenant is provided with different API credentials:
* **Emporix API** — used to access the API from a business owner's perspective.
* **Storefront API** — used to access the API from a customer's perspective. These credentials are used to perform basic actions on a storefront — browse products, view prices, or add products to cart.
* **Custom API** - build your custom scopes to access different services and assign permissions to the users
You can access your tenant's API credentials in the [API Keys section of the Developer Portal](https://app.emporix.io/api-keys).
{% hint style="info" %}
To learn more about our API, check out the [Getting started with Emporix API](https://app.gitbook.com/o/z8MNPigQv25NZe33g3AV/s/d4POTWomuSS7d3dnh4Dg/).
{% endhint %}
### Preconfigured data
To make onboarding easier, some of the resources are automatically configured.
If you want to check specific values configured for your tenant, call the API endpoints referenced in the table.
| Resource | Data available out-of-the-box | API |
| ----------------------------------- | ----------------------------------------------------------------------------------------------------------------------------------------------------------------------------------------------------------------------------------------------------------------------------------------------------------------------------------------------------------------- | ------------------------------------------------------------------------------------------------------------------------------------------------------------------------------------------------------------------------------------------------------------------------------- |
| Global (tenant-wide) configurations |
|
{% hint style="success" %}
Emporix facilitates the tenant onboarding and configuring process through the AI extensions you might use to for initial setup.
* AI Smart Import allows you to import test sample data so that you get familiar with the system and connections between resources before productizing the project data.
* AI Smart Config guides you through the tenant setup process and helps you choose the relevant tenant configuration for your tenant needs.
For more information, check out the [Quickstart Powered by AI](https://app.gitbook.com/s/8GgoeZEZYjZrpjOU6w52/ai-in-emporix/ai-intro "mention").
{% endhint %}
### External applications
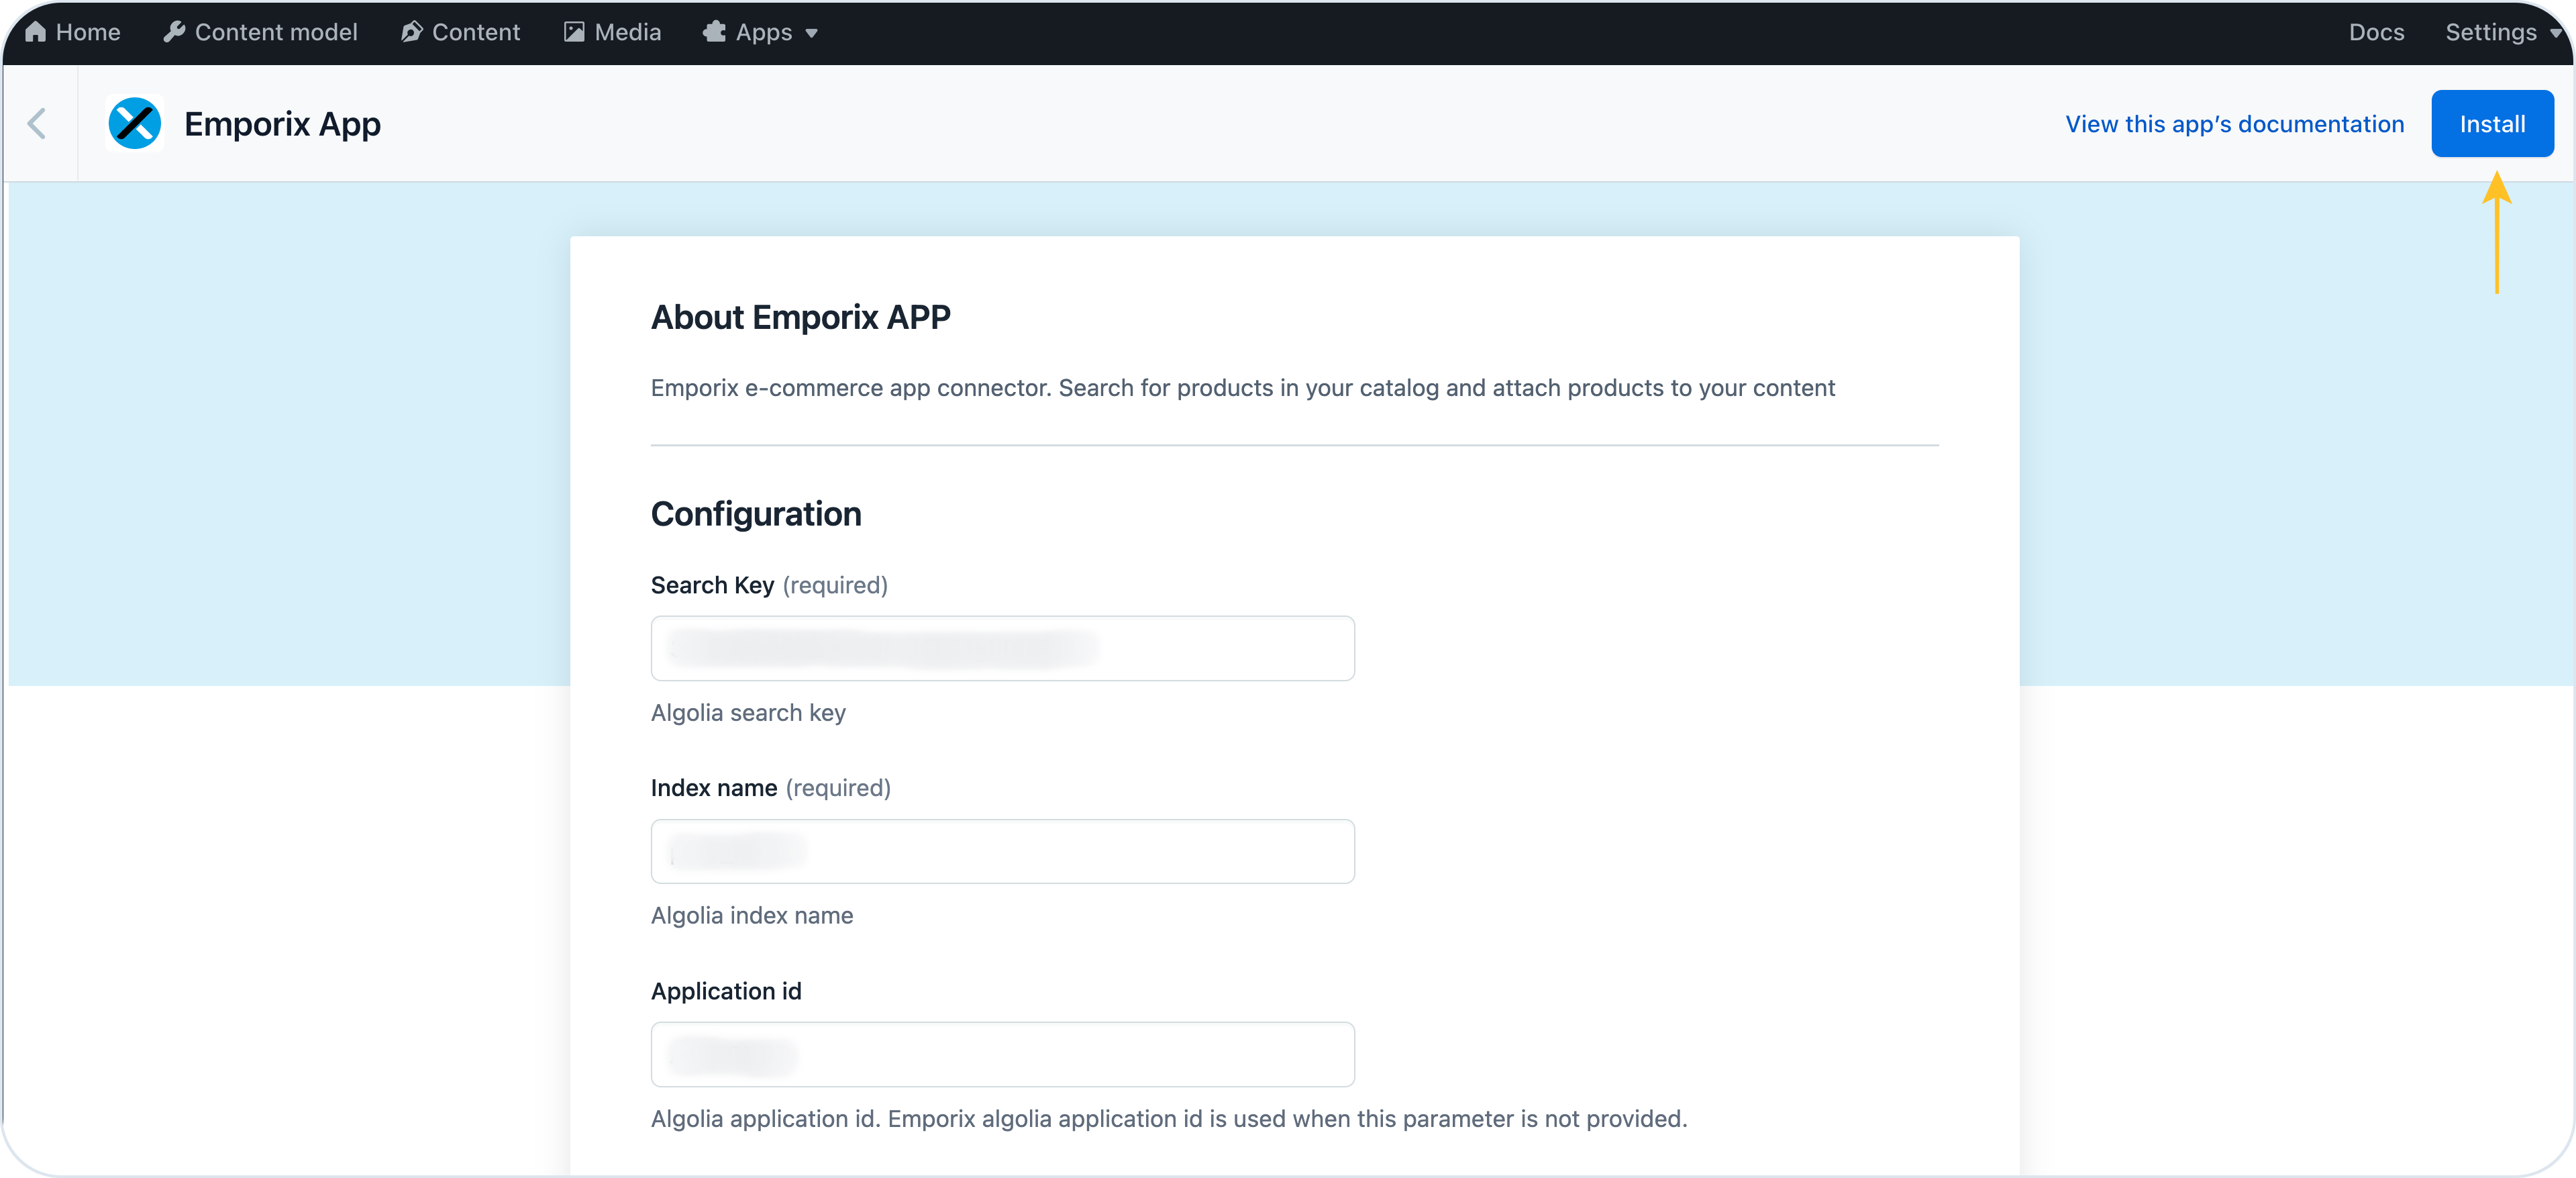
To improve your customers' shopping experience, you can enable an external application for search and indexing. Check out [Search Configuration](https://developer.emporix.io/ce/system-management/search/search-configuration) and [Indexing Service](https://developer.emporix.io/ce/system-management/search/indexing) documentation.
{% hint style="warning" %}
Indexing of your tenant's data in Algolia is disabled by default. If you want to enable this functionality, reach out the [Support Team](mailto:support@emporix.com).
{% endhint %}
## Performance tests
To ensure good system performance for all our partners, we need to know in advance if you plan to run any load, stress, or other types of performance tests on your tenant. In such cases, contact the [Support Team](mailto:support@emporix.com).
# Developer Portal
Developer Portal is a starting place for setting up and configuring your tenant.
The [**Emporix Developer Portal**](https://app.emporix.io/) is designed to help you manage your company account at Emporix.
## Login page
You can log in to the Developer Portal using one of the following methods:
* Password-based authentication
* Single sign-on (requires additional configuration of an Identity Provider service, to learn more see [Single Sign-On](https://developer.emporix.io/ce/system-management/authentication-and-authorization/authentication/user-authentication/sso))
* Social login with the following platforms:
* Google
* LinkedIn
* Microsoft
## User Interface
Learn how to navigate through the Developer Portal and what are the available functionalities.
The top menu is displayed in all the views of the Developer Portal so it is easier to navigate between different functionalities and get access directly to what you need.
### Tenant chooser
Your Emporix account can be assigned to multiple tenants at the same time. To switch between tenants, expand the dropdown menu on the left side of the Developer Portal. You also have an option to create a tenant from here.
### Dropdown menu
The top menu gives you access to administer different parts of your account.
Expand the dropdown menu to see available options and navigate directly to a chosen section from any point in the application:
* **Overview** — where you can access all the services available through the Developer Portal.
* [**Users**](https://developer.emporix.io/ce/getting-started/developer-portal/manage-users) — where you can manage your team members and their privileges.
* [**API Keys**](https://developer.emporix.io/ce/getting-started/developer-portal/manage-apikeys) — where you can access your keys, and see some usage examples.
* [**My Account**](https://developer.emporix.io/ce/getting-started/developer-portal/myaccount) — where you can edit your personal settings.
### Direct links
From the Developer Portal, you can navigate to Emporix documentation portal to see the latest updates and get proper help, or you can jump into Management Dashboard to get backend view on your data. The links to these services are available from all Developer Portal views.
## Overview
{% hint style="warning" %}
Note that the Developer Portal offers two roles:
* `ADMIN` - the user has manage access to all the functionalities of the Developer Portal
* `USER` - the user can only manage their own account and change their password, for the Developer Portal functionalities they have view access only, except for the demo data.
{% endhint %}
All the functionalities of the Developer Portal are available from the Overview page.\
It is divided into the following sections:
* [**Manage Users**](https://developer.emporix.io/ce/getting-started/developer-portal/manage-users) - change the users' settings
* [**Manage API Keys**](https://developer.emporix.io/ce/getting-started/developer-portal/manage-apikeys) - view API keys
* [**Tenant List**](https://developer.emporix.io/ce/getting-started/developer-portal/tenant-list) - see the tenants assigned to your account or create a new one
* [**My Account**](https://developer.emporix.io/ce/getting-started/developer-portal/myaccount) - edit personal settings or change password
* **Management Dashboard** - access Management Dashboard
* **Documentation** - read Emporix documentation
# Manage Users
Grant relevant access rights to your team.
The **Manage Users** view of the Emporix Developer Portal is designed to help you manage team members who can access your Emporix tenant and also set proper access to the Management Dashboard.
{% hint style="warning" %}
Note that the Developer Portal offers two roles:
* `ADMIN` - the user has manage access to all the functionalities of the Developer Portal
* `USER` - the user can only manage their own account and change their password, for the Developer Portal functionalities they have view access only, except for the demo data.
{% endhint %}
To find a specific user, search by their name or email address. You can also use the filters options for users of a specific application: Management Dashboard or Developer Portal, or of a specific role they have within the tenant, which means in what capacity they access the Developer Portal.
To edit user's personal details or access settings, choose the **Edit** icon next to the chosen user and amend the details accordingly.
## Adding users
The Developer Portal `ADMINS` can add new tenant users.
### Adding a single user
To add a single user:
1. Choose **+ Add user**.
2. Provide personal details and email address.
3. Select a relevant Developer Portal role, and the Management Dashboard role.
4. Confirm with **Save**.
### Adding multiple users
Adding multiple users and specifying their roles is possible by **CSV import** option.
To add multiple users:
1. Choose **+CSV Import users**.
2. Download the CSV file with a template for multiple user import. The template includes the name of the user, their email address, and roles within the Developer Portal and Management Dashboard.
3. Add the users to your CSV file. The pattern is `name,surname,email address,tenant role, MD role`, for example: `john,doe,john.doe@emporix.com,User,CE Manager`.
1. Save the file.
2. Import the CSV file using the drag-and-drop or by browsing your files.
After the file is uploaded, you get a notification with confirmation that the users were added to the tenant.
As a result of user creation, each new user gets an email with activation code to confirm their account details and a welcome email inviting them to join the tenant. When they activate their account, they have to set the password. With the first login to the tenant, they can also opt in for the Emporix newsletter.
{% hint style="warning" %}
If you have configured SSO for authentication of your users, the newly created users would be able to configure the SSO only after the account activation and setting a temporary password.
{% endhint %}
{% hint style="warning" %}
**Alert for Unrecognized Browser Logins**
There is a security feature implemented in our system to enhance the protection of your account. Whenever a login attempt is made from an unrecognized browser or device, an alert email is automatically generated and sent to the email address associated with your account.
This alert email is designed to promptly notify you of any login activities that may be unauthorized or suspicious. If you receive such an alert email and you haven't recently logged in or attempted to access your account from a new browser or device, we strongly advise you to take immediate action to secure your account. This includes changing your password and reviewing your account activity, as well as reporting this fact to your organization.
Note that the alert feature works for email and password logins, while for social logins through external platforms, it has to be configured separately by the provider.
{% endhint %}
## Resetting a user's password
If a user forgets their password, they can use the reset option on the login page. The user gets an email with the recovery code thanks to which they are able to set a new password.
The `ADMIN` users in the Developer Portal also have the option to trigger resetting a password for a user in the Developer Portal.
To reset a user's password:
1. Select a particular user and use **Edit** to see their details.
2. Go to the **Change password** tab and choose **Reset user password**.
The user gets an email with the recovery code and a link to change the password.
{% hint style="warning" %}
If your account is configured to use a social login or single sign-on to access the Emporix applications, you are not able to reset your password on your own, as this is managed by an external provider. To reset the password, change it through the provider directly.
{% endhint %}
# Manage API Keys
API keys enable you to work with Emporix API with different scopes and perspectives.
The **Manage API Keys** view of the Emporix Developer Portal is the place where you access the API keys connected to your tenants. API keys allow you to access API from either business or a customer's perspectives.
When you create an Emporix tenant, you obtain keys to the following types of :
| API type | Description |
| ------------------ | --------------------------------------------------------------------------------------------------------------------------------------------- |
| **Emporix API** | Used to access and manage your tenant's resources. With this key, you have access to all services and scopes within the application. |
| **Storefront API** | Used to access storefront application to perform basic e-commerce actions like browsing products, viewing prices, or adding products to cart. |
| **Custom API** | Used to define your own keys for separate services and with specific scopes. |
To authorize API requests, you need `Client ID` and `Secret` of a specific API key depending on the request you want to send. You can easily copy the credentials with the **copy** icon or view the `Secret` with the **preview** icon. Also, it is possible to regenerate the API keys by choosing the **renew** option.
## Custom API keys
You can create your custom API keys for various purposes. It is possible to define separate API keys for different services that contain some specific scopes. This way the application stays more secure. The custom API keys are assigned to the specific tenant.
### Creating custom API keys
1. If you don't have any custom API keys, in the **Manage API Keys** view choose the **Create scopes** in the **Custom API** row. Once you have already defined some API keys and want to define more scopes, expand the **Custom API** and choose **Add custom API**.
2. Enter the name for your custom keys and select the scopes of your interest. You can choose scopes from different services.
3. Confirm with **Generate** and the created group appears under **Custom API**.
## Quick start sample
For easier start of working with API keys, you get a preview of sample requests. Choose the **Get started** option next to the selected API key to get a preview of an example request.
# Tenant List
View and manage your tenants.
The **Tenant List** view of the Emporix Developer Portal is the place where you can see all the tenants assigned to your account or you can create a new one.
## Creating additional tenants
When you create an account on Emporix and verify your email address, you are asked to set up a tenant — your business subscription to Emporix services. This tenant acts as a **production environment** that your customers will interact with directly.
You can create more tenants for different purposes, such as a **staging environment** for testing. This way, you can try out new APIs, get familiar with New features, or verify your assumptions about our system without the risk of breaking the production environment.
{% hint style="warning" %}
Depending on your contract with Emporix, additional tenants may be subject to billing.
{% endhint %}
1. Go to the **Tenant List** view.
2. Choose **Add Tenant**.
3. Provide required details and your preferences and confirm with **Create a tenant**.
Result: When the tenant is created in the system, you receive an email notification. You can start working with your new tenant.
# My Account
The **My Account** view of the is the place where you can manage your account information, change password, or set up the MFA.
## Personal settings
In **Personal settings**, you can view and edit your personal information and see the specific roles you are assigned to in the and .
The **Custom Roles** section is visible if you have specific user groups assigned in the . These can be managed directly in the by `CE Administrator` users.
## Password
In the **Change password** tab, you can change the access password to your account.
If your account is configured to use a social login or single sign-on to access the applications, you are not able to reset your password on your own, as this is managed by an external provider. To reset the password, change it through the provider directly.
## Multi-factor authentication (MFA)
In the Manage MFA section of your account settings, you can set up Multi-Factor Authentication (MFA).
1. Using an **Authenticator App** (for example Google or Windows ones) on your phone, scan the provided QR code or enter the provided secret key manually.
2. Enter the verification code and save the configuration. After you choose **Save**, you are logged out and need to log in to the developer portal again.
Your MFA setup is complete. You can disable it at any time using the **Disable MFA** button.
* All the users can use the MFA, but only Authenticator Apps are supported.
* When you enable MFA, it works both for the Developer Portal and the Management Dashboard.
# Manage Showcase and Sample Data
Use sample data and showcase storefront to test your setup.
The **Manage Showcase & Sample Data** view of the Emporix Developer Portal is a designed to help you start working with your data and check our Emporix Showcase.\
The view is available for users with the **Admin** role.
* [Emporix Showcase](https://app.emporix.io/demo-data/b2bshowcase/manage) - see a sample storefront that is built to showcase how you can set up your own one.
* [How to import sample data](https://github.com/emporix/emporix-documentation-portal/blob/master/content/user-guides/extensibility-and-integrations/ai/ai-import.md) - learn about importing sample data to the selected tenant and then see how you can manage it in the Management Dashboard.
# Commerce Use Cases
Get familiar with the Emporix storefront showcase. We've described a few use case examples to demonstrate the possibilities of Emporix system.
The Emporix use cases documentation is to demonstrate how the Emporix API can be used on a frontend. No middleware was used to build the showcase and every API call is visible from the browser developer network tab.
{% hint style="danger" %}
Use the Emporix API with any showcase or frontend. This showcase exists purely to demonstrate the flexibility of our APIs and how it works across different UI implementations. **It is not a final product**. It’s a simplified demo designed to prove that any type of frontend can be connected. For a production-ready experience, see our [B2B Commerce Frontend](https://app.gitbook.com/o/z8MNPigQv25NZe33g3AV/s/OgeoK7nW6gEh0q1ceUZP/).
{% endhint %}
{% hint style="info" %}
* If you want to learn about our API and get more information about our product possibilities see [Emporix API documentation](https://app.gitbook.com/o/z8MNPigQv25NZe33g3AV/s/d4POTWomuSS7d3dnh4Dg/) and our user guides: [Core Commerce](https://developer.emporix.io/ce/core-commerce/introduction) and [Management Dashboard](https://developer.emporix.io/ce/management-dashboard/introduction).
* You can also use the [Emporix Free Trial](https://www.emporix.com/emporix-free-trial) to check the solution.
{% endhint %}
Below you can see a general explanation how the B2B Showcase is structured and some description about core elements.
## My Account
When you log in to the showcase as a valid user, you can see the name of your account on the right hand side of the menu. Clicking on the name gives you the option to go to your account settings.
The account details page includes such information as your personal details, company details, orders, quotes, carts, returns, or discounts.
* **My Orders**: All the orders are visible together with their details.
* **My Quotes**: All the quotes are visible together with their details. Here, you can decide to approve, decline or request a change for a specific quote.
* **Addresses**: It is possible to add, edit or create a new address for the B2B customer.
* **My Returns**: All the returns created by a user and their corresponding statuses.
* **My Discounts**: The redeem options for reward points including the existing points of a customer.
## Navigation menu
The reference store navigation menu consists of two layers:
* The top layer has a site, language and currency selector, a customer user login link and a sign-up link. This layer shows a sign up page, which allows you to create a new showcase **Customer** and **Customer ID** accessible with the Emporix Management Dashboard.
* The lower layer has:
* **Catalog** link, which dynamically builds a menu out of the category structure in the demo data from the connected tenant
* **Brands** link that shows a table of Brands from the demo data using the Brand Service
* **Quick Order** link that lets you quickly populate a cart by simply typing in product codes and quantities
* **About Us** link which will simply take you to some example content
* **Product Search** field powered by the [Algolia](https://www.algolia.com/) search engine. If you modify a category or product data in the Emporix Management Dashboard, this triggers a search index update in Algolia.
## Catalog
### Product display
The Product display is split into a facet or filter list on the left hand side, and a grid or list view on the right.
When you are **not logged in** the display shows the default catalog price. When you **are logged in**, it shows your personalized pricing, assuming you have a corresponding Emporix price list defined.
When you click on an individual product tile in the grid, or row in the list, it opens up the **Product Details** page for that product.
### Product details page
The **Quantity** and **Add to Cart** buttons work to add the item to the **Cart**. All the displayed data like product name, product description, images and attributes comes from a demo catalog.
## Contacts
In case of questions please contact Emporix at or .
To submit new ideas, visit the [Emporix Support Portal](http://support.emporix.com).
# Quote Process
Find out how a quote process looks like from start to end.
Very often customers want to negotiate the price regarding the products they want to buy. For such a process, it is important that an eCommerce platform supports a more sophisticated process. Requesting a quote is a common use case especially for B2B business model, but within the Emporix platform, the quotes for B2C customers are also supported.
Below you can see the general, simplified flow:
Not only the customer is able to request quotes, but also the merchant's employee or a sales manager can generate a quote on behalf of the customer. This is described step by step in the 2nd demo scenario - Employee creates quote on behalf of a customer.
Roles included:
* B2B or B2C customer
* Merchant employee who needs to accept or decline a quote request
### Demo scenario - a customer (B2B or B2C) requests a quote
This is a step-by-step description of the quoting process within the Emporix Showcase and what to look for in detail.
1. Browse for a product by categories or use the search bar to find the product which you want to add to the cart.
{% hint style="warning" %}
This search uses Algolia as a search engine for displaying the search results. For a newly created tenant it works out of the box.
{% endhint %}
2. Choose the product you want to add to the cart and open the product details page.
3. Change the quantity, for example to 5 and add the product to the cart.
**Result**: The following screen is displayed:
4. Within the cart you can change the quantity and a recalculation of the cart will take place.
5. To create the quote, choose the **Request quote** button.
**Result**: the quote page appears.
6. To see the quote overview, choose the **Quote overview** button. The quote gets the **Awaiting** status.
7. Open the Management Dashboard and go to **Quotes**, the quotes overview page is displayed.
* The created quote is displayed with the **awaiting** status.
* The merchant employee is informed by email that a customer created a quote request. The corresponding sales representative or a customer service employee can then work on the quote request quickly.
8. Open the quote and check its details, prices and discounts. Go to the **Approval** tab and choose **Approve quote** to accept the quote. You can add a comment from a merchant perspective if needed.
9. Click **Update status** and then confirm you want to change the quote status.
**Result**: The quote request from customer is accepted by the merchant and the quote status changes from **Awaiting** to **Open**.
{% hint style="success" %}
It is possible to work on quotes in Management Dashboard and to update them anytime needed. For details on how to work with quotes in MD, see [Quotes](https://developer.emporix.io/ce/management-dashboard/quotes) documentation.
{% endhint %}
10. In the Emporix showcase, the customer goes to the **My Quotes** view under **My Account**. The Quote should have the **open** status as well.
{% hint style="warning" %}
After the merchant employee accepts the quote, the customer gets an email with the corresponding PDF. Within the demo the red bubble indicates that a new quote is available for the customer. In this case 2 quotes are new and available.
{% endhint %}
11. Customer opens the details of the quote and can decide if they want to accept or decline the quote.
In case they request a change or decline the quote, they have to select a change or decline reason with an additional text.
12. In case the customer accepts the quote the status of the quote is updated within the showcase and also within the Management Dashboard.
* Showcase status - quote detail page:
{% hint style="danger" %}
To get the storefront status updated you need to refresh the page.
{% endhint %}
* Backend status - Management Dashboard:
**Result** The accepted quote creates an order within CE and within the quote detail the order link is available.
### Employee creates quote on behalf of a customer
It is possible for you as an employee to create a quote on behalf of the customer in the Management Dashboard. For example, a customer calls a customer service department and asks for a specific quote.\
To create the quote on their behalf, you need to be logged in to the Management Dashboard as an employee.
Then, follow the steps described in the [Quotes - Creating a quote](https://developer.emporix.io/ce/management-dashboard/quotes/quotes-view#creating-a-quote) guide.
**Result**: After you follow the steps and click the **create quote** button at the end, the quote is created with **Open** status and the quote notification is sent to the customer by email, including the PDF.\
The customer can accept or decline the quote as described under Customer requests.
{% hint style="info" %}
To learn more about API used in this use case see the [Quote Service](https://app.gitbook.com/s/d4POTWomuSS7d3dnh4Dg/api-guides/quotes) and for user guides check the [Quotes](https://developer.emporix.io/ce/management-dashboard/quotes) and the [Quote Management](https://developer.emporix.io/ce/core-commerce/quote-management) documentation.
{% endhint %}
# Orders
See the end-to-end order process.
## Cart
When a customer is browsing products on your storefront and finds something interesting, they can put it in cart with a standard **Add to cart** option. When they're done with selecting products, they select the **Cart** icon to see all the chosen items. It's possible to edit the cart content, add or subtract the product quantities or remove items from the cart before proceeding to checkout.
## Quick order
If a customer knows exactly what they want to buy, they can use the **Quick order** option. It allows for simple entering a valid product code and it automatically suggests products. Customers can easily populate the rows and create a new blank row underneath. Additionally, they can also add a list of product codes and quantities via a `.csv` file (download of sample possible). Finally they can add the list of product codes separated by a comma or a carriage return.
Once filled, customers place the items in the cart with the **Add to Cart** option.
After adding some products to the list and adding them to the cart, the mini-cart opens.\
In the mini-cart, the customer can see all the added items, it's possible to add or subtract product quantities and delete a line item before proceeding to the next steps.
## Checkout process
When a customer is ready to proceed with the purchase, the following options are available:
* **Go to checkout** - to finish the order by registering or logging in
* **Continue as guest** - to process the purchase without the need to register or log in
* **Go to the cart** - to check more details of the products and the order before moving to payment
* **Request quote** - to send a request for a quote - for more details, see [Quote Process](https://developer.emporix.io/ce/customer-use-cases/scenarios-introduction/quote-process)
### Go to Checkout
Choosing this option takes a customer to the login page where they can register or log in to their account using one of the available options.
The checkout process has the following steps:
1. Details of the shipping information
The shipping details are taken from:
* the customer's address book - the default address is selected
* the company locations tagged as `shipping` - if the customer is assigned to the registered company
The taxes are applied according to the shipping location country.
2. Payment information
The billing addresses are taken from:
* the customer's address book
* the company locations tagged as `billing` - if the customer is assigned to the registered company
You can also add a coupon to get a discount.
3. Review Order
This page shows the order review before the final order confirmation. Clicking the **Confirm and Pay** button creates an order in Emporix Management Dashboard.
### Continue as guest
The customer has the option to complete the purchase without the need to register or log in. They can choose **Continue as guest**.
The checkout has the following steps:
1. Details of the shipping information
The customer needs to provide their name, contact information, and shipping address. Also, they need to choose one of the available shipping methods.
{% hint style="warning" %}
The email address provided in the shipping information cannot be associated with an existing customer account.
{% endhint %}
2. Payment information
The customer chooses the payment method and billing address.
3. Review Order
The customer reviews all the provided details and if everything is accurate confirms the order and proceeds to the payment by **Confirm and Pay**.
{% hint style="warning" %}
There is a validation mechanism that runs in the background and checks if the provided email address is already associated with an existing customer. If so, it prevents completing a guest checkout with such an email. The customer has an option to either log in or to provide a different email address.
{% endhint %}
Successful checkout creates an order in Emporix Management Dashboard.
{% hint style="warning" %}
In the case when a guest customer later wants to return the purchased item, they need to register with the email address provided at checkout and to create a customer account. After logging in, the customer can view the orders under the order history associated with the email.
{% endhint %}
{% hint style="info" %}
To learn more about API used in this use case see the [Order Service](https://app.gitbook.com/s/d4POTWomuSS7d3dnh4Dg/api-guides/orders/order) and for user guides check the [Order Fulfillment](https://developer.emporix.io/ce/management-dashboard/orders-module) documentation.
{% endhint %}
After the customer submits the order, it is created within the Management Dashboard. The employee can set the status of the order and the storefront is updated accordingly. In a real scenario, the updates are normally integrated from an ERP backend system.
In the Management Dashboard, for the orders that were created by guest users, the **Customer #** field is marked as **Anonymous**. If the guest customer later chooses to create an account, the value of the **Customer #** is replaced with the real customer ID.
# Coupons and Redeeming Rewards
See the example of using coupons end-to-end.
This is to demonstrate how our **Coupon Service** and **Reward Point Management Service** can be used.
### Coupons
Coupons can be managed within the Management Dashboard, two different types are supported: percentage and absolute.
{% hint style="info" %}
To learn about details how to create coupons, see the [Coupon](https://developer.emporix.io/ce/management-dashboard/customer-management/coupons) user guides.
{% endhint %}
1. Login as a customer and add products to the cart.
2. Go to the checkout and add a coupon to the cart.
3. Choose **Apply**, the discount is calculated based on the Subtotal without VAT.
{% hint style="warning" %}
If you delete the coupon, the discount percentage is added again to the cart value. Vat is calculated based on “Subtotal without VAT” - “Discount Amount” = Base value for VAT.
{% endhint %}
4. Go through the normal check out and submit the order. The discount is also displayed within the **My Orders** overview page.
### Reward Points
Reward points can be exchanged for coupons by customers within the B2B Showcase. To have that functionality available it is necessary to create rewards points first using the [Reward Points](https://github.com/emporix/emporix-documentation-portal/blob/master/content/user-guides/b2b-showcase/business-scenarios/ce-use-cases/broken-reference/README.md) endpoint.
In case a customer already had points, use Adding [reward points for a customer endpoint](https://github.com/emporix/emporix-documentation-portal/blob/master/content/user-guides/b2b-showcase/business-scenarios/ce-use-cases/broken-reference/README.md) to add additional points to a customer.
Points can be exchanged to coupons, which then can be used for future purchases. Redemption options are not limited and can be configured by your employees
To use it within the B2B Showcase follow the steps:
1. Login and add a product to the cart.
2. Go to the checkout and click on **Get coupons for points**.
3. The redeem options are displayed which were configured beforehand. Select one redeem coupon and click on **Redeem selected**.
**Result**: The discount should appear in green and the points are counted down.
4. Proceed with the checkout and submit the order.
{% hint style="info" %}
To learn more about API used in this use case see the [Rewards and Promotions Services](https://app.gitbook.com/s/d4POTWomuSS7d3dnh4Dg/api-guides/rewards-and-promotions) and for user guides check the [Coupons](https://developer.emporix.io/ce/core-commerce/coupons) and [Reward Points](https://developer.emporix.io/ce/core-commerce/reward-points-management) documentation.
{% endhint %}
# Returns
Learn how the returns work in CE.
In case a customer is not satisfied with the product, they can call the merchant (customer service) and ask for a return of a complete order, partial order or from different orders for different products.
### Scenario - Customer calls Merchant Support to return items
A customer created several orders with several items. After the delivery the customer calls the merchant customer service to ask for a return of one or more items.
1. As a customer service employee, log in to the Management Dashboard and open the returns overview page.
2. To open the edit mode, click the **Create return** button.
3. Select the order you want to make a return for:
**a. Existing customers:** Select the corresponding customer from the list.
{% hint style="warning" %}
Only one customer can be selected and for that customer returns can be created.
{% endhint %}
After selecting the customer, go to the **Orders** tab to select the orders which the customer wants to create the return for.
**b. Guest customers:** Go to **Orders** tab to find the relevant order. You can filter the orders by email from the purchase.
{% hint style="warning" %}
If you don't select any customer in the **Customer** tab, the **Orders** tab shows **only** the orders created by the **guest** customers.
{% endhint %}
4. In the **Products** tab, all the related products are displayed for these selected orders. The following screen shows the selected orders and the corresponding products.
{% hint style="danger" %}
All the products that you want to return have to be selected. It is possible to decide if the same **reason code** & **reason details** is used for all products. The reason code on header level is mandatory. Reason codes are provided on product level.
{% endhint %}
If different reason codes and reason details are necessary, it is possible to maintain a different reason for separate materials.
5. Select the products which should be returned. With selecting the items the pricing calculation takes place.
{% hint style="warning" %}
If the ordered quantity is greater than one, only a partial quantity can be returned.
{% endhint %}
6. The return total is calculated with the selected products. Within the last step, in the **review** tab, it is possible to check the whole return.
Check the return under **review** and save the return.
**Result**: After saving the return it is visible under the **Returns** overview with status pending.
{% hint style="warning" %}
By default, the validity of the return is set to 30 days.
{% endhint %}
7. It is possible to change the statuses within the details of the return.
Let's assume everything is booked in the corresponding backend systems (integration work for a project). The status is selected and set to **Approved** within the Management Dashboard.
8. Save the return, the status gets updated.
### Scenario - Customer creates a return from the storefront
Within this scenario, we provide the possibility to enable the self service for your customer. This means your customer is able to create a return from your storefront.
1. Customer logs in and opens the **My Orders** overview under **My Account**.
{% hint style="warning" %}
In the case when a guest customer wants to return the purchased item, they need to register with the email address provided at checkout and to create a customer account. After logging in, the customer is able to see the orders history associated with the email.
{% endhint %}
2. The customer clicks on **Return** and the order that is to be returned is opened.
{% hint style="danger" %}
You can only decrease the quantity. A return reason (reason code) is mandatory. The text (reason details) is optional.
{% endhint %}
3. The customer clicks the **Submit return** button, a return is created within the showcase and Management Dashboard.
* Storefront view:
{% hint style="info" %}
In a real scenario, an email notification is sent out to the merchant to notify them regarding the created return.
{% endhint %}
* Backend view:\
Overview page - return is created with status pending
* Return details:
4. The employee can decide if the return is rejected, approved or just closed. In this case, the return is approved.
{% hint style="info" %}
At the moment no cancellation reason can be maintained by the employee. In a real scenario an email notification is sent out to the customer after the merchant rejects the return.
{% endhint %}
5. The status is updated for the customer under **My Account** → **My Returns**.
Return details:
It is not possible to create a second return for the same order in the showcase.
{% hint style="info" %}
To learn more about API used in this use case see the [Returns Service](https://app.gitbook.com/s/d4POTWomuSS7d3dnh4Dg/api-guides/orders/returns) and for user guides check the [Returns](https://developer.emporix.io/ce/core-commerce/returns) documentation.
{% endhint %}
# Payments
See how you can utilize different payment solutions.
Emporix allows for configuration of a variety of payment methods. In the scenarios below, you can see how the configuration works with the example of Emporix demo storefront.
{% hint style="info" %}
To learn about the technical implementation of the Emporix payment gateway, see the [Payments](https://developer.emporix.io/ce/extensibility-and-integrations/payments) documentation in the System Management section.
{% endhint %}
## User scenarios
Examples of the payment methods seen from the user perspective when creating an order on a storefront.
### Credit Card with Spreedly Express
When users choose to pay with a credit card, they have to follow the standard payment process and provide their credit card details for payment authorization.
1. As a checkout step, the user sees a list of available payment methods and selects the **Credit card** payment option.
2. The user chooses the **Enter Payment Info** button and then provided the credit card details.
3. The user chooses **Pay Now** and finished the checkout process. The payment amount is authorized automatically and it is captured during the invoice generation.
### Credit Card 3D Secure with Spreedly Express
Users can choose to pay with a 3D secure credit card. In comparison to the standard credit card, 3D secure adds an additional security layer to the payment process. Users have to provide an authorization token that is generated and sent to them during the payment process.
1. As a checkout step, the user sees a list of available payment methods and selects the **Credit card (3D Secure)** payment option.
2. The user chooses the **Enter Payment Info** button and then has to provide the credit card details.
3. The user chooses **Pay Now** and sees the 3D Secure window.
4. The user finishes the checkout with the credit card authorization. Spreedly sends a callback to the Emporix payment gateway with a result of the authorization. The payment amount is authorized automatically and it is captured during the invoice generation.
### Spreedly Sprel
Spreedly Sprel is a solution to use for the off-site payments. It means the payments are done after an order is placed.
1. As a checkout step, the user sees a list of available payment methods and selects the **Sprel** payment option.
2. The user completes the checkout and after the order is completed sees the option to finish the payment.
3. The user chose the **Finish Payment** button and completed the payment process. Spreedly sends a callback to the Emporix payment gateway with a result of the authorization. The payment amount is authorized automatically and it is captured during the invoice generation.
## Payment operations
Details of the payment possibilities, cancellations and returns.
### Payment statuses
To check a payment status of an order, go to Management Dashboard -> **Orders** -> **Payment Info** tab.
* In the **Payment information** section, you have information about the payment provider, payment method, transaction ID (an internal Emporix transaction ID), current status, authorized amount, paid amount and the last message.
* In the **Transaction logs** section you can see all the payment events. Usually the following events are included there:
* AUTHORIZATION\_START - when an order is created
* AUTHORIZATION\_CALLBACK - when Spreedly notifies Emporix Payment-Gateway service about authorization status)
* CAPTURE\_SUCCESS - when an invoice is generated and capture operation finished with success
All possible statuses:
* PENDING - an order has been created but payment is not done yet
* AUTHORIZATION\_SUCESS - an authorization flow finished with success
* AUTHORIZATION\_FAILURE - an authorization flow finished with failure
* CAPTURE\_SUCCESS - a capture flow finished with success
* CAPTURE\_FAILURE - a capture flow finished with failure
* CANCELLATION\_SUCCESS - a cancellation flow finished with success
* CANCELLATION\_FAILURE - a cancellation flow finished with failure
* REFUND\_SUCCESS - a refund flow finished with success
* REFUND\_FAILURE - a refund flow finished with failure
### Payment capture
Capture is a process done during an invoice generation. It's when a payment is completed by settling funds for the transaction.
1. To generate the invoice, go to Management Dashboard -> **Orders**.
2. Select the order and go to the **Data** tab.
3. Choose the **Send Invoice** button.
**Result**: The payment capture is done with the invoice generation. After that, the invoice is sent to a customer.
### Payment refund
The payment refund is possible only when a payment has been invoiced and capture done. The user can get a full or partial refund of the order, but it's not possible to return more than the captured value.
1. To create the refund, go to Management Dashboard -> **Orders**.
2. Select the order for which the payment should be revoked and go to the **Payment Info** tab.
3. In the **Refund** section add a value that should be refunded and confirm it by choosing the **Refund** button.
**Result**: The refund is confirmed and the event is visible in the **Transaction logs**.
### Payment cancellation
Payment cancellation can happen for many reasons, for example when a user requests to cancel an order, or an order cannot be completed by a store.
If for any reason the order is not completed and the payment should be cancelled, the merchant can set the order status to cancelled. The cancellation is then done automatically after the status change.
1. To set the status as cancelled, go to Management Dashboard -> **Orders**.
2. Select the order for which the payment is cancelled and go to the **Data** tab.
3. In the **Order** section choose **Cancelled** as the **extended order status**.
**Result**: The order payment cancellation is visible in the **Payment Info** tab. The status is displayed as **Cancellation Success**.
# User Management and Approvals
Learn how you can manage users and permissions on the storefront.
As a B2B customer, with Emporix you can easily manage your company data and your company users' data directly from your storefront.
## Company setup while registering as a customer
When a new customer registers at your storefront, all the registration data are automatically reflected in your Emporix account. This includes the company data, like address and contact information that your new customer provided during the registration. The most important piece of information is the customer's email address. By default, the customer is created with the admin role and becomes a primary contact for the company, if no other primary contact exists.
{% hint style="warning" %}
Make sure you add security measures in your implementation for creating new B2B customers on the storefront. For the showcase purposes, the new customer by default gets admin rights which for sure is not the desired behavior on your side.
{% endhint %}
## Creating users within the storefront
1. Log in to your storefront account and go to **My account** -> **Manage Users**.
2. To start creating a new user, choose **Create new user**.
3. Enter the user data, and choose the role for the user: you can select between Admin, Purchaser and Requester.
* **Admin**: manages users, creates orders, approves orders from other users, who have the purchaser or material manager roles.
* **Purchaser**: creates orders within the defined account threshold and can approve orders from material managers
* **Requester**: creates order requests for purchaser or admin
4. Choose if the user should be activated or not.
After you create the new user, they receive an email notification to set the account password.
All of the users' data is reflected and visible in the Emporix account in the backend system.
## B2B sign-up process
During the sign-up process, when the customer has a defined `b2b.companyRegistrationId` property, an additional validation takes place. The populated `b2b` property indicates that the registration process is for the B2B customers. The properties that are required for the B2B customers are:
* `firstName`
* `lastName`
* `company`
By default, a B2B customer is added to a legal entity matched by the name. If such a legal entity doesn’t exist, the company is created in the system, but only after an address is assigned to the newly created customer.
When the `Admin` customer creates a customer, the customer is automatically assigned to the legal entity of the `Admin` customer. When the customer is created for the B2B flow, then the default employee is informed about that by an email notification. The default employee is defined by the `default_employee` property.
## Approval requests flow
Having different user roles within a company helps in keeping the purchasing process in an ordered and transparent way. Anytime an order that is created has to be approved, the approval process starts.
{% hint style="danger" %}
To be able to set up such a workflow and properly resolve relevant access rights, you need to generate a **B2B token** that contains the legal entity information. The `refreshtoken` ensures that the authorization token contains the right legal entity details so that the services retrieve only the relevant information. To learn more about the B2B token, refer to the [B2B Token](https://app.gitbook.com/s/d4POTWomuSS7d3dnh4Dg/standard-practices/b2btoken) documentation.
{% endhint %}
### Requesting an approval
As a purchaser or material manager, you can create orders within the storefront and then request an approval. To request the approval, a user has to create a standard order first and then go through the standard checkout flow. During the checkout, the user can create an approval request for ordering the items in the cart.
1. To start the approval process, choose the **Request approval** option.
2. Choose the person who should be an approver of the request and add any additional information if necessary. After that, use the **Submit** button to send the request.
**Result**: After sending the approval request an email notification is sent to the approver. You can also see a confirmation message that the approval was requested. In your **Saved Carts** , you can check the status of your request.
### Approving the request
As an admin, you have the permission to approve the order requests that are sent by a purchaser or a material manager. When such a request is created, you get an email notification informing you about a pending approval.
1. To start working on the approval requests, go to the **Saved Carts** in your storefront account. Here, you can check the requests that are pending processing.
2. Choose the approval request to view the checkout details for the order.
3. Review the order, change the shipping information if needed, and decide if you approve or decline the request.
* If you decide to approve, choose the **Confirm & Pay** button, this completed the checkout process.
* If you decide not to approve, choose the **Decline Request** option. The requester receives information that the request was declined.
# Customer Social Login
See how social login facilitates accessing your online store.
Social login is a form of single sign-on offered to your customers. Instead of creating a new account specifically to your store, the customers can use their existing social networking service account, such as Facebook, Google, or other, to log in to your online store. Frequently, this is a more convenient option for your customers. Therefore, by facilitating users access, the social login feature enhances the overall user experience.
See how it is used on an example storefront page.
1. Open the login page on the storefront.
2. Choose **Social login** to log in with some other service credentials.
3. Choose the service to log in with, for example Google. You get redirected to the service to log you in with your existing account.
4. After authorization, you are logged in to the storefront.
# Personalized Commerce - Customer Segments
See the example of using customer segments to offer personalized experience.
Offering personalized experiences to your customers can be a game changer for your business. Tailored content and responding to what your customers need is the key to gaining loyalty and trust.\
**Customer Segments** is a convenient tool for targeting the right group of people with the relevant products or promotions. Let's see in action how you can use the functionality in your online store.
Let's assume that for certain customers, for example, of a specific industry, you want to display some dedicated categories and products only. You'd also like to promote some specific products and make a special price offer for these customers.\
When the customers of that segment log in to your store, they see only the offer that is best suited to their industry needs and fulfill their shopping lists. The customers receive a special discount coupon that they can redeem at checkout.\
With customer segments you can easily achieve that and respond to any similar scenario.
## Segment creation
1. First, create a segment. To demonstrate the case, create a segment for the `DE` site with some categories assigned, and a few additional products that you want to sell to the segment customers. Remember to save your changes at every step of the segment configuration.
2. Assign the chosen category to the segment:
And assign a few additional products:
3. Add a coupon that is valid only for the segment assignments:
4. Add customers as the segment members:
## Personalized shopping
Now, the customers who are members of the Golden Card segment get a personalized shopping experience on the DE site.
To demonstrate the difference, first log in as a customer that is not assigned to any segments. Judy Wilson, from Company XYZ, is not assigned to any segment and she can browse all the products and categories on the storefront:
Now, check what's available for a customer that belongs to the segment with a dedicated category and products. John Doe, is one of the customers assigned to the Golden Card segment. When Mr Doe logs in to the online store, he can browse only the Golden Card assortment plus the additional products assigned to the segment.
The dedicated segment products are available under the **Assigned Products** tab.
Mr Doe has received an email notification with the special coupons details. He decides to make some purchases and adds chosen items to the cart. He continues to the checkout where he's able to apply the coupon codes that are valid for the segment assignments only. The coupons in this case use the subtotal amounts as tax calculation base.
As this example demonstrates, the customer gets a personalized shopping experience, which leads to greater customer satisfaction. Customer segments feature facilitates the way how you can increase customer loyalty by tailoring the storefront content to the dedicated customers and responding quickly to the ever-changing market requirements.
### Segmented search offer in the showcase
To further personalize the shopping experience and ensure that customers can only search relevant products, we have added segments to [Algolia](https://developer.emporix.io/ce/system-management/search/search-configuration) for our showcase. For example, only search results that match the segment are displayed. This additional enhancement ensures a customized and efficient shopping experience for all customers.
{% hint style="info" %}
To learn more about how to configure segments on the storefront, refer to the API guide: [Customer Segment Service Tutorials](https://app.gitbook.com/s/d4POTWomuSS7d3dnh4Dg/api-guides/companies-and-customers/customer-segments/segments).\
To learn more how to manage segments in the Management Dashboard, refer to the [Segments](https://developer.emporix.io/ce/management-dashboard/customer-management/segments) documentation.
{% endhint %}
# Company Shared Orders and Customer Groups
Learn how customer groups and shared company orders can facilitate your workflows.
## Use Case
As a B2B seller, you'd like to set permissions and scopes to your end customers and respond to their specific needs. While the buyer companies have multiple representatives, with frequently different liability levels, it is crucial for them to manage the users and assign relevant permissions to the organization resources in your store. For example, they'd like to keep their purchase orders under control and therefore they'd like to be able to view the orders made not only by themselves but also the other orders that were related to their company (legal entity).
In this case, customer groups and shared orders features come very useful on the storefront. With the right access, the end customers are able to take care of user management on their own, without the need to contact your support team.
## Customer Groups in the Management Dashboard
As a B2B seller, you have an option in the Management Dashboard to create and manage B2B customer groups. Customer groups are legal-entity-aware, so the information relevant to the company can be read by the relevant customer group.
A customer group is automatically created when creating a company in the system. A customer assigned to the legal entity (company) is assigned to the customer group. Also, a new customer that signs up to the storefront, gets assigned to the customer group related to the company they provide during the registration.
To manage a customer group on behalf of your B2B customer in the Management Dashboard, go to the **Customer Management -> Groups**. You can create and edit customer groups from there. You can change and add permission scopes or manage group members.
### Adding company related orders visibility
To allow your customers to view the orders associated with the same organization, assign the `read` scope for legal entity in relation to the order objects.
{% stepper %}
{% step %}
**Go to Groups**
In the Management Dashboard, go to the **Customer Management -> Groups** module.
{% endstep %}
{% step %}
**Go to edit mode**
Edit the chosen group.
{% endstep %}
{% step %}
**Assign permissions**
In the **Customer Settings** section, assign the `read` permission for orders and save the changes.
{% endstep %}
{% endstepper %}
{% hint style="warning" %}
The system ensures orders are only shared among users assigned to the same company.\
When a customer belongs to more than one legal entity, the permissions related to the customer groups are resolved with the refresh token. When a customer switches to another legal entity, the token gets refreshed with the relevant `legalEntityId`. This way, the right scopes and permissions are received for the customer in relation to each organization. So, for one legal entity the customer can have the access to the company-related orders while for another legal entity not.
{% endhint %}
## Viewing shared orders on the storefront
Your B2B customer now has an option to monitor what has already been ordered on behalf of their organization.\
After logging in, they go to their account details.
In **My Orders**, they can view the orders placed by themselves:
But, if they have been assigned to a group with the `read for legal entity` scope for orders, they can also view the history of orders placed by other members of their company:
Viewing the orders related to the company improves the collaboration and transparency for your customers as it allows them to check the order details, return the items, or make the same order if needed.
Thanks to the scopes and permissions, they can consciously control who gets access to the company's shared information. If they don't have the right scope assigned, they're not able to see the company-related orders:
{% hint style="info" %}
To see how B2B customers can manage the users from the same legal entity on their own on the storefront, see the [User Management and Approvals](https://developer.emporix.io/ce/customer-use-cases/scenarios-introduction/right-roles) use case.
{% endhint %}
# Automated Use Cases
Explore the examples of how Emporix CE and OE systems can work together to learn how the functionalities we offer can be used in your company.
As an innovative commerce software, Commerce Engine (CE) can closely integrate with Orchestration Engine (OE), which is responsible for enhancing and improving business processes. We integrate CE and OE to enable a fully automated end-to-end process chain. This step is crucial for increasing efficiency, saving time, and providing seamless, fast, and reliable services to our customers. By eliminating manual processes and ensuring seamless collaboration between CE and OE, we strengthen excellence and innovation in digital commerce.
This documentation is build as a showcase to present business use cases that can be solved with a combination of CE and OE working together and creating one end-to-end process.
See the below business scenario as an example of an end-to-end business process:
{% hint style="warning" %}
Treat these use cases just as examples, the real life scenarios can be different.
{% endhint %}
* [First Registration Coupon](https://developer.emporix.io/ce/customer-use-cases/introduction/first-registration-coupon)
* [Availability and Warehouse Assignment](https://developer.emporix.io/ce/customer-use-cases/introduction/availability-and-warehouse)
* [Quote and Order Entry Automation](https://developer.emporix.io/ce/customer-use-cases/introduction/order-entry)
To explore more possibilities and solutions that Emporix CE and OE can provide, contact our [Sales team](mailto:sales@emporix.com) and request a demo of other use cases.
{% hint style="info" %}
For more information about Orchestration Engine, see [What is OE?](https://app.gitbook.com/s/8dAaH7DfB59pzZwLxmur/getting-started/what-is-oe) documentation.
{% endhint %}
# First Registration Coupon
Check out usage of a value stream to automate coupon creation for first time customers.
There are numbers of marketing strategies you might use to gain new customers for your online store. One of them could be a Welcome Campaign that offers a discount coupon for first time users that register at your store. Here, you might use the power of value streams that come with Orchestration Engine. You can create such a scenario with a simple value stream, like the one presented in the example.
### Overview video
{% embed url="" %}
### Process flow
In this use case, we create a simple value stream that covers the following flow:
The value stream starts automatically when a first time user registers as a customer on the storefront. The registration event serves as a trigger for OE.\
OE catches the customer creation event from the storefront and passes the customer's ID to the CE API endpoint responsible for creating coupons. CE creates a coupon and saves it in the database. As a result the discount coupon code is visible in the Management Dashboard, under **Customer Management** -> **Coupons**.
For the first time registration use case, the coupon works only for the customer with the given ID that is read from the previous step. But, the coupon can have different redemption rules, like for example, it can only work for a certain category of products, can be valid only for some period, or work only with some minimum order value, or more depending on your preferences.
The next step of the value stream takes care of sending an email to the new customer with the created coupon code. OE triggers the mailing service to send out an email with coupon details, encouraging the customer to make a purchase in your store. The customer can use the coupon straightaway at checkout if they fulfill the set coupon rules.
The value stream as described here can look like this:
{% hint style="warning" %}
This use case serves only as an example of what you can achieve with CE and OE. The value streams we presented here can be adjusted to your actual needs. For further information, contact our [Sales Team](mailto:sales@emporix.com).
{% endhint %}
# Availability and Warehouse Assignment
Check out the Emporix use case of product availability check and warehouse reassignment process.
To ensure smooth shopping experience for your customers, your online store has to have some backend mechanism to check availability of the products in your storefront site.
In B2B world, typically customers get assigned to a specific warehouse based on their address. The warehouse is determined when a customer logs in to the online store. Basing on the assigned warehouse, the customer can see the relevant availability of products in the store. Frequently, the availability data comes from external systems such as ERP or OMS. When the customer adds a product to cart, the background process has to retrieve its availability information from an external system and return it to the storefront to allow or disallow the customer complete the checkout.
In this use case, we demonstrate how you can use CE together with OE to automate the process of assigning a customer to a warehouse and triggering availability check from an external system for a product added to a cart. Additionally, when a product is not available, the automated process notifies a merchant and asks for their approval to transfer the goods delivery to another warehouse where the product is available. The product availability is reflected in the storefront making it possible to complete the checkout. The customer in turn gets a coupon code for free shipping as a form of making up for the delayed delivery. The value stream enhances customer satisfaction and increases retention rate.
Sounds like a valid use case for your business? Let's take a look at how such a value stream can be configured.
## Process flow
In this value stream, we cover the following flow:
We are going to create two value streams that can run separately: one value stream responsible for getting the right warehouse data, and another value stream taking care of checking products availability and taking appropriate actions when products are out of stock.
### Warehouse availability
When a customer logs in to the online store, the value stream for assigning a corresponding warehouse starts. OE listens to the webhook event when a customer logs in and based on the customer's address information it writes down the warehouse information in the session context.
This way, the availability of products in the storefront reflects the stock levels in the particular warehouse that the customer got assigned to. The session context holds the information about the warehouse that is later retrieved when a customer adds a product to cart.
The value stream ends here, but if the customer decides to make some purchases on the storefront, their action triggers another value stream.
### Item added to cart
1. This value stream starts when a customer adds an item to cart. Orchestration Engine is subscribed to the webhook event of logging in that triggers the workflow.
2. The product availability is checked against the warehouse stock levels and is updated in the cart.
* If the product is available, the flow ends. The customer can proceed with the checkout and complete the purchase.
* If the product is out of stock, we add conditional logic for additional steps.
* OE sends a form to a merchant with a request for transferring the missing product from another warehouse. The merchant gets a magic link to a form where they can directly act on the request.
When the merchant approves the change and the goods are transferred, it serves as a trigger to check availability and update it in the customer's cart to notify them that the items are ready to be purchased again.
If the merchant doesn't approve the transfer, the flow ends without any further changes.
* As the customer is not able to get the selected product immediately, we add a step for automatic coupon creation as a means of making the customer happy again. When the item delivery is delayed because of the necessity to change the warehouse, OE triggers CE to create a coupon code for free delivery and sends it to the customer so that they can use it to complete the transferred product purchase.
{% hint style="info" %}
Bear in mind this use case serves only as an example of what you can achieve with CE and OE. The value streams we presented here can be adjusted to your actual needs. For further information, contact [Sales team](mailto:sales@emporix.com).
{% endhint %}
# Quote and Order Entry Automation
See the use case of how the quotes and order process can be automated.
In this scenario, we'll explore how AI is used by Orchestration Engine and Commerce Engine to automate Order Entry across various sales channels. Handling sales orders by email channels requires manual involvement, which is often very time consuming and inefficient. The integration of CE, OE and AI enhances and improves business processes by minimizing manual work. You can see how Emporix contributes to automating the quote and order entry process.
The scenario covers a use case when a customer sends an email with a PDF order form. Information about this event works as a trigger for OE to start the process and then for AI to begin a quote preparation that finally leads to completing the order for the customer.
## Process flow
1. When the customer sends the email with an order request attached as a PDF file, it sets off the whole value stream.
The trigger is a starting point for the value stream and is configured to listen to the specified event and starts the process execution.
2. When the process starts with the received event, the next step is to check the purchase order identifying the products that were ordered and their quantity, calculating a quote for the order, and matching the customer with the order.\
This process step consists of smaller subflows that ensure the process is conducted step by step and all the data is parsed together.
* The step starts with AI retrieving the ordered products and creating data that includes the identifier of the ordered products and the quantity.
* When the data of the ordered products is gathered, the next part is to create a quote based on the number of the ordered items and their matching price.
* The last subflow of this process step is to match the customer ID with the placed order.
3. The data from the trigger event and the first process step is combined in a process context which fetches data from all the steps of the value stream until the last step. Using the data that is already included in the process step it's possible to move to the next step and create the actual quote. This step is based on a condition that the customer ID was found and it's possible to generate the quote.
4. When the quote is generated the process checks whether the quote can be automatically approved or whether it needs additional internal approval. In this value stream we use a business rule that says that the quote can be accepted automatically if the threshold is <4000.
The business rule is created in OE's [Rulestore](https://app.gitbook.com/s/8dAaH7DfB59pzZwLxmur/management-dashboard/rulestore) and works as a condition for the quote auto approval step. If the order value is > 4000, then the quote has to be approved manually.
5. When the quote is auto approved it creates a new event that works as a trigger for the next process steps. The trigger is to send an email to the customer.
The email contains a link to a quote that can be accepted or rejected by the customer.
This document can be prepared for the customer using [Forms](https://github.com/emporix/emporix-documentation-portal/blob/master/oe-user-guides/management-dashboard/forms/README.md) that are integrated within OE.
6. When the quote is sent to the customer, the value stream waits for another event, which is the customer response to the quote. The customer can either accept, or reject the quote. When the customer accepts the offer, and sends their response, it works as a trigger for the last step to complete the order. The customer can accept the quote directly from the link, it doesn't require any additional logging in.
Having the response from the customer who accepted the quote, the quote status is automatically updated and visible in Management Dashboard as accepted. The order is confirmed and can be completed.
# Introduction
System management tools in Emporix are designed to help you take full advantage and maximize Emporix capabilities.
The **System Management** category contains overviews of the Emporix system management functionalities. Each document describes the way that a particular concept is designed in our system.
{% hint style="info" %}
If you're looking for documentation on how to configure specific system management functionalities for your Emporix tenant, check out our [API Docs](https://app.gitbook.com/o/z8MNPigQv25NZe33g3AV/s/d4POTWomuSS7d3dnh4Dg/).
{% endhint %}
{% hint style="warning" %}
To start working with [api.emporix.io](http://api.emporix.io/), make sure to allowlist its IP: 34.128.182.253.
{% endhint %}
# Authentication and Authorization
Enable proper authentication and authorization measures to keep the system secure.
At Emporix, we care much about security of our systems to protect your data. One of the security measures that Emporix undertakes is enabling appropriate user authentication and authorization. The tools within Emporix system allow for adequate verification of user identity and access rights.
To learn more about the available tools and their configuration, see:
User Authentication:
* [Emporix Single Sign-On (SSO)](https://developer.emporix.io/ce/system-management/authentication-and-authorization/authentication/user-authentication/sso)
Customer Authentication:
* [Auth0](https://developer.emporix.io/ce/system-management/authentication-and-authorization/authentication/customer-authentication/auth0)
* [Keycloak](https://developer.emporix.io/ce/system-management/authentication-and-authorization/authentication/customer-authentication/keycloak)
Authorization:
* [Identity and Access Management (IAM)](https://developer.emporix.io/ce/system-management/authentication-and-authorization/authorization/iam)
* [Site Permissions](https://developer.emporix.io/ce/system-management/authentication-and-authorization/authorization/site-permissions)
{% hint style="info" %}
For technical implementation examples, refer to the [Customer Authentication](https://app.gitbook.com/s/d4POTWomuSS7d3dnh4Dg/quickstart/authentication-and-authorization/customer-authentication) guides.
{% endhint %}
# Authentication
# User Authentication
# Emporix Single Sign-On (SSO)
Integrate single sign-on mechanism.
Thanks to the Single sign-on functionality, working with Emporix Commerce Engine is even easier for your employees.
## Purpose
Single sign-on is an authentication scheme that allows users to log in to different business applications with a single ID without the need to re-enter authentication credentials. Enabling SSO enhances the user experience, bolsters security measures and simplifies identity management within your organization. As the SSO ensures standardized integration for backend logins, the employees can access Emporix Management Dashboard of Commerce Engine with the same login they use for other systems you've integrated with your identity provider.\
The Emporix SSO functionality has been implemented flexibly for you to integrate with an identity provider of your choice. The identity provider has to be compatible with OpenID Connect (OIDC). For example, you can integrate with Azure AD, Google, Apache Directory Server, or other.
## Features
| Business Aspect | Description |
| ---------------------- | ----------------------------------------------------------------------------------------------------------------------------------------------------------------------------------------------------------- |
| **No coding required** | Pure configuration of the identity provider to integrate with the Commerce Engine. |
| **One login only** | Only one authentication login for all the different internal applications on the merchant side. |
| **OIDC standard** | Integrating with an identity provider compatible with OpenID Connect ensures secure authentication. |
| **SSO enforcement** | Possibility to configure additional security measures to allow logging in only for the accounts set up in your IDP through SSO functionality. If you want to enable this option, get in touch with Emporix. |
## Overview
The following diagram presents the general process:\\
## Configuration
Emporix SSO functionality enables integration of external identity providers (IDP) with the Emporix authentication system. You can choose any identity provider that is compatible with OpenID Connect (OIDC) standard.
As a customer, you have to configure the IDP system of your choice and provide the required credentials to Emporix so that we can enable SSO for your tenants.
As the IDP configuration is tool-specific and dependent on your needs, we don't impose any configuration steps.\
Once you have the application registered in your identity provider, provide the credential details to Emporix. Depending on your IDP, these may be called differently, but should be equivalent to a unique identifier (for example \`Application ID\`) and secret password (for example \`client secret\`). These details are essential to enable the SSO functionality on the Emporix side.
### Redirect URI
In your IDP system, register a redirect URI with a callback function: `https://auth.emporix.io/oauth2/v1/authorize/callback`.\
The URL is where the identity platform redirects a user's client and sends security tokens after authentication.
## Login page
The login page contains the option to log in to Emporix systems using Single sign-on once you enter the configured email address:
If your email domain is configured to use SSO, once you enter it, the option to **Login with SSO** appears, and you get redirected to the IDP provider to verify your credentials. Once you are logged in, you don't have to re-enter the password to log in to the Emporix Management Dashboard.
{% hint style="warning" %}
Only already activated user accounts can use SSO to log in to Emporix tools. The newly created user accounts need to be activated first. A new user receives an invitation email with a link to set a temporary password. When the password is set, the user can log in and link the account with an OIDC account. To link the Emporix account with the external OIDC account, the temporary password is necessary.\
Temporary password can be only used for linking the account with external providers. The option to log in to the system using temporary password is blocked.
{% endhint %}
## SSO connection
After the SSO has been properly configured on IDP and Emporix, the authentication happens in the background. See how it works together on the following diagram:
Each time an employee logs in to the Developer Portal or Emporix Management Dashboard system, a request is sent to the Emporix user authentication solution with the proper IDP ID. The solution communicates with the Identity Provider system. The IDP returns a token that allows the user to log in to the Emporix Management Dashboard.
{% hint style="info" %}
To learn more how you can configure an external identity provider system, see the Azure AD example - [Quickstart: Register an application with the Microsoft identity platform](https://learn.microsoft.com/en-us/entra/identity-platform/quickstart-register-app).
{% endhint %}
# Customer Authentication
# Auth0
Authenticate users with Auth0.
### Introduction
[Auth0](https://auth0.com/) offers a versatile, ready-to-use solution for integrating authentication and authorization services into your applications.
Auth0 facilitates simplified authentication for users. Instead of having to log in separately to each individual application or platform, users can enter their credentials once and subsequently be authenticated across multiple websites or applications.
The following diagram shows the authentication and authorization flow:
### Features
| Features | Description |
| ------------------------------------- | --------------------------------------------------------------------------------------------------------------------- |
| **Universal login** | A customizable login experience that supports various identity providers. |
| **Social identity providers** | Integration with popular social platforms for authentication, including Google, Facebook, Twitter, Twitch and others. |
| **Multi-factor authentication (MFA)** | Enhances security by supporting multiple authentication factors, such as SMS, email, or authenticator apps. |
| **Log streaming** | Provides logs and monitoring capabilities to track authentication and authorization events for auditing and analysis. |
### Setting up the Auth0 account
To set up the account:
1. Register your account at [Auth0](https://auth0.com/).
2. When your account is created, go to the **Getting Started** section and choose **Create Application**.
3. Provide the application name and select **Single Page Web Applications**.
4. Choose **Create**.
5. When the application is created, provide the following application details to Emporix: domain, client ID, client secret, certificate and redirect URL.
* You can find the **Domain**, **Client ID** and **Client Secret** in the **Settings** tab.
* For the certificate go to the bottom of the **Settings** tab where you can find **Advanced Settings**. Expand the section, go to **Certificates** and copy the value of the **Signing Certificate**.
* **Redirect URL** is the URL of your storefront where the user is redirected after the Auth0 process.
When you provide the values, the configuration is now done on the Emporix side. Wait for the confirmation from us that this part is ready.
6. When the configuration is ready, you need to configure the allowed-origins and callbacks URL. Go to the **Settings** tab in you Auth0 account and enter the values in the **Application URIs** section. The values should point to your storefront, for example:
* **Allowed Callback URLs** -
* **Allowed Logout URLs** -
* **Allowed Web Origins** -
### Storefront implementation
To set up your storefront:
1. To redirect the user to Auth0 page, add a login button to the login page:
```json
```
* AUTH0\_DOMAIN - is the Domain value from the **Settings** tab in your Auht0 account
* AUTH0\_CLIENT\_ID - is the Client ID value from the **Settings** tab in your Auht0 account
* REDIRECT\_URI - is the value provided in the **Application URI** in the **Settings** tab in your Auth0 account, it should point to a place where user is redirected after the authentication flow
2. When user finishes the auth flow, Auth0 redirects the user to the URL provided in REDIRECT\_URI parameter. It adds an additional query parameter called `code`. Having the code value, you need to invoke Emporix API to exchange the Auth0 code with the Emporix token. Apart from the CODE value, you also need Emporix ${ANONYMOUS\_TOKEN}.
{% hint style="info" %}
To check how to obtain the anonymous token from Emporix, check the [Customer Service (Customer Managed)](https://app.gitbook.com/s/d4POTWomuSS7d3dnh4Dg/api-guides/companies-and-customers/customer-management/api-reference/authentication-and-authorization) documentation.
{% endhint %}
When you have the two values, invoke the following API:
```json
curl --location --request POST 'https://api.emporix.io/customer/${TENANT}/socialLogin?code=${CODE}&anonymous_token=${ANONYMOUS_TOKEN}' \
--header 'Authorization: Bearer ${ANONYMOUS_TOKEN}'
```
Response:
```json
{
"social_access_token": "eyJ23GciOiJkaXIiLCJlbmMiOiJBMjU2R0NNIiwiaXNzIjoiaHR0cH23Ly9kZXYtNjRwN2E3M2xjMHhveDVjMi51cy5hdXDoMC5jb20vIn0..AsJCnRiPn3V9GUMh.y8MQhJCZwzOnYla39L3szXOmi8MzCk6RUU_sN_GKxBqQxxtGKfoKarmiWCdZ7WlPddnfeiBcusFl69pN6mChiGv-xSej1xVK-CNrv8Lh7GL-qMgkblWcVyHSfexef8EEDFWse_17D7PkuGH1noLfVnlZsAZ2eIbWZCWL6PnyDmUegB-DEGTYxaRSu6602x8x55kRZCDqVZvg-pivv9lqb-Qrwcpb0YZrnuSKwGr6wGOQowFhJ95VmwOse5tfhoGmswuKVp_672GEMy21KiSDmkvUDItDAawASEFVcr40YQ3kYlxSjBwmQbBL0ZMXf_w4xbfzgdZXabMuItVfoGqL5lAgEq6DLEHlTTazY0GPYRV-sqxced8.buqIsoB5IfkCVik_kJunRQ",
"social_id_token": "eyJhbGci1iJSUzI1NiIsonZ5cCI6IkpXVCIsImtpZCI6ImY3cFZsUjl0WHBUZC1IS2QtemNnayJ9.eyJnaXZlbl9uYx1lIjoiTHVrYXN6ICIsImZhbWlseV9uYW1lIjoiU3R5cGthIiwibmlja25hbWUiOiJsLnN0eXBrYSIsIm5hbWUiOiJMdWthc3ogU3R5cGthIiwicGljdHVyZSI6Imh0dHBzOi8vbGgzLmdvb2dsZXVzZXJjb250ZW50LmNvbS9hL0FDZzhvY0lFYmFBZGFPY19TOUk2V2FPRVZDVF9wSkEzRzNCQ1N1Ylh3OUt3TV9UbT1zOTYtYyIsImxvY2FsZSI6ImVuLUdCIiwidXBkYXRlZF9hdCI6IjIwMjMtMTEtMThUMjA6MDI6NDEuMTc1WiIsImVtYWlsIjoibC5zdHlwa2FAZW1wb3JpeC5jb20iLCJlbWFpbF92ZXJpZmllZCI6dHJ1ZSwiaXNzIjoiaHR0cHM6Ly9kZXYtNjRwN2E3M2xjMHhveDVjMi51cy5hdXRoMC5jb20vIiwiYXVkIjoib3diWkhObVdkcG1aOWJPcldIQjVBRndpa083UVByQWciLCJpYXQiOjE3MDAzMzc3NzgsImV4cCI6MTcwMDM3Mzc3OCwic3ViIjoiZ29vZ2xlLW9hdXRoMnwxMDQ3NDE0Mjc0MDUwNDQ1NTg2NjIiLCJzaWQiOiJydGlKM003OVpRYks0ajdZQVU0WjdoNVc5TnFMdDFlNSJ9.OsV4_Gcx7o28b65f0ryq1dTd-_BnhfZflVpIK_1Hbto-tO1ggIoDUPW1il0GCQEsINZUovM637zIdoGdO7-hZdFAyXi7YTCkeHFpsjbbRaAA-BMJY9OJuVI1frNJX91d01BJju4uW6zPlEkso9WPYW-zNEn-dDYdw_O3S1K7GV_Rx4Z8XX0tBvNcyNPmeC3cgWc5yzdAPmgBC_hjGqnH84QYCDsvg0djxwd0mFZj4JDVxRzIgvNajt3dI7UksH0EuJtcPDOyZrQ3csxDUAZfvD3SgGxsh6XwDdfX5j7uhhpyzeKT9_FYyFSyl3nyncMxuFfLKT75U3gQUYD3wwSOZg",
"refresh_token": "1uKxU23p9wY9kIMsc16OMnA1qjjYvqgL",
"refresh_token_expires_in": "86399",
"session_idle_time": 120,
"token_type": "Bearer",
"access_token": "wmU2vzAR2B8drfBc9HrXobpcc1bF",
"saas_token": "eyJ0eABaOiJKV1QiLCJhbGciOiJIUzI1NiJ9.eyJzdWIiOiI45TEyMDk3NyIsImV4cCI6MTcwMDM1MjE3OCwiaWF0IjoxNzAwMzM3Nzc4LCJqdGkiOiI4ODcyYWQ5OC0yZWNlLTQ1YmItOTcyZS0xZGVkZjAwM2UyZTgifQ.TzzNTfPjaunqWBCkvMpExM8sqcJqooTfxvXoFfYRgbo",
"expires_in": 14399,
"scope": "tenant=emporix"
}
```
{% hint style="warning" %}
Store the `access_token` and `saas_token` for further communication with Emporix.
{% endhint %}
### Connecting with social applications
Auth0 can be connected with many social apps. When the apps are integrated with Auth0, users can then access your storefront with the social application login.
Twitch is an example of the application that you can integrate with.\
To configure the setup:
1. Sign up for a [Twitch Developer account](https://dev.twitch.tv/login).
2. Set up an application on the Twitch Developer portal. For the detailed instructions, see [Twitch's guide on registering an application](https://dev.twitch.tv/docs/authentication#registration).
3. Connect your Twitch application to your Auth0 application. For the detailed instructions, see [Auth0's guide on connecting apps to Twitch](https://auth0.com/docs/connections/social/twitch).
**Result**: After the configuration, users can now use the Twitch account as a way of logging in.
{% hint style="info" %}
For more information about connections to social apps, see the [Auth0 Social Connections](https://marketplace.auth0.com/features/social-connections) documentation.
{% endhint %}
# Keycloak
See how to integrate with Keycloak.
## Introduction
[Keycloak](https://www.keycloak.org) is an open-source Identity and Access Management (IAM) solution that supports standard protocols like OpenID Connect, OAuth 2.0, and SAML 2.0. Integrating Keycloak with Emporix allows for secure management of user authentication and access across applications. At the same time it reduces development effort and aligns with enterprise compliance needs.
As a centralized identity provider, Keycloak supports Single Sign-On (SSO), external identity federation and fine-grained access control.
You can integrate Emporix with Keycloak and ensure clean separation between identity management and business functionality, while at the same time meeting the diverse needs for authentication, federation, and security.
| **Feature** | **Description** |
| ------------------------------------ | ---------------------------------------------------------------------------------------- |
| **Standards-Based Authentication** | Supports OpenID Connect, OAuth 2.0, and SAML 2.0 for secure identity management. |
| **Single Sign-On (SSO)** | Enables seamless user access across multiple applications, reducing login friction. |
| **Social & External Federation** | Integrates with social logins and external IdPs like Google, Azure AD or Auth0. |
| **Customizable Login & UI** | Provides built-in, customizable UI for login, registration, and account self-management. |
| **Role-Based Access Control (RBAC)** | Fine-grained authorization based on realms, roles, and client-specific configurations. |
| **Centralized User Management** | Admin console for managing users, groups, roles, permissions, and token policies. |
## Integration setup request
If you have a Keycloak account and want to integrate with Emporix, contact our [Emporix Support Team](mailto:support@emporix.com) and provide us with the following data:
```bash
{
"domain" : "",
"token_endpoint": "",
"provider": "keycloak",
"client_id" : "",
"redirect_uri" : "",
"client_secret" : "",
"public_key" : ""
}
```
* The `domain` is the Keycloak domain value, for example, `keycloak.eu.yourdomain.com`.
* The `token_endpoint` is the endpoint that is used for the token call, for Keycloak it’s usually `protocol/openid-connect/token`.
* The `provider` is the provider that is configured for the IDP, the provider value can be then used in the state parameter, thanks to that it’s possible to have multiple configurations for one tenant, for example, `keycloak_siteA`, `keycloak_siteB`.
* The `client_id` and `client_secret` are the credentials provided by the customer, to find the credentials in the Keycloak app go to **Clients** -> **Clients list**.
* The `redirect_uri` is a value provided by customer that indicates where a user should be redirected after authentication flow. The value points storefront URL, for example, `https://storefront.emporix.io/keycloak`.
* The `public_key` is a value provided by customer as their signing certificate. It has to be stored in one line, however each line of the original certificate value should be separated by `\n`.
* Copy the value to the json in the `public_key` field and surround it with `-----BEGIN CERTIFICATE-----\n{TOKEN}\n-----END CERTIFICATE-----`
See the request example:
```bash
{
"domain" : "keycloak.eu.yourdomain.com",
"token_endpoint": "protocol/openid-connect/token",
"provider": "keycloak",
"client_id" : "showcase",
"redirect_uri" : "https://storefront.emporix.io/keycloak",
"client_secret" : "8Ku1to4R3mJAJ3tJ3u645EgKt4YfqRoN",
"public_key" : "-----BEGIN CERTIFICATE-----\nMIICnzCC+F0\n-----END CERTIFICATE-----"
}
```
# Authorization
# Identity and Access Management (IAM)
IAM Service provides out-of-the-box identity and access management.
Here you can find an overview of the Emporix identity and access management (IAM) concept, along with its features and benefits.
{% hint style="info" %}
* Looking for code tutorials? Check out the [Identity and access management (IAM) Service guide](https://app.gitbook.com/s/d4POTWomuSS7d3dnh4Dg/api-guides/users-and-permissions/iam/iam).
* Looking for API reference? Check out the [IAM Service](https://app.gitbook.com/s/d4POTWomuSS7d3dnh4Dg/api-guides/users-and-permissions/iam) in the Emporix API Reference.
{% endhint %}
### Purpose
The IAM feature has been introduced to help you control the user access level in specific services. By defining clear-cut roles and permissions, you can be sure that unauthorized users won't be able to modify or view sensitive data.\
We have prepared a set of predefined access control templates so that you can get started quickly.
### Features
The Emporix IAM concept introduces a set of features that make identity and access management easier:
| Feature | Description |
| ------------------------------------------------ | -------------------------------------------------------------------------------------------------------------------------------------------------------------------------------------------------------------------------------------------------------------------------------------------------------------------------------------------------------------------------------------------------------------------------------------------------------------------------------------------- |
| **User types** | For a tenant, there are two types of users available: customers and employees of that tenant. |
| **Employee groups** | Employee groups aggregate employees of a tenant that share the same access control within a particular service and resource. By assigning an employee to a particular group, you grant them a specific access control level. Access controls are applied to both the Emporix Management Dashboard and the APIs through scopes. To learn more about scopes, check out the [Authorization and scopes guide](https://developer.emporix.io/docs/content/introduction/#authorization-and-scopes). |
| **Access controls and access control templates** | Access controls combine both resources and roles. For example, a user with a `manager` role can view, create, delete, and edit resources within a service. You can use access control templates that contain predefined settings for roles. For more information, check out [Access control templates](#access-control-templates). |
| **Resources** | Objects within Emporix API services, for example `area` and `time` resources in the **Delivery Service**. |
| **Roles** | Roles encapsulate predefined permissions that allow users to perform actions on resources within services. For example, a user with a `manager` role can create, view, edit, and delete resources within a service. |
| **Permissions** | Permissions define what actions a user with a specific role can perform on resources within services. For example, a service might have permissions to perform the following actions on a resource: view, create, delete, and edit. |
| **Localized fields** | When creating or updating a group, permission, or role, you can specify its name and description in multiple languages. |
### Overview
The following diagram presents an example of the information flow in the IAM Service.
{% hint style="success" %}
For example, a "Catalog editors" user group may comprise of users granted edit, create, and view permissions within the Catalog resource in the Catalog service.
{% endhint %}
### Access control templates
Emporix provides you with several predefined access control templates that you can apply to a group:
| Name | Service/Resource |
| ----------------------------- | ------------------------------------------------------------------------------------------------------------------------------------------------ |
| **Catalog Manager** |
Catalog
Category
Product
Product template
Label
Brand
Supplier
Webhook
|
| **Pricing Manager** |
Price Model
Price List
Tax
Unit
|
| **Order Fulfillment Manager** |
Customer
Order
SEPA
Return
Checkout
Site
|
# Site Permissions
Site permissions provide granular access control over commerce data, such as companies (legal entities), customers, carts, orders, and quotes, across various brands, regions, or markets for employees.
Site permissions extend the existing permission management framework, so that access rights can be defined and enforced per site (or store) not just globally. This lets businesses restrict employee visibility to the specific sites or business units relevant to their roles, while still reusing the central permission management concepts such as roles, scopes, and permission policies.
Site permissions separate responsibilities across multiple sites, markets, or brands and reduce the risk of unauthorized changes. Employees, as business users, benefit from an improved and simpler experience because they only interact with the sites that are relevant to them.
## Example use cases
The functionality is particularly relevant for B2B scenarios, when multiple tenants, customers, or business units are hosted on one platform. However, it can also be valuable in B2C setups with multiple brands, countries, or storefronts where responsibilities need to be clearly separated.
:book-atlas:
Regional separation
A company operates multiple regional sites (for example, DE, FR, US), therefore needs separate access control for different regional sites. Local teams need to manage only their own region. With site-aware permissions, roles can be configured so that the German team only has access to the DE site, the French team only to FR, and the like, while global admins can still see and manage all sites.
:building-memo:
Delegated administration
A large manufacturer company shares the commerce platform with multiple distributors. They need a single shared infrastructure and centralized product data, but each distributor needs to manage their own orders and customers.
## Technical overview
Site-aware permissions build on the existing Identity and Access Management framework that enables granting users specific roles, scopes, and policies - and extend it with a site dimension. When an employee logs in or performs actions, their effective permissions are evaluated based on both their role and the current site context. Site-aware entities query these permissions with a specific site identifier to determine which data and actions are available for that employee on that site.
Technically, this is achieved through the `restriction` property added to entities that are restriction-aware, which can either automatically synchronize with site codes (default setup) or be configured independently for advanced requirements. The implementation involves updated API scopes and a revamped management interface that ensures security and operational focus by preventing unauthorised cross-site data access.
### Concepts
Here are some concepts that are crucial for site or restriction-based permissions management.
#### Restriction
The `restriction` property serves as the foundation for access control. By default, restriction serves to limit access to entities that are site-aware, by reading the associated `siteCode`. However, the restrictions can be extended by defining the custom restriction values. This provides the flexibility to handle advanced access scenarios beyond site separation. The restriction-aware entities are companies (legal entities), customers, carts, orders, and quotes.
#### Scope format
When the site permissions or custom restrictions are enabled, the system generates scopes by appending a restriction suffix to the standard permission in the format `{entity}.{action}--{restriction}`.
Examples:
* `order.order_read--DE` - for a single restriction
* `order.order_manage--DE#FR#PL` - for multiple restrictions combined
#### Access control
By defining relevant scopes, you benefit from two distinct tiers of access control, allowing you to balance central governance with granular, site-specific security.
* Global scopes (for example, `order.order_read`) - Represent the traditional, unrestricted access model, regardless of any site or restriction settings. They are designed for high-level administrators who require full visibility across the entire organisation. If a user holds a global scope, the backend service bypasses restriction filtering entirely. This is essential for "global admins" who need to manage all sites without being limited to a specific region.
* Restriction-limited scopes (for example, `order.order_read--DE`) - Introduce the permission model designed to limit a user's access to specific data subsets, such as a single country or brand. They strictly limit access to entities that match the specified restriction values:
* For `GET` operations - The backend automatically filters data, returning only entities that match the restriction.
* For `CREATE/UPDATE` operations: The system validates that the target entity belongs to the user's allowed restriction before permitting the change.
Restriction‑scoped permissions also control who can edit existing restrictions. To change a restriction on a restriction-aware entity, an employee must have the relevant manage scope. If the employee’s group includes restriction‑scoped permissions (for example, `quote.quote_manage--DE#FR`), they can create or update restrictions only to the values in their scopes (for example, `DE` or `FR`). They cannot create an entity without a restriction.
### Restrictions handling
To ensure flexibility of how you can handle and enforce relevant permissions, the functionality relies on the following implementation:
* Generic `restriction` property - The property can be added to various entities, such as companies (legal entities), customers, carts, orders, and quotes. It acts as a tag that defines which subset of data an entity belongs to. It typically aligns with a site (for example, a specific storefront site), but it is designed as a generic solution, allowing for broader use cases like regional groupings (for example, `westEU`). By default, it's empty `[]`.
* Configuration modes - Admins can handle restrictions in two distinct modes depending on their business needs with the `enableSyncBetweenRestrictionsAndSiteCodes` setting.
| **Sync `true`** | **Sync `false`** |
| :------------------------------------------------------------------------------------------------------------------------: | :----------------------------------------------------------------------------------------------------------------------------------------------------: |
| The default setup. In this mode, the restriction property automatically synchronizes with the entity's current `siteCode`. | This mode disconnects the restriction from the site code, allowing for custom definitions added in the system preferences (for example, westEU, Asia). |
## Restriction resolution when creating site-aware entities
The `restrictions` and `enableSyncBetweenRestrictionsAndSiteCodes` properties are correlated. When a restriction-aware entity is created, the system determines the entity's `restriction` value using a fixed order of precedence. The following three cases describe how the restriction is resolved.
### Case 1: No restriction in the payload, no customer restriction, sync enabled
**When it applies:** The `enableSyncBetweenRestrictionsAndSiteCodes` is set to `true`, and the request does not include a restriction value. The customer or context creation has no customer-level restriction.
**Behaviour:** The entity's `siteCode` is used as the restriction. The system automatically sets `restriction` to the same value as `siteCode`.
**Example — customer creation**
Request payload:
```json
{
"firstName": "John",
"lastName": "Doe",
"siteCode": "main",
"restriction": null
}
```
Resulting customer:
```json
{
"firstName": "John",
"lastName": "Doe",
"siteCode": "main",
"restriction": "main"
}
```
**Workflow**
```mermaid
---
config:
layout: fixed
theme: base
themeVariables:
primaryColor: '#DDE6EE'
primaryBorderColor: '#4C5359'
actorBkg: '#DDE6EE'
actorBorder: '#4C5359'
actorLineColor: '#4C5359'
signalColor: '#E86C07'
signalTextColor: '#7B8B99'
background: transparent
---
sequenceDiagram
participant Client
participant API
participant Config as Configuration Service
participant DB
Client->>API: Create entity (restriction = null, siteCode = "main")
API->>Config: getEnableSyncBetweenRestrictionsAndSiteCodes()
Config-->>API: true
API->>API: restriction = siteCode ("main")
API->>DB: Save entity (restriction = "main")
DB-->>API: Entity saved
```
### Case 2: Customer restriction present, no restriction in the payload
**When it applies:** The request does not include a restriction value, but the customer already has a restriction assigned (in the Management Dashboard, the customer restriction is visible in the **Preferred Site** or **Restriction** properties). This works independently from the sites and restrictions synchronization setting.
**Behaviour:** The new entity inherits the customer's restriction. For example, if the customer has a `restriction = DE`, a newly created cart or quote also gets the `restriction = DE`.
**Example:** A customer with the `restriction = DE` creates a cart without sending the `restriction` in the payload. The saved cart has the `restriction = DE`.
For custom restrictions setup example, a customer is assigned to a specific regional grouping restriction (for example, `restriction = westEU`) by the API or backend process. When such a customer creates carts or orders, these entities inherit the `restriction = westEU` regardless of which specific storefront (`siteCode`) the customer is browsing.
**Workflow**
```mermaid
---
config:
layout: fixed
theme: base
themeVariables:
primaryColor: '#DDE6EE'
primaryBorderColor: '#4C5359'
actorBkg: '#DDE6EE'
actorBorder: '#4C5359'
actorLineColor: '#4C5359'
signalColor: '#E86C07'
signalTextColor: '#7B8B99'
background: transparent
---
sequenceDiagram
participant Client
participant API
participant DB
Client->>API: Create cart/quote (restriction = null)
API->>DB: Load customer
DB-->>API: Customer (restriction = "DE")
API->>API: restriction inherited from customer ("DE")
API->>DB: Save entity (restriction = "DE")
DB-->>API: Entity saved
```
### Case 3: Restriction explicitly provided in the payload
**When it applies:** The request payload includes an explicit `restriction` value when creating a restriction-aware entity (such as legal entity, customer, cart, order, or quote).
**Behaviour:** The restriction from the payload takes precedence over other restrictions. It overrides both the customer's restriction and the entity's `siteCode` restrictions. As a prerequisite, the provided value must exist in the restrictions configuration; otherwise the request is rejected.
**Workflow**
```mermaid
---
config:
layout: fixed
theme: base
themeVariables:
primaryColor: '#DDE6EE'
primaryBorderColor: '#4C5359'
actorBkg: '#DDE6EE'
actorBorder: '#4C5359'
actorLineColor: '#4C5359'
signalColor: '#E86C07'
signalTextColor: '#7B8B99'
background: transparent
---
sequenceDiagram
participant Client
participant API
participant Config as Configuration Service
participant DB
Client->>API: Create entity (restriction = "PL")
API->>Config: Get allowed restrictions
Config-->>API: ["PL", "DE", "FR"]
API->>API: Payload restriction has highest priority
API->>DB: Save entity (restriction = "PL")
DB-->>API: Entity saved
```
## Employee access control
Restrictions applied to entities influence access control for employees. The permissions granted to employees become more granular and context-specific. This process is managed through the Identity and Access Management (IAM) Service and group permissions. Groups include the `restrictions` property that carries the entities visibility for group members. Employees assigned to groups with specific restrictions applied receive restricted scopes to particular entities. For example, an employee belonging to a group with access restriction for DE site and `manage` rights for order entity gets the `order.order_manage--DE` scope, while an employee belonging to a group with defined restrictions for DE and FR sites and `read` permission for order entity gets the `order.order_read--DE#FR` scope.
The scopes defined through restrictions and through specific entity rights on a group level affect what an employee can see and/or manage in the Management Dashboard.
Groups without assigned restrictions maintain full entity visibility.
{% hint style="info" %}
For more information on the employee groups and permissions management, see the [Users and Groups](https://developer.emporix.io/ce/management-dashboard/administration/usersandgroups).
{% endhint %}
### Deployment and migration
{% hint style="warning" %}
If you DO NOT need permissions separation by sites or by another factor, no action is required. The synchronization between sites and restriction is enabled by default, but it doesn't affect employees access unless you explicitly define restrictions on groups.
{% endhint %}
{% hint style="danger" %}
**Data Migration**
The feature does not affect existing data automatically. Migration of the existing data is required. Our [Support Team](mailto:support@emporix.com) can perform migration upon your request.
{% endhint %}
### Enabling site-related restrictions/permissions
To use the **site-based** restrictions to manage access control for your employees, ensure the following:
{% stepper %}
{% step %}
**Enable sites and restrictions sync**
In the Management Dashboard, go to the **Settings** -> **System Preferences** and ensure the `enableSyncBetweenRestrictionsAndSiteCodes` is set to true (the default value). The setting for the list of restrictions populates automatically with the site codes available in your tenant.
Enable sites and restrictions sync setting
List of restrictions setting
{% endstep %}
{% step %}
**Create dedicated employee groups**
Go to the **Administration** -> **Users and Groups** and create appropriate groups with site-specific access to limit access only to site-aware entities with specific site restrictions. Specify the access rights to the relevant site-aware entities (read or manage) and assign employees to the corresponding groups.
{% endstep %}
{% step %}
**Run data migration**
Contact the [Support Team](mailto:support@emporix.com) to run a migration script for the existing data.
{% endstep %}
{% endstepper %}
### Enabling independent custom restrictions
For the cases when you want to apply access control restrictions that do not map one-to-one with technical storefront sites, enable and define custom restrictions. For instance, you want to group multiple countries into a single administrative region (for example, "Western Europe") or to manage permissions based on business divisions rather than storefronts. The process to allow custom permissions is as follows:
{% stepper %}
{% step %}
**Disable site code synchronization**
In the Management Dashboard **System Preferences**, disable the `enableSyncBetweenRestrictionsAndSiteCodes` setting to be able to define custom configuration.
Sites and restrictions sync off setting
{% endstep %}
{% step %}
**Configure restrictions**
Define custom restrictions in the `restrictions` setting in the **System Preferences** (for example, westEU, eastEU, Asia).
List of custom restrictions list setting
{% endstep %}
{% step %}
**Create employee groups and assign employees**
In the **Administration** -> **Users and Groups**, create relevant groups and select the relevant custom restrictions to limit access to the entities that bear the same restriction(s). Assign specific access rights to the selected entities and add relevant employees to these groups.
{% endstep %}
{% step %}
**Adjust Backend for Frontend (BFF)**
It is essential to adjust the API requests in your BFF so that the payloads carry the relevant `restrictions` properties and populate these values to the entities. For example, assign customers to custom restrictions during registration, fetch restrictions during order creation, and more.
{% endstep %}
{% step %}
**Run data migration**
Contact the [Support Team](mailto:support@emporix.com) to run a migration script for existing data.
{% endstep %}
{% endstepper %}
{% hint style="info" %}
For more information on how to handle restrictions on the user groups level, see the [Users and Groups](https://developer.emporix.io/ce/management-dashboard/administration/usersandgroups#create-a-user-group) guide.
{% endhint %}
{% hint style="info" %}
If you're looking for instructions how to handle multiple sites in your tenant, refer to the [Multi-site Architecture](https://app.gitbook.com/s/d4POTWomuSS7d3dnh4Dg/quickstart/multisites).
{% endhint %}
# Webhook Event Publishing
Set up webhook events to ensure smooth interaction between services and systems.
Here you can find an overview of the Emporix Webhook Service, along with its features and benefits.
{% hint style="info" %}
* Looking for code tutorials? Check out the [Webhook Service guide](https://app.gitbook.com/s/d4POTWomuSS7d3dnh4Dg/api-guides/webhooks/webhook-service/webhooks-tutorial).
* Looking for API reference? Check out the [Webhook Service](https://app.gitbook.com/s/d4POTWomuSS7d3dnh4Dg/api-guides/webhooks/webhook-service) in the Emporix API Reference.
{% endhint %}
### Purpose
To move towards an event-driven architecture, we are introducing the Webhook Event Publishing functionality. This feature, implemented through the Emporix API Webhook Service, allows external systems to subscribe to internal events published by the Commerce Engine. Thanks to the Webhook Service, you do not need to call specific API endpoints to look for recent changes in services — you will be automatically notified instead.
### Features
The Webhook Service introduces the following features:
| Feature | Description |
| --------------------------------- | ------------------------------------------------------------------------------------------------------------------------------------------------------------------------------------------------------------------------------------------------------------------------------- |
| **Events** | All actions that take place in the Emporix API are considered events. For example, creating and updating a catalog in the Emporix API Catalog Service are both considered events. |
| **Event subscription management** | You can manage notifications for your Emporix tenant by subscribing to and unsubscribing from particular events. |
| **Event Gateway** | The Event Gateway is a dashboard where you pre-configure endpoints to receive notifications about events you have subscribed to in the Webhook Service. The Event Gateway acts as an intermediary, as it passes notifications from the Webhook Service directly to your tenant. |
| **Statistics** | You can retrieve statistics for the Shared Account strategy on the number of events successfully sent to the endpoints that you earlier configured in the Event Gateway. |
| **Strategy configuration** | Possible to configure within the Emporix Management Dashboard if Shared Account, Licensed Account - Svix, or Other - HTTP strategy is used. |
| **Specific Target URLs** | For the Other - HTTP strategy, it is possible to define different target URLs for different events. |
#### Webhooks strategies
You can apply one of the following strategies to your tenant:
* Svix-Shared - default strategy allowing you to use the shared Svix subscription offered by Emporix
* Svix - strategy that allows you to connect your own Svix licence
* HTTP - strategy that provides possibility to receive events notification as HTTP requests to a declared URL
### Overview
The Emporix Webhook Event Publishing process consists of the following sequence of events:
1. When an event that you subscribed to takes place, a message is sent to the Webhook Service.
2. The Webhook Service forwards the message to the Event Gateway.
3. The Event Gateway passes the event to your pre-configured endpoint for this particular event.
{% hint style="success" %}
For example, if a catalog is created in the Emporix environment, a notification is sent to the Webhook Service. The service passes the message to the Event Gateway. If you configured the `Create a new catalog` endpoint beforehand, you will receive the notification from the Event Gateway that a new catalog has been created.
{% endhint %}
{% hint style="danger" %}
With the Svix-shared strategy, the maximum number of events per tenant is limited to 5000/month. The limit resets on the first day of each month. After you exceed the set limit, the requests do not get sent. For further information about the limits, please contact the Sales department at .
{% endhint %}
{% hint style="info" %}
For more information about webhooks usage, see [Webhooks](https://developer.emporix.io/ce/management-dashboard/administration/webhooks).\
For more information on HMAC configuration, see [HTTP Webhook Strategy - HMAC Configuration](https://developer.emporix.io/ce/system-management/webhooks-user-guide/hmac-configuration).\
To see example integration with external application through webhooks, see:
* [HTTP Webhook Strategy - Integration with Azure Service Bus](https://developer.emporix.io/ce/system-management/webhooks-user-guide/azure-service-bus-integration)
* [HTTP Webhook Strategy - Integration with Amazon Simple Queue Service (SQS)](https://developer.emporix.io/ce/system-management/webhooks-user-guide/amazon-sqs-integration)
{% endhint %}
# HTTP Webhook Strategy - HMAC Configuration
Configure webhooks HMAC to ensure additional authentication layer.
{% hint style="info" %}
This article applies to **HTTP webhook strategy** only.
{% endhint %}
With the HTTP webhook strategy `active`, all the events are sent to the configured `destinationURL` through HTTP `POST` requests. These requests can be (optionally) authenticated using **HMAC** (Hash-based message authentication code). By using HMAC, you can add authentication layer and verify that the incoming data is correct and authentic.
To enable such an authentication mechanism, provide the `secretKey` in the HTTP configuration.
**HMAC** involves cryptographic hash function and a secret cryptographic key. `SHA-256` is used as a cryptographic hash function and the provided `secretKey` acts as a secret cryptographic key.
{% hint style="warning" %}
The payload sent by Emporix is secured by `emporix-event-signature`. All the fields and the nested structures are sorted alphabetically. Also, all integer numbers are formatted as integers, not as decimals (for example, the payload contains value `1` instead of `1.0`).\
To compute HMAC in a proper way on the receiver side, the order and format of the numbers has to be the same.
{% endhint %}
## Authentication process
The steps to authenticate the message are as follows:
1. The `secretKey` is used to produce a `key`.
2. The event’s payload is converted to JSON format producing a `message`.
3. The `SHA-256` hash function is used to produce an `HMAC` derived from the `message` and the `key`.
4. `HMAC` is encoded using `Base64` scheme.
5. The encoded HMAC value is attached to the request as the `emporix-event-signature` header of the HTTP request.
These steps ensure that the recipient is able to verify if the request is correctly authenticated.
## Example HMAC implementation
Here is an example JavaScript function which verifies incoming HTTP request on the receiver's side:
```js
const functions = require('@google-cloud/functions-framework');
const crypto = require('crypto');
const stringify = require('json-stable-stringify');
const secretKey = 'password123';
functions.http('helloHttp', (req, res) => {
const body = stringify(req.body); // 1
const hmac = crypto.createHmac('sha256', secretKey); // 2
hmac.update(body); // 3
const computedHmac = hmac.digest('base64'); // 4
if (computedHmac === req.headers['emporix-event-signature']) { // 5
console.log('HMAC validation passed.'); // 6
} else {
console.log("HMAC validation didn't pass."); // 7
}
res.send(`Hello ${req.query.name || req.body.name || 'World'}!`);
});
```
This simple function conveys the following logic:
1. It converts the request body into JSON. The `stringify` function from an external library is used to order all the fields and nested objects alphabetically which allows maintaining the correct order.
2. It generates the `key` based on the `secretKey`. The `secretKey` is `password123`.
3. It generates the `HMAC` using `SHA-256` hash function.
4. It encodes `HMAC` to `Base64` scheme.
5. It compares the value from the `emporix.event-signature` header with the generated `HMAC`.
* If the values match, it logs `HMAC validation passed`.\
With the above configuration, if the `secretKey` is set to `password123` on the source side, the validation passes.
* If the values do not match, it logs `HMAC validation didn't pass`.\
With the above configuration, if the `secretKey` is set to some different value than `password123` on the source side, the validation doesn't pass.
This example demonstrates how you can implement HMAC in your own setup.
# HTTP Webhook Strategy - Integration with Azure Service Bus
See the example integration with Azure Service Bus through webhooks.
Thanks to **HTTP webhook strategy**, you can choose the event service that enables communication between Emporix and external systems.\
\
This article serves as an example demonstrating how you can connect **Azure Service Bus** to receive events notifications from Emporix. Follow the steps to set up the connection on both sides. Adjust the actual implementation to your needs.\
\
**Azure Service Bus** is a messaging service that allows for communication between decoupled systems, so it can serve as a solution to connect Emporix with some other systems in your company through the webhooks functionality.
## Preparing Azure infrastructure
The integration between Emporix and Azure Service Bus in this example will use Azure Function that will act as a consumer of webhook events coming from Emporix. The Azure Function will receive the HTTP request, validate HMAC signature and send the request body to the given queue.
### Azure Service Bus
To create Azure Service Bus, go to the Azure Portal.
{% hint style="success" %}
Follow the steps described in the Microsoft documentation [Use Azure portal to create a Service Bus namespace and a queue](https://learn.microsoft.com/en-us/azure/service-bus-messaging/service-bus-quickstart-portal).
{% endhint %}
1. Create a Service Bus called `webhooking` and a queue called `webhook`.
2. Save the **Connection String** that is present in the **Shared access policies** section.
### Azure function
1. Create a Function App.
{% hint style="success" %}
Follow the steps described in the Microsoft documentation [Create your first function in the Azure portal](https://learn.microsoft.com/en-us/azure/azure-functions/functions-create-function-app-portal#create-a-function-app).
{% endhint %}
In this example, the function uses NodeJS and JavaScript.
2. Create the function locally and then deploy it to Azure.
{% hint style="success" %}
Follow the steps described in the Microsoft documentation [Develop Azure Functions locally using Core Tools](https://learn.microsoft.com/en-us/azure/azure-functions/functions-run-local?tabs=macos%2Cisolated-process%2Cnode-v4%2Cpython-v2%2Chttp-trigger%2Ccontainer-apps\&pivots=programming-language-javascript).
{% endhint %}
3. Create a new project:
```
func new --template "Http Trigger" --name MyHttpTrigger2
```
4. Modify the generated code.
a. Add a new dependency to `package.json`:
```
"@azure/service-bus": "^7.0.0"
```
b. Execute `npm install` to apply the change.
c. Provide the required information in the function's code so that the function sends the requests to Azure Service Bus.\
Let's take a look and analyze the function’s code:
```js
const { app } = require('@azure/functions');
const { ServiceBusClient } = require("@azure/service-bus");
const crypto = require('crypto');
const connectionString = "FILL_IT" // i
const queueName = "webhook"; // ii
const secretKey = 'password123'; // iii
app.http('MyHttpTrigger2', {
methods: ['GET', 'POST'],
authLevel: 'anonymous',
handler: async (req, context) => {
const serviceBusClient = new ServiceBusClient(connectionString);
const sender = serviceBusClient.createSender(queueName);
const body = JSON.stringify(req.body);
context.log(body);
const hmac = crypto.createHmac('sha256', secretKey);
hmac.update(body);
const computedHmac = hmac.digest('base64');
if (computedHmac !== req.headers['emporix-event-signature']) {
context.res = {
status: 401,
body: "HMAC validation didn't pass.",
};
}
try {
const messageBody = req.body;
const message = {
body: messageBody,
};
await sender.sendMessages(message); // iv
context.log("Message successfully sent");
context.res = {
status: 200,
body: "Message sent to the queue",
};
} finally {
await sender.close();
await serviceBusClient.close();
}
}
});
```
\\
Pay attention to the marked lines and provide relevant information:
i. `connectionString` constant - replace the value with the connection string to your Azure Service Bus instance. Find it in the **Shared access policies** section in Azure Portal.
ii. `queueName` constant - provide the value of the queue you created. Here, it equals `webhook` just as the queue we created.
iii. `secretKey` constant - provide the secret phrase for HMAC validation. You need to specify the same value in the webhooks HTTP configuration in the later steps. Here, we defined it as `password123`.
{% hint style="info" %}
Find more information on how to configure HMAC validation in [HTTP Webhook Strategy - HMAC Configuration](https://developer.emporix.io/ce/system-management/webhooks-user-guide/hmac-configuration).
{% endhint %}
iv. when HMAC validation passes, the message body is sent with the request to the queue.
5. Deploy the function to Azure by calling the command:
```
func azure functionapp publish
```
## Configuring Emporix webhooks
Now, prepare Commerce Engine.
1. Configure webhooks to send the events as HTTP POST requests. Use the following curl and provide relevant information in the placeholders:
```curl
curl -L 'https://api.emporix.io/webhook/{{tenant}}/config' \
-H 'Content-Type: application/json' \
-H 'Authorization: Bearer {{token}}' \
-d '{
"code": "http",
"active": true,
"provider": "HTTP",
"configuration": {
"secretKey": "password123",
"destinationUrl": "{{destinationUrl}}"
}
}'
```
Placeholders to fill in:
* `tenant` - name of your production tenant
* `token` - your generated Emporix access token with relevant scopes
* `destinationUrl` - link to your Azure Function
2. Subscribe to a chosen event. In this example, we subscribe to product creation event (remember to replace the values in the placeholders):
```curl
curl -L -X PATCH 'https://api.emporix.io/webhook/{{tenant}}/event-subscriptions' \
-H 'Content-Type: application/json' \
-H 'Authorization: Bearer {{token}}' \
-d '[
{
"eventType": "product.created",
"action": "SUBSCRIBE",
"fieldsToSubscribe": [
"name"
],
"fieldsToUnsubscribe": [
"description"
]
}
]
'
```
## Creating product
The integration is ready. To see it in action, let's create a product.
Create a product with the following curl request providing your relevant details in the placeholders:
```curl
curl -L 'https://api.emporix.io/product/{{tenant}}/products/' \
-H 'Content-Language: en' \
-H 'Content-Type: application/json' \
-H 'Authorization: Bearer {{token}}' \
-d '{
"name": "Test product for documentation",
"code": "unique",
"description": "product description",
"published": false
}'
```
After the product is created the event is sent. The webhook service consumes the event and sends it as HTTP request to the specified `destinationUrl`, which is the Azure Function. The Azure Function receives the request and sends it to Azure Service Bus Queue.
# HTTP Webhook Strategy - Integration with Amazon Simple Queue Service (SQS)
See the example of integration Amazon Simple Queue Service through webhooks.
Thanks to **HTTP webhook strategy**, you can choose the event service that enables communication between Emporix and external systems.\
\
This article demonstrates how you can connect **Amazon Simple Queue Service** to receive events notifications from Emporix. Follow the steps to set up the connection on both sides. Adjust the actual implementation to your needs.\
\
**Amazon Simple Queue Service (SQS)** is a service that allows for sending, storing, and receiving messages between distributed systems. As such, you can choose it as one of the solutions to connect Emporix with some other systems in your company through the webhooks functionality.
## Preparing Amazon infrastructure
The integration between Emporix and Amazon Simple Queue Service in this example will use **Amazon Lambda** that is able to receive the HTTP request, validate HMAC signature and then send the request body to the specified queue.
### Amazon Simple Queue Service (SQS)
To create SQS, go to the AWS Management Console.
{% hint style="success" %}
Follow the steps described in the AWS documentation [Creating an Amazon SQS standard queue and sending a message](https://docs.aws.amazon.com/AWSSimpleQueueService/latest/SQSDeveloperGuide/creating-sqs-standard-queues.html).
{% endhint %}
1. Create a queue called `webhooks` and use the default settings.
2. Save the URL value of your queue, which you can see in the **Details** section. This is later required in the Lambda code.
### Secret key
1. Create a `Secret Key` that is required in the later steps to set up the connection between Lambda and SQS.
{% hint style="success" %}
Follow the steps described in the AWS documentation [Where’s My Secret Access Key?](https://aws.amazon.com/blogs/security/wheres-my-secret-access-key/)
{% endhint %}
2. Save the `Access Key Id` and `Secret Key` values to provide them later in the Lambda code.
### Amazon Lambda
1. Create a Lambda function called `webhookFun`.
{% hint style="success" %}
Follow the steps described in the AWS documentation [Run a Serverless "Hello, World!" with AWS Lambda](https://aws.amazon.com/tutorials/run-serverless-code/).
{% endhint %}
The function uses NodeJS 16 and JavaScript.
2. Modify the function's code to provide necessary details in the placeholders:
```js
const AWS = require('aws-sdk');
const crypto = require('crypto');
// i
AWS.config.update({
region: 'eu-north-1',
accessKeyId: 'FILL_IT',
secretAccessKey: 'FILL_IT',
});
const sqs = new AWS.SQS();
const secretKey = 'password123'; // ii
exports.handler = async (event, context) => {
console.log(event);
const body = JSON.stringify(event.body);
const hmac = crypto.createHmac('sha256', secretKey);
hmac.update(body);
const computedHmac = hmac.digest('base64');
if (computedHmac !== event.headers['emporix-event-signature']) {
return {
statusCode: 401,
body: JSON.stringify("HMAC validation didn't pass."),
};
}
try { // iii
const messageParams = {
MessageBody: body,
QueueUrl: 'queue-url',
};
await sqs.sendMessage(messageParams).promise();
return {
statusCode: 200,
body: JSON.stringify('The message was sent to SQS queue.'),
};
} catch (error) {
console.error('Error:', error);
return {
statusCode: 500,
body: JSON.stringify('An error occured during sending message to SQS queue.'),
};
}
};
```
Pay attention to the marked lines:
i. `AWS.config` - define relevant values to the following properties: `region`, `accessKeyId` and `secretAccessKey`.
ii. `secretKey` constant - provide the secret phrase for HMAC validation. You need to specify the same value in the webhooks HTTP configuration in the later steps. Here, we defined it as `password123`.
{% hint style="info" %}
Find more information on how to configure HMAC validation in [HTTP Webhook Strategy - HMAC Configuration](https://developer.emporix.io/ce/system-management/webhooks-user-guide/hmac-configuration).
{% endhint %}
iii. when HMAC validation passes, the message body is sent with the request to the queue. Provide the `QueueUrl` which points to your queue.
3. Deploy the modified function.
### API Gateway
To fully prepare Amazon's part, API Gateway is required so that it triggers the Lambda through HTTP requests.
1. Create an API Gateway of an `HTTP API` type.
{% hint style="success" %}
Follow the steps described in the AWS documentation [Create an HTTP API](https://docs.aws.amazon.com/apigateway/latest/developerguide/getting-started.html#getting-started-create-api).
{% endhint %}
a. In the **Integrations** section, point to your Lambda.
b. For the **API name**, choose `webhooks`.
c. In **Routes**, create a `POST` route.
2. Deploy the `API Gateway` and save the url to your function. It will be needed while defining webhooks HTTP configuration on Emporix side.
## Configuring Emporix webhooks
Now, prepare Commerce Engine.
1. Configure webhooks to send the events as HTTP POST requests. Use the following curl and provide relevant information in the placeholders:
```curl
curl -L 'https://api.emporix.io/webhook/{{tenant}}/config' \
-H 'Content-Type: application/json' \
-H 'Authorization: Bearer {{token}}' \
-d '{
"code": "http",
"active": true,
"provider": "HTTP",
"configuration": {
"secretKey": "password123",
"destinationUrl": "{{destinationUrl}}"
}
}'
```
Placeholders to fill in:
* `tenant` - name of your production tenant
* `token` - your generated Emporix access token with relevant scopes
* `destinationUrl` - link to your API Gateway
2. Subscribe to a chosen event. In this example, we subscribe to the product creation event (remember to replace the values in the placeholders):
```curl
curl -L -X PATCH 'https://api.emporix.io/webhook/{{tenant}}/event-subscriptions' \
-H 'Content-Type: application/json' \
-H 'Authorization: Bearer {{token}}' \
-d '[
{
"eventType": "product.created",
"action": "SUBSCRIBE",
"fieldsToSubscribe": [
"name"
],
"fieldsToUnsubscribe": [
"description"
]
}
]
'
```
## Creating product
The integration is ready. To see it in action, let's create a product.
Create a product with the following curl request providing your relevant details in the placeholders:
```curl
curl -L 'https://api.emporix.io/product/{{tenant}}/products/' \
-H 'Content-Language: en' \
-H 'Content-Type: application/json' \
-H 'Authorization: Bearer {{token}}' \
-d '{
"name": "Test product for documentation",
"code": "unique",
"description": "product description",
"published": false
}'
```
After the product is created the event is sent. The webhook service consumes the event and sends it as HTTP request to the specified `destinationUrl`, which is the API Gateway. Then, the Lambda function receives the request and sends it to Amazon Simple Queue Service (SQS).
# Search
Good search possibility is a key to achieving sales targets.
With Emporix, you get additional ways to enhance search functionality. Check out these resources:
* [Universal Search Connector](https://developer.emporix.io/ce/system-management/search/universal-search-connector)
* [Search Configuration](https://developer.emporix.io/ce/system-management/search/search-configuration)
* [Indexing Service](https://developer.emporix.io/ce/system-management/search/indexing)
# Universal Search Connector
Universal Search Connector allows you to optimize the system and automate indexing of your products.
Here you can find an overview of the universal search connector in Emporix, along with its features and benefits.
{% hint style="info" %}
Looking for tutorials? Check out the [Search Configuration](https://developer.emporix.io/ce/system-management/search/search-configuration).
{% endhint %}
### Purpose
With the Emporix universal search connector, it is possible to gather all events happening in the system and set up automated actions that will ensue in relation to those events. Every time an object is created, updated, or deleted, the events are being indexed and sent to the Webhook Service. The webhook events are further sent out to the Svix application, which in turn updates the search engine database of your choice. The actions, as configured in Svix, can be executed in various third-party applications, as the solution is universal and widely applicable.
### Features
| Feature | Description |
| ------------------------------------------------ | ------------------------------------------------------------------------------------------------------------------------------------------------------------------------- |
| **Universal search engine integration solution** | This feature is designed to be universal in order to fit your business' needs. You can use various search engines, such as Algolia, clerk.io, constructor.io, and others. |
| **Product-related events** | All product-related events, such as price updates, product deletions, and others, trigger the indexing service that sends events to Svix. |
| **Management Dashboard navigation** | The configuration and management of the indexing feature is handled through the Emporix Management Dashboard. |
| **Webhooks integration** | Thanks to the integration with the Webhook Service, the product-related events are automatically sent out to other integrated third party applications. |
| **Event Gateway** | In the Svix application, the event gateway serves as an intermediary between Emporix services and search engines. |
### Overview
The indexing process consists of the following sequence of events:
1. When a product-related event takes place, it is processed by CE.
2. The event is consumed by a messaging system and undergoes indexing.
3. An indexing message is sent to the Webhook Service.
{% hint style="warning" %}
The indexing messages are sent in an asynchronous way. The indexing service searches for changes every two minutes to gather all related events and send them in one collective message, for example when you update the price, availability, and delivery methods of a particular product. This may result in a delay in message delivery.
{% endhint %}
4. The Webhook Service forwards the message to the Svix Event Gateway.
5. The Event Gateway passes the event to your pre-configured endpoint for this particular event, and updates the search engine database of your choice.
{% hint style="success" %}
For example, if a price is updated in the Emporix environment, an indexed message is sent to the Webhook Service. In Management Dashboard, if you enabled actions for index item updates and/or deletions, the events are passed further to the Svix Event Gateway. If an endpoint for the update/delete actions was configured in Svix, all relevant actions are executed in the third-party search engines that your system is integrated with.
{% endhint %}
# Search Configuration
Learn the possibilities for configuring search in Emporix.
You can integrate the Emporix Commerce Engine with any index providers by leveraging the webhook events concept.\
Emporix CE recognizes all changes around a product item like the product itself, its price, category or availability related to the product. If any of the connected entities is modified, our platform prepares an index-item object which contains all the necessary data.
See the event schema for an updated index item - IndexItemUpdated.
```json
"id": "String",
"code" : "String",
"siteCode" : "String",
"name" : "Map", // Localized map
"description" : "Map", // Localized map
"categoryAssignments" : [
{
"id" : "String",
"code" : "String",
"name" : "String",
"localizedName" : "Map", // Localized map
"localizedSlug" : "Map", // Localized map
"parent" : "Object"
}
],
"tags" : String[], // Array of strings
"popularity" : "Integer",
"prices" : [
{
"id" : "String",
"itemId" : {
"id" : "String",
"itemType" : "String" // PRODUCT
},
"currency" : "String",
"originalAmount" : "Number",
"effectiveAmount" : "Number",
"location" : {
"countryCode" : "String"
},
"salePrice" : {
"discountAmount" : "Double",
"discountRate" : "Double",
"description" : "String"
},
"priceModelId" : "String",
"priceModel" : {
"id" : "String",
"name" : "Map", // Localized map
"description" : "Map", // Localized map
"includesTax" : "Boolean",
"measurementUnit" : {
"quantity" : "Double",
"unitCode" : "String"
},
"tierDefinition" : {
"tierType" : "String",
"tiers" : [
{
"id" : "String",
"minQuantity" : {
"quantity" : "Double",
"unitCode" : "String"
}
}
]
}
},
"restrictions" : {
"validity" : {
"from" : "String",
"to" : "String"
},
"siteCodes" : "String[]" // Array of strings
},
"tierValues" : [
{
"id" : "String",
"priceValue" : "Double"
}
],
"mixins" : "Map",
"siteCode" : "String"
}
],
"medias" : [
{
"url" : "String",
"position" : "Integer",
"contentType" : "String",
"customAttributes" : Map
}
],
"availability" : {
"id" : "String",
"stockLevel" : "Double",
"productId" : "String",
"site" : "String",
"available" : "Boolean",
"popularity" : "Integer",
"distributionChannel" : "String"
},
"mixins" : "Map",
"published" : "Boolean",
"available" : "Boolean"
```
See an example of the index-item object and what is emitted every time a product is created or updated.
```json
{
"availability": {
"available": false,
"distributionChannel": "ASSORTMENT",
"id": "main:643dacfad50d664c58694c2d",
"popularity": -2147483648,
"productId": "643dacfad50d664c58694c2d",
"site": "main",
"stockLevel": 2313
},
"available": false,
"categoryAssignments": [
{
"id": "79eccb8b-b163-4cb9-9528-ed9468b9f740",
"localizedName": {
"en": "c1"
},
"name": "c1"
}
],
"code": "Oranges",
"id": "643dacfad50d664c58694c2d",
"medias": [
{
"contentType": "image/jpeg",
"customAttributes": {
"height": 800,
"name": "oranges.jpeg",
"sizeKB": 156.7138671875,
"width": 1200
},
"mainImage": false,
"url": "http://res.cloudinary.com/saas-ag/image/upload/v1681763617/lsindexdbstage/media/643dad208fc03d22f4e857e6"
}
],
"popularity": -2147483648,
"prices": [
{
"currency": "EUR",
"effectiveAmount": 1.55,
"id": "643dad10c0dc2925289a6206",
"itemId": {
"id": "643dacfad50d664c58694c2d",
"itemType": "PRODUCT",
"name": {
"en": "Oranges"
}
},
"location": {
"countryCode": "DE"
},
"originalAmount": 1.55,
"priceModel": {
"description": {
"en": "Default price model"
},
"id": "63402c86af907617bb4e1234",
"includesTax": false,
"measurementUnit": {
"quantity": 1,
"unitCode": "pc"
},
"name": {
"en": "Default price model"
},
"tierDefinition": {
"tierType": "BASIC",
"tiers": [
{
"id": "63402c86af907617bb4e9826",
"minQuantity": {
"quantity": 0,
"unitCode": "pc"
}
}
]
}
},
"priceModelId": "63402c86af907617bb4e1234",
"restrictions": {
"siteCodes": [
"main"
]
},
"siteCode": "main",
"tierValues": [
{
"id": "63402c86af907617bb4e9826",
"priceValue": 1.55
}
]
}
],
"published": true,
"siteCode": "main",
"tags": [
"product",
"published"
]
}
```
See the event schema for a deleted index item - IndexItemDeleted.
```json
"id": "String",
"siteCode" : "String"
```
See an example message that is sent when a product is deleted.
```json
{
"id": "643dab38a9e0f24d6bda45ee",
"siteCode": "main"
}
```
## Enabling webhook service
1. Log in to the Management Dashboard and go to **Administration** -> **Webhooks**.
2. Choose the webhooks strategy that best suits your needs.
{% hint style="info" %}
For more information on webhooks strategies and configuration, see [Webhooks](https://developer.emporix.io/ce/management-dashboard/administration/webhooks).
{% endhint %}
3. Extend the **Index item** webhook details and enable the **Index item updated** and the **Index item deleted** events.
4. Depending on the chosen webhook strategy, there are different ways to configure the endpoints for receiving notifications about events happening in the system. Configure your strategy to be able to process the events.
See example webhook configuration
For Svix-shared strategy, you can use Open Svix Dashboard option to configure the relevant endpoints.
1. Go to **Endpoints** and choose the **Add Endpoint** button to start the endpoint configuration.
For testing purposes, you can use **Svix Play** configuration, it automatically creates a sandbox destination.
2. In the **Message Filtering** section, choose the **index-item** events:
* `index-item.deleted`
* `index-item.updated`
3. Save your endpoint configuration by choosing the **Create** button.
You can test the configuration by going back to the Emporix Management Dashboard and adding a new product.\
After a few minutes, you should see the updated delivery statistics in Svix.
## Search provider configuration
Commerce Engine allows you to configure your own search functionality. You can choose any provider that suits your needs. For demonstration purposes of how you can configure search through the webhooks functionality, we present examples of configuring **Algolia** and **BatteryIncluded**. These are the search engines that can be configured to work with Emporix CE and Svix.
{% hint style="info" %}
To learn more about **Algolia**, see [algolia.com](https://www.algolia.com/).\
To learn more about **BatteryIncluded**, see [batteryincluded.ai](https://batteryincluded.ai/en/).
{% endhint %}
### Prerequisites
Before you start configuring a search engine in Emporix, ensure the following:
* Enable the **Index item updated** and **Index item deleted** events are enabled in Management Dashboard, see [Enabling webhook service](#enabling-webhook-service).
* Activate Algolia or BatteryIncluded account.
**Initial steps**
1. Log in to the Management Dashboard and go to **Administration** -> **Webhooks**.
2. Go to Svix by choosing the **Open Svix Dashboard** button.
3. To start the endpoint configuration, go to **Endpoints**.
4. Follow the steps for one of the providers: Algolia or BatteryIncluded.
### Algolia Configuration
**Creating and updating products**
1. In **Endpoints**, choose **Add Endpoint** and fill in the fields with the following values:
* Endpoint URL - `https://{ALGOLIA_APPLICATION_ID}.algolia.net/1/indexes` - provide your Algolia application ID
* Description - `Algolia Create/Update`
* Message filtering - select only the `index-item.updated` event
2. Choose **Create** and check if your configuration was properly saved.
3. Go to the **Advanced** tab, provide the required custom headers and enable the transformation feature:
* Key: `X-Algolia-API-Key`\
Value: `YOUR_ALGOLIA_ADMIN_API_KEY`
* Key: `X-Algolia-Application-Id`\
Value: `YOUR_ALGOLIA_APPLICATION_ID`
Find the right values for your keys in your application settings (API Keys) in your Algolia account.
4. In the **Transformations** section, set the **transformation** feature to **enabled**.
5. In **Edit transformation**, start working on the Algolia mapping.
Since there are differences between the default mapping in Svix and Algolia requirements, we need to adjust the mapping to make it work properly.
The default mapping available in Svix is as follows:
```json
/**
* @param webhook the webhook object
* @param webhook.method destination method. Allowed values: "POST", "PUT"
* @param webhook.url current destination address
* @param.webhook.eventType current webhook Event Type
* @param webhook.payload JSON payload
* @param.webhook.cancel whether to cancel dispatch of the given webhook
*/
function handler(webhook) {
// modify the webhook object...
// and return it
return webhook
}
```
\
According to Algolia API Reference, the request that should be sent is as follows:
```json
curl "https://${APPLICATION_ID}.algolia.net/1/indexes/contacts/myID" \
-X PUT \
-H "X-Algolia-API-Key: ${API_KEY}" \
-H "X-Algolia-Application-Id: ${APPLICATION_ID}" \
-d '{
"name": "Betty Jane Mccamey",
"company": "Vita Foods Inc.",
"email": "betty@mccamey.com"
}'
```
To learn more about Algolia API, see [Algolia API Reference](https://www.algolia.com/doc/rest-api/search/#add-or-replace-object-by-id).
In the **Edit transformation** section, change the code to create the right mapping:\
\
a. Change the http method:
```json
/**
* @param webhook the webhook object
* @param webhook.method destination method. Allowed values: "POST", "PUT"
* @param webhook.url current destination address
* @param.webhook.eventType current webhook Event Type
* @param webhook.payload JSON payload
* @param.webhook.cancel whether to cancel dispatch of the given webhook
*/
function handler(webhook) {
webhook.method = "PUT";
return webhook
}
```
\
b. Modify the target URL:
```json
/**
* @param webhook the webhook object
* @param webhook.method destination method. Allowed values: "POST", "PUT"
* @param webhook.url current destination address
* @param.webhook.eventType current webhook Event Type
* @param webhook.payload JSON payload
* @param.webhook.cancel whether to cancel dispatch of the given webhook
*/
function handler(webhook) {
var indexName = "emporix_" + webhook.payload.siteCode;
webhook.url = webhook.url + "/" + indexName + "/" + webhook.payload.id;
webhook.method = "PUT";
return webhook
}
```
\
c. Optional: Modify the message body. For example, you can add additional field like image based on media field:
```json
/**
* @param webhook the webhook object
* @param webhook.method destination method. Allowed values: "POST", "PUT"
* @param webhook.url current destination address
* @param.webhook.eventType current webhook Event Type
* @param webhook.payload JSON payload
* @param.webhook.cancel whether to cancel dispatch of the given webhook
*/
function handler(webhook) {
if(webhook.payload.medias && webhook.payload.medias.length > 0) {
webhook.payload.image = webhook.payload.medias[0].url;
}
var indexName = "emporix_" + webhook.payload.siteCode;
webhook.url = webhook.url + "/" + indexName + "/" + webhook.payload.id;
webhook.method = "PUT";
return webhook
}
```
6. Choose **Run test** for the `index-item.updated` payload. As a result, you can see your transformed output.
7. If the output is correct, save your changes.
To test the configuration, create a product in Management Dashboard and after a few minutes check if it appears in your index in the Algolia account. With this configuration, every time when a product is created or updated, the appropriate event is propagated to Svix, transformed and sent to Algolia.
**Deleting products**
1. In **Endpoints**, choose the **Add Endpoint**. Fill in the fields with the following values:
* Endpoint URL - `https://{ALGOLIA_APPLICATION_ID}.algolia.net/1/indexes` - provide your Algolia application ID
* Description - `Algolia Delete`
* Message filtering - select only the `index-item.deleted` event
2. Choose **Create** and check if your configuration was properly saved.
3. Go to the **Advanced** tab, provide the required custom headers and enable the transformation feature:
* Key: `X-Algolia-API-Key`\
Value: `YOUR_ALGOLIA_ADMIN_API_KEY`
* Key: `X-Algolia-Application-Id`\
Value: `YOUR_ALGOLIA_APPLICATION_ID`
Find the right values for your keys in your application settings (API Keys) in your Algolia account.
4. In the **Transformations** section, set the **transformation** feature to **enabled**.
According to Algolia API Reference, the request that should be sent is as follows:
```json
curl -X DELETE \
-H "X-Algolia-API-Key: ${API_KEY}" \
-H "X-Algolia-Application-Id: ${APPLICATION_ID}" \
"https://${APPLICATION_ID}.algolia.net/1/indexes/contacts/myID"
```
To learn more about Algolia API, see [Algolia API Reference](https://www.algolia.com/doc/rest-api/search/#add-or-replace-object-by-id).
In the **Edit transformation** section, change the code to create the right mapping:\
\
a. Change the http method:
```json
/**
* @param webhook the webhook object
* @param webhook.method destination method. Allowed values: "POST", "PUT"
* @param webhook.url current destination address
* @param.webhook.eventType current webhook Event Type
* @param webhook.payload JSON payload
* @param.webhook.cancel whether to cancel dispatch of the given webhook
*/
function handler(webhook) {
webhook.method = "DELETE";
return webhook
}
```
\
b. Change the target URL:
```json
/**
* @param webhook the webhook object
* @param webhook.method destination method. Allowed values: "POST", "PUT"
* @param webhook.url current destination address
* @param.webhook.eventType current webhook Event Type
* @param webhook.payload JSON payload
* @param.webhook.cancel whether to cancel dispatch of the given webhook
*/
function handler(webhook) {
var indexName = "emporix_" + webhook.payload.siteCode;
webhook.url = webhook.url + "/" + indexName + "/" + webhook.payload.id;
webhook.method = "DELETE";
return webhook
}
```
c. If the output is correct, save your changes.
To test the configuration, delete a product in Management Dashboard and after a few minutes check if it was deleted in your index in the Algolia account. With this configuration, every time when a product gets deleted, the appropriate event is propagated to Svix, transformed and then sent to Algolia.
### BatteryIncluded Configuration
**Creating and updating products**
1. In **Endpoints**, choose **Add Endpoint**. Fill in the fields with the following values:
* Endpoint URL - `https://api.batteryincluded.io/api/v1/collections/{BATTERY_INCLUDED_TENANT}/documents/import`
* Description - `BatteryIncluded Create/Update`
* Message filtering - select only the `index-item.updated` event
{% hint style="success" %}
Replace the `{BATTERY_INCLUDED_TENANT}` with the value from the URL address in the BatteryIncluded Portal. For example, if the URL looks like this `https://portal.batteryincluded.io/#/discover/customer.emporix`, the `{BATTERY_INCLUDED_TENANT}` value is `customer.emporix`.
{% endhint %}
2. Choose **Create** and check if your configuration was properly saved.
3. Go to the **Advanced** tab, provide the required custom headers:
* Key: `X-BI-API-KEY` Value: Your private integration key
Find the right values for your keys in your connection settings in your BatteryIncluded account.
To test the configuration, create a product in Management Dashboard and after a few minutes check if it appears in your index in the BatteryIncluded account. With this configuration, every time when a product is created or updated, the appropriate event is propagated to Svix, transformed and then sent to BatteryIncluded.
**Deleting products**
1. In **Endpoints**, choose **Add Endpoint**. Fill in the fields with the following values:
* Endpoint URL - `https://api.batteryincluded.io/api/v1/collections/{BATTERY_INCLUDED_TENANT}/documents/delete`
* Description - `BatteryIncluded Delete`
* Message filtering - select only the `index-item.deleted` event
{% hint style="success" %}
Replace the `{BATTERY_INCLUDED_TENANT}` with the value from the URL address in the BatteryIncluded Portal. For example, if the URL looks like this `https://portal.batteryincluded.io/#/discover/customer.emporix`, the `{BATTERY_INCLUDED_TENANT}` value is `customer.emporix`.
{% endhint %}
2. Choose **Create** and check if your configuration was properly saved.
3. Go to the **Advanced** tab, provide the required custom headers and enable the transformation feature:
* Key: `X-BI-API-KEY` Value: Your private integration key
4. In the **Transformations** section, set the **transformation** feature to **enabled**.
5. In the **Edit transformation** section, change the code to create the right mapping. Modify the HTTP method:
```json
/**
* @param webhook the webhook object
* @param webhook.method destination method. Allowed values: "POST", "PUT"
* @param webhook.url current destination address
* @param.webhook.eventType current webhook Event Type
* @param webhook.payload JSON payload
* @param.webhook.cancel whether to cancel dispatch of the given webhook
*/
function handler(webhook) {
// modify the webhook object...
// convert data
const playload = [webhook.payload.id]
webhook.method = "DELETE";
webhook.payload = playload
return webhook
}
```
6. If the output is correct, save your changes.
To test the configuration, delete a product in Management Dashboard and after a few minutes check if it was deleted in your index in the BatteryIncluded account. With this configuration, every time when a product is deleted, the appropriate event is propagated to Svix, transformed and then sent to BatteryIncluded.
# Indexing Service
Configure search indexer to bring great searching experience on your storefront.
The Indexing Service is designed to help you configure the search index in your Emporix instance.
The Indexing Service is responsible for including all your resources, such as products, or categories, in the search index and make them searchable on your storefront.\
You have to enable your own indexing service on Emporix by providing your credentials for the index provider into CE platform. Currently, the supported index provider is [Algolia](https://www.algolia.com/). For more information how you can configure search, see [Search Configuration](https://developer.emporix.io/ce/system-management/search/search-configuration).
The Indexing Service gives you the possibility to provide your own API keys to the indexing provider, separately for each tenant. This approach gives you more flexibility in configuration.
There are two groups of endpoints in the Indexing Service:
* Secured endpoints - that require a security scope and serve managing configuration.
Example response:
```
{
"active": true,
"searchKey": "84dc4886f81f805c42bdd89d64de751a",
"applicationId": "8AP2HABA2I",
"indexName": "exampleTenant",
"provider": "ALGOLIA",
"writeKey": "51ebe89215dddcf85e5dacd5643d17e7"
}
```
* Public endpoints - that do not require any security scopes and they can be used directly on a storefront. The public endpoints do not return a `writeKey`, but a `searchKey` only.
Even though the public endpoints do not require any scopes, an authorization token is required to complete the request.
Example response:
```
{
"active": true,
"searchKey": "84dc4886f81f805c42bdd89d64de751a",
"applicationId": "8AP2HABA2I",
"indexName": "exampleTenant",
"provider": "ALGOLIA"
}
```
## Reindexing data
Be aware that changing configuration for indexing provider isn't enough to apply your changes in the index. Usually, the indexing process of your data is triggered by changes done on your products, or dependant entities, such as category, price, media etc. There is a scheduler job that discovers the delta changes on the resource data and starts reindexing of the updated instances, so that they are searchable on the storefront.\
Applying the changes done to the search index configuration require updating all existing product data. To avoid updating all the data, there is a reindexing mechanism available. So, if you change the index configuration, remember to reindex all your product data by using the `reindex` endpoint.
## Indexing strategies
As Emporix is a multi-site solution, data on each site may differ, such as `availability` or `price`. Therefore, site-aware data must be included in the index. The Indexing Service provides two index strategies:
* **SPLIT**: The default strategy. The strategy creates as many indices as the number of sites declared in the system. The index item does not contain `sitePrices` and `siteAvailabilities` fields. All the site-aware fields are available on the root level. This approach may be more flexible as a particular index contains only information related to one site. But, the fields that are not site-aware, like `description`, `name` etc are duplicated across all the indices. The number of indices is significantly higher.
See an example index with SPLIT strategy
```
{
"name": [
"Banana"
],
"localizedName": {
"en": "Banana"
},
"categories": [
"Food"
],
"popularity": 0,
"prices": [
{
"id": "659bd4e09862ec2ec136a61b",
"itemId": {
"itemType": "PRODUCT",
"id": "659bd4bfb9ce7a0b975c33eb",
"name": {
"en": "Banana"
}
},
"currency": "EUR",
"originalAmount": 1.99,
"effectiveAmount": 1.99,
"location": {
"countryCode": "DE"
},
"priceModelId": "63402c86af907617bb4e1234",
"priceModel": {
"id": "63402c86af907617bb4e1234",
"name": {
"en": "Default price model"
},
"description": {
"en": "Default price model"
},
"includesTax": false,
"measurementUnit": {
"quantity": 1,
"unitCode": "pc"
},
"tierDefinition": {
"tierType": "BASIC",
"tiers": [
{
"minQuantity": {
"quantity": 0,
"unitCode": "pc"
},
"id": "63402c86af907617bb4e9826"
}
]
}
},
"restrictions": {
"validity": null,
"siteCodes": [
"main"
]
},
"tierValues": [
{
"id": "63402c86af907617bb4e9826",
"priceValue": 1.99
}
],
"siteCode": "main"
}
],
"description": [
"Banana "
],
"localizedDescription": {
"en": "Banana "
},
"image": "http://res.cloudinary.com/saas-ag/image/upload/v1704711465/lspaymentstage/media/659bd5286bec48360e3b3a83",
"code": "Banana",
"categoriesMissing": false,
"available": false,
"distributionChannel": [
"ASSORTMENT"
],
"category_assignments": [
{
"id": "2918ddc4-0c1c-4977-bb91-a4c366c535a6",
"name": "Food",
"localizedName": {
"en": "Food"
},
"code": "food",
"localizedSlug": {
"en": "food"
},
"parent": null
}
],
"category_levels": {
"level0": [
"Food"
]
},
"_tags": [
"product",
"published"
],
"category_ids": [
"2918ddc4-0c1c-4977-bb91-a4c366c535a6"
],
"objectID": "urn:yaas:saasag:caasproduct:product:TENANT;659bd4bfb9ce7a0b975c33eb"
}
```
* **MERGE**: An alternative strategy. The strategy creates just a single index that contains information from all the sites. The site-aware information is stored in `sitePrices` and `siteAvailabilities` properties. These properties are maps where a key corresponds to a site code and a value corresponds to the `price` or `availability` object respectively. This approach is more performant as you have only one index.
See an example index with MERGE strategy
```
{
"name": [
"Banana"
],
"localizedName": {
"en": "Banana"
},
"categories": [
"Food"
],
"popularity": 0,
"prices": [
{
"id": "659bd4e09862ec2ec136a61b",
"itemId": {
"itemType": "PRODUCT",
"id": "659bd4bfb9ce7a0b975c33eb",
"name": {
"en": "Banana"
}
},
"currency": "EUR",
"originalAmount": 1.99,
"effectiveAmount": 1.99,
"location": {
"countryCode": "DE"
},
"priceModelId": "63402c86af907617bb4e1234",
"priceModel": {
"id": "63402c86af907617bb4e1234",
"name": {
"en": "Default price model"
},
"description": {
"en": "Default price model"
},
"includesTax": false,
"measurementUnit": {
"quantity": 1,
"unitCode": "pc"
},
"tierDefinition": {
"tierType": "BASIC",
"tiers": [
{
"minQuantity": {
"quantity": 0,
"unitCode": "pc"
},
"id": "63402c86af907617bb4e9826"
}
]
}
},
"restrictions": {
"validity": null,
"siteCodes": [
"main"
]
},
"tierValues": [
{
"id": "63402c86af907617bb4e9826",
"priceValue": 1.99
}
],
"siteCode": "main"
}
],
"description": [
"Banana"
],
"localizedDescription": {
"en": "Banana"
},
"image": "http://res.cloudinary.com/saas-ag/image/upload/v1704711465/lspaymentstage/media/659bd5286bec48360e3b3a83.jpg",
"code": "Banana",
"categoriesMissing": false,
"available": false,
"distributionChannel": [
"ASSORTMENT"
],
"sitePrices": {
"DE": [
{
"id": "659bd4f29862ec2ec136a61c",
"itemId": {
"itemType": "PRODUCT",
"id": "659bd4bfb9ce7a0b975c33eb",
"name": {
"en": "Banana"
}
},
"currency": "EUR",
"originalAmount": 2.49,
"effectiveAmount": 2.49,
"location": {
"countryCode": "DE"
},
"priceModelId": "63402c86af907617bb4e1234",
"priceModel": {
"id": "63402c86af907617bb4e1234",
"name": {
"en": "Default price model"
},
"description": {
"en": "Default price model"
},
"includesTax": false,
"measurementUnit": {
"quantity": 1,
"unitCode": "pc"
},
"tierDefinition": {
"tierType": "BASIC",
"tiers": [
{
"minQuantity": {
"quantity": 0,
"unitCode": "pc"
},
"id": "63402c86af907617bb4e9826"
}
]
}
},
"restrictions": {
"validity": null,
"siteCodes": [
"DE",
"FR"
]
},
"tierValues": [
{
"id": "63402c86af907617bb4e9826",
"priceValue": 2.49
}
],
"siteCode": "DE"
}
],
"main": [
{
"id": "659bd4e09862ec2ec136a61b",
"itemId": {
"itemType": "PRODUCT",
"id": "659bd4bfb9ce7a0b975c33eb",
"name": {
"en": "Banana"
}
},
"currency": "EUR",
"originalAmount": 1.99,
"effectiveAmount": 1.99,
"location": {
"countryCode": "DE"
},
"priceModelId": "63402c86af907617bb4e1234",
"priceModel": {
"id": "63402c86af907617bb4e1234",
"name": {
"en": "Default price model"
},
"description": {
"en": "Default price model"
},
"includesTax": false,
"measurementUnit": {
"quantity": 1,
"unitCode": "pc"
},
"tierDefinition": {
"tierType": "BASIC",
"tiers": [
{
"minQuantity": {
"quantity": 0,
"unitCode": "pc"
},
"id": "63402c86af907617bb4e9826"
}
]
}
},
"restrictions": {
"validity": null,
"siteCodes": [
"main"
]
},
"tierValues": [
{
"id": "63402c86af907617bb4e9826",
"priceValue": 1.99
}
],
"siteCode": "main"
}
],
"FR": [
{
"id": "659bd4f29862ec2ec136a61c",
"itemId": {
"itemType": "PRODUCT",
"id": "659bd4bfb9ce7a0b975c33eb",
"name": {
"en": "Banana"
}
},
"currency": "EUR",
"originalAmount": 2.49,
"effectiveAmount": 2.49,
"location": {
"countryCode": "DE"
},
"priceModelId": "63402c86af907617bb4e1234",
"priceModel": {
"id": "63402c86af907617bb4e1234",
"name": {
"en": "Default price model"
},
"description": {
"en": "Default price model"
},
"includesTax": false,
"measurementUnit": {
"quantity": 1,
"unitCode": "pc"
},
"tierDefinition": {
"tierType": "BASIC",
"tiers": [
{
"minQuantity": {
"quantity": 0,
"unitCode": "pc"
},
"id": "63402c86af907617bb4e9826"
}
]
}
},
"restrictions": {
"validity": null,
"siteCodes": [
"DE",
"FR"
]
},
"tierValues": [
{
"id": "63402c86af907617bb4e9826",
"priceValue": 2.49
}
],
"siteCode": "FR"
}
]
},
"siteAvailabilities": {
"DE": {
"id": "DE:659bd4bfb9ce7a0b975c33eb",
"stockLevel": 700,
"productId": "659bd4bfb9ce7a0b975c33eb",
"site": "DE",
"available": false,
"popularity": 0,
"distributionChannel": "ASSORTMENT"
},
"main": {
"id": "main:659bd4bfb9ce7a0b975c33eb",
"stockLevel": 999,
"productId": "659bd4bfb9ce7a0b975c33eb",
"site": "main",
"available": false,
"popularity": 0,
"distributionChannel": "ASSORTMENT"
},
"FR": {
"id": "FR:659bd4bfb9ce7a0b975c33eb",
"stockLevel": 50,
"productId": "659bd4bfb9ce7a0b975c33eb",
"site": "FR",
"available": false,
"popularity": 0,
"distributionChannel": "ASSORTMENT"
}
},
"category_assignments": [
{
"id": "2918ddc4-0c1c-4977-bb91-a4c366c535a6",
"name": "Food",
"localizedName": {
"en": "Food"
},
"code": "food",
"localizedSlug": {
"en": "food"
},
"parent": null
}
],
"category_levels": {
"level0": [
"Food"
]
},
"_tags": [
"product",
"published"
],
"category_ids": [
"2918ddc4-0c1c-4977-bb91-a4c366c535a6"
],
"objectID": "urn:yaas:saasag:caasproduct:product:lspaymentstage;659bd4bfb9ce7a0b975c33eb"
}
```
### Changing index strategy
Changing the index strategy can be done in the following ways:
* **System Preferences** of the Emporix Management Dashboard: see the [System Preferences](https://developer.emporix.io/ce/management-dashboard/settings/system-preferences).
* API request to the Configuration Service
(If there is an already existing configuration for your tenant, send `PUT` request to update configuration. If there is no configuration yet, first send the `POST` request to create one. If there is no configuration, the SPLIT strategy is used by default.)
{% hint style="danger" %}
Please remain patient as propagating changes to the index strategy may take up to 1 hour, so you might not be able to see the changes instantly.
{% endhint %}
Example request with SPLIT strategy
```curl
curl --location --request PUT 'https://api.emporix.io/configuration/{TENANT}/configurations/indexing_siteAwareFieldsStrategy' \
--header 'authorization: Bearer {TOKEN}' \
--header 'Content-Type: application/json' \
--data-raw '{
"key": "indexing_siteAwareFieldsStrategy",
"value": {
"strategy": "SPLIT"
}
}'
```
Example request with MERGE strategy
```curl
curl --location --request PUT 'https://api.emporix.io/configuration/{TENANT}/configurations/indexing_siteAwareFieldsStrategy' \
--header 'authorization: Bearer {TOKEN}' \
--header 'Content-Type: application/json' \
--data-raw '{
"key": "indexing_siteAwareFieldsStrategy",
"value": {
"strategy": "MERGE"
}
}'
```
{% hint style="info" %}
* Looking for API tutorials? Check out [Indexing Service Tutorial](https://app.gitbook.com/s/d4POTWomuSS7d3dnh4Dg/api-guides/configuration/indexing-service/indexing).
* Looking for API reference? Check out the [Indexing Service](https://app.gitbook.com/s/d4POTWomuSS7d3dnh4Dg/api-guides/configuration/indexing-service) in the Emporix API Reference.
{% endhint %}
# Optimistic Locking
Ensure smooth simultaneous work for multiple users with optimistic locking mechanism.
**Optimistic locking** is a concurrency control mechanism that prevents overriding another user's changes when multiple transactions accessing the same data are happening simultaneously. The main idea behind it is to avoid the use of locks and instead assume that conflicts between operations are rare. With optimistic locking, we can ensure better performance of the Emporix applications.\
Within **Commerce Engine**, optimistic locking is based on the `metadata.version` field. It's supported at the API level, but it also works within Management Dashboard directly.
{% hint style="info" %}
All the entities that have `metadata.version` field defined use the optimistic locking. Entities that don't have such field defined, don't support optimistic locking. You can check if a particular entity has that field defined in our [API Documentation](https://app.gitbook.com/o/z8MNPigQv25NZe33g3AV/s/d4POTWomuSS7d3dnh4Dg/).\
For API calls, ensure to provide the correct `metadata.version` in `PUT` operations to turn on the optimistic locking feature.\
For `PATCH` operations, providing `metadata.version` is optional, so if you don't provide the value, optimistic locking is skipped.
{% endhint %}
All the `metadata` fields are set during a document creation in the database, and their values are as follows:
* `version = 1`
* `createdAt = Instant.now()`
* `modifiedAt = Instant.now()`
Here’s how optimistic locking works:
1. **Version check**: Triggered by an API request or an action within Management Dashboard, the optimistic locking mechanism checks if the request includes the `metadata.version` field.
2. **Transaction processing**: The transaction proceeds with the requested changes and updates the data tentatively only in memory, excluding `id` and `metadata` fields from the payload.
3. **Document update**: The mechanism updates the `metadata` fields:
* `metadata.version` increased by 1
* `metadata.modifiedAt` set to the current time
4. **Database update**: The relevant document with matching `id` and `metadata.version` is found in the database and updated accordingly. However, if the document cannot be found due to the fact that another operation that has run in the system modified the same data in the meantime, the system throws an exception error, prompting the user to retry the operation.
{% hint style="success" %}
*Example*
The Management Dashboard user, Tom, opens the `ABC` product to edit it. At the same time, another user, Michael, opens the same `ABC` product for edition. Michael is quicker to complete and save his changes. When Tom wants to save the product after he's done with his changes, he gets an error notification, because in the meantime the document version has changed. Tom needs to reload the product in order to make his updates.
{% endhint %}
# Extensibility Cases
Take a look at the possibilities that Emporix offers to extend the platform to even better suit your needs.
In an e-commerce environment, data is often sourced from multiple systems. Commerce Engine provides the ability to extend the platform with additional tooling, ensuring seamless integration of data between business applications. Learn how you can extend Commerce Engine to streamline your operations.
* [External Products, Pricing and Fees](https://developer.emporix.io/ce/extensibility-and-integrations/extensibility-cases/external-pricing-and-products)
* [Enabling Custom Extensions](https://developer.emporix.io/ce/extensibility-and-integrations/extensibility-cases/custom-extensions)
* [Extension and Cloud Function Hosting](https://developer.emporix.io/ce/extensibility-and-integrations/extensibility-cases/extension-hosting)
# External Products, Pricing and Fees
You can connect an external application or system to fetch products, prices, or fees outside Emporix.
The cart and checkout functionality typically enables customers to purchase items listed in your store's database. During checkout, the system calculates the total price, taking into account the listed prices, shipping costs and any applicable discounts. However, in B2B use cases, you may need to integrate an external system to calculate prices, custom fees or even allow the purchase of products sourced from an external ERP system, bypassing the standard product catalog.
Emporix recognizes that B2B transactions often demand competitive pricing tailored to various factors, such as product relationships, purchase volume, customer loyalty, and more. It also understands that sometimes you might require to calculate additional fees for shipping, freight and more.
To address this, Commerce Engine allows seamless integration with external systems that handle product management, price calculations and custom fee management. By leveraging external applications, businesses can ensure accurate and tailored pricing for each customer, streamline pricing and fee processes, and enhance overall operational efficiency. This can be accomplished by leveraging the extensibility features of the Cart Service.
The extended cart supports the following integration scenarios:
* **Third-party pricing for products existing within CE**: Prices are calculated externally by other applications and overwrite those set in Commerce Engine.
* **Third-party pricing for products not defined within CE**: Products from an external system, including their pricing, are added to the cart.
* **Products without predefined prices**: The cart allows products with no set price to be added making checkout possible, with the final price updated from an external system at the last stage of purchase completion. To cover such a case and proceed with checkout, set temporarily the price value to `0`.
* **Third-party sourced fees**: The products added to the cart might require additional fees to be calculated, such as for example shipping, freight, packaging, large-size load, or more. Calculate additional fees externally and add them at the customer's cart level.
## Extended cart flow
The diagram shows the communication between Emporix and an external system that calculates prices or manages product information.\
The storefront triggers an additional layer, it can be a backend for frontend (BFF) or an external service outside of the Emporix environment. The price calculation happens at that middleware layer by sending a request to an ERP system. Once the data is ready the BFF layer communicates with the Emporix Cart Service directly.
## Enabling external products, pricing and fees
Enabling an external service to provide product, pricing and fee information at the cart level requires the following steps:
1. Get the `cart.cart_manage_external_prices` scope to handle external system communication.
a. Go to the Emporix Developer Portal, **Manage API Keys** section.
b. In the **Custom API**, use **Add scopes** or **Add more groups** option.
c. Add a group name of your choice, and under **Cart**, select the `cart.cart_manage_external_prices` scope.
d. Confirm with **Generate**.
Now, you can use the generated API keys to allow communication between the Cart Service and an external system for managing pricing.
{% hint style="danger" %}
Never grant access to these API keys to the end customers as it may lead to security risk of faking your price data.
{% endhint %}
2. Turn on the `enableExternalPrices` setting. You can achieve that in the Management Dashboard or through the [Configuration Service](https://app.gitbook.com/s/d4POTWomuSS7d3dnh4Dg/api-guides/configuration):
* In the Management Dashboard, go to the **Settings** -> **System Preferences**. Set the value to *true* for the **Allow fetching external prices** setting.
* In the Configuration Service, add the following configuration:
```
{
"key": "enableExternalPrices",
"value": true,
"version": 1,
"secured": false
}
```
3. Use your dedicated Backend-for-Frontend (BFF) layer or an external service responsible for managing pricing, fees and/or products on your side. This layer is to be positioned in between the storefront and the Emporix Cart Service.\
Ensure that this BFF is properly configured, as the generated API key with the scope for managing external pricing serves as an authorisation token. The token enables direct communication with the Cart Service to update your storefront customers' carts.
{% hint style="warning" %}
When external pricing is enabled, it is essential to ensure the accuracy of the external prices from your price engine, as CE does not perform price validation in such cases.
{% endhint %}
## Managing carts with external product, pricing, or fee information
Once you've enabled the external system in Emporix environment, and configured the external service properly, you're able to use the external service to handle price and fee calculation or product management at a customer's cart level.\
When a customer creates a cart, you're able to add custom product, pricing and fee data that comes from another service by using the Emporix Cart Service API. Modifying the customer's cart is possible by making a call to the [Adding a product to cart](https://github.com/emporix/emporix-documentation-portal/blob/master/content/user-guides/extensibility-and-integrations/extensibility/broken-reference/README.md) endpoint, defining the external sourcing.\
The request payload has to define the `itemType` property and set it to `EXTERNAL`. This ensures the CE cart is able to read data coming from external applications. Include the price details and also tax details relevant for the pricing.\
See examples of how you can construct such a request.
### External prices
* Overwriting a product's price from an external source
```json
{
"itemYrn": "urn:yaas:saasag:caasproduct:product:mytenant;1600A016BF",
"itemType": "EXTERNAL",
"price": {
"effectiveAmount": 2.0,
"originalAmount": 2.0,
"currency": "EUR"
},
"tax": {
"name": "STANDARD",
"rate": 10,
"grossValue": 2.0,
"netValue": 1.82
},
"quantity": 1
}
```
Notice that to overwrite a product that is available in CE product catalog, you need to provide the relevant `itemYrn` property.\\
### External products
* Adding a product from an external source, outside CE catalog, including external price calculation
```json
{
"itemType" : "EXTERNAL",
"product": {
"id": "myTestId",
"name": "myExternalProduct",
"description": "testExternalProduct",
"sku": "sku",
"images": [
{
"id": "imageid",
"url": "imageURL"
}
]
},
"price": {
"effectiveAmount": 2.00,
"originalAmount": 2.00,
"currency": "EUR"
},
"tax": {
"name": "STANDARD",
"rate": 10,
"grossValue": 2.00,
"netValue": 1.82
},
"quantity": 1
}
```
* Adding a product without a price
```json
{
"itemYrn": "urn:yaas:saasag:caasproduct:product:mytenant;1600A016BF",
"itemType": "EXTERNAL",
"price": {
"effectiveAmount": 0.0,
"originalAmount": 0.0,
"currency": "EUR"
},
"tax": {
"name": "STANDARD",
"rate": 10,
"grossValue": 0.0,
"netValue": 0.0
},
"quantity": 1
}
```
To achieve completing checkout with products without price defined, define the price to `0.0` value. You can then overwrite the pricing at a later stage, calculating it according to the relevant factors you want to take into account.
### External fees
* Adding an external fee
```json
{
"itemYrn": "urn:yaas:saasag:caasproduct:product:mytenant;1600A016BF",
"externalFees": [
{
"name": {
"en": "Freight Fee"
},
"feeType": "ABSOLUTE",
"feeAbsolute": {
"amount": 5.00,
"currency": "EUR"
}
}
]
}
```
It is possible to combine standard fees with external fees. Depending on your context, you could add a standard fee to one product in a cart and an external fee to another one.\
However, adding a custom external fee prevails over the standard fee defined for a specific product in the Fee Service.
The calculated fees are visible in the order summary in the Management Dashboard.
{% hint style="info" %}
For more information, see the [Cart Service Tutorial](https://app.gitbook.com/s/d4POTWomuSS7d3dnh4Dg/api-guides/checkout/cart/cart).
{% endhint %}
# Enabling Custom Extensions
You can introduce your custom logic and functionality you need easily with custom extensions functionality.
You can extend the Management Dashboard with your custom extensions, which can be embedded directly in Management Dashboard to make it easier for your employees to work with integrated systems. Learn how to prepare your custom extension to make it work smoothly within Emporix platform.
## Custom extension
### Prerequisites
Use the **MD extension template** to build your extension. The template is based on the module federation concept that introduces more flexibility for developers, who can use the shared code, components and dependencies in the custom applications. Refer to the [MD Module Template](https://github.com/emporix/md-module-template) repository to start building your own extension.
### Create a custom extension
{% stepper %}
{% step %}
Fork the [MD Module Template](https://github.com/emporix/md-module-template) repository and create your own project from it.
{% endstep %}
{% step %}
Install dependencies in your new project by running `npm install`.
{% endstep %}
{% step %}
Copy `.env.example` to `.env` and provide the API URL for your environment.
{% endstep %}
{% step %}
Start local development with `npm run dev` and build your extension UI.
{% endstep %}
{% step %}
Before publishing, run quality checks:
* `npm run lint`
* `npm run typecheck`
* `npm run test:run`
{% endstep %}
{% step %}
Build the extension for deployment by running `npm run build`.
{% endstep %}
{% step %}
Host the generated files on your preferred hosting platform and make sure the app can be loaded from the Management Dashboard domain (CORS enabled).
{% endstep %}
{% step %}
Copy the URL to `remoteEntry.js` from your hosted build. You need it when registering the extension in Management Dashboard.
{% endstep %}
{% endstepper %}
{% hint style="info" %}
If you want to test your extension locally in Management Dashboard first, run `npm run preview` and use the local `remoteEntry.js` URL from the preview server.
{% endhint %}
### Add the extension to the Management Dashboard
When your extension is ready, add it to the Management Dashboard. There are a few ways to add an extension:
* As an extension - follow the steps described in [Extensions](https://developer.emporix.io/ce/management-dashboard/administration/extensions). The custom extension is visible under **Extensions** module.
* As a module - follow the steps described in [Modules](https://developer.emporix.io/ce/management-dashboard/administration/modules#add-custom-modules). The module is displayed where you place it in the navigation menu.
* As a perspective - follow the steps described in [Perspectives](https://developer.emporix.io/ce/management-dashboard/administration/perspectives). The extension is available from the perspective chooser.
This video tutorial demonstrates how to add the custom extension to the Emporix Management Dashboard.
{% embed url="" %}
{% hint style="success" %}
**Hosting**
Emporix provides you with the possibility to host the custom extensions within the Emporix infrastructure. Emporix hosting is a secure, and scalable way to store your custom components. To have the service enabled on your tenant, contact the [Sales Team](mailto:sales@emporix.com).
Learn more in [Extension and Cloud Function Hosting](https://developer.emporix.io/ce/extensibility-and-integrations/extensibility-cases/extension-hosting).
{% endhint %}
## Example use case
Custom extensions can support many different business needs and help your teams work more efficiently in many ways.
One practical example is a custom extension for improving storefront search by managing synonyms in your search index provider.\
We have built the *Synonyms* extension that communicates directly with an index provider and we've embedded it in the Management Dashboard. While the example uses Algolia, the same approach can be used with other providers.
With this extension, your team can add, edit, and remove product-related synonyms directly in the Emporix UI.\
This helps improve search relevance, because customers often use different words for the same product.\
As a result, teams can optimize search results without switching to a separate search provider interface.
{% hint style="warning" %}
The *Synonyms* extension is an example use case of custom extensions.\
If you want to try it out, as a prerequisite for the extension to work, you need to activate and configure your own index provider.\
You can achieve that by using the Emporix API.\
To learn more, see the [Indexing Service](https://developer.emporix.io/ce/system-management/search/indexing).
{% endhint %}
{% hint style="info" %}
To see more example extensions that are available for public reuse and adaptation, refer to the [MD Extensions](https://github.com/emporix/md-extensions/tree/master) repository. Check it out to get inspired and start building your own extensions.
{% endhint %}
{% hint style="info" %}
See also the related pages:
* [Management Dashboard - Administration - Extensions](https://developer.emporix.io/ce/management-dashboard/administration/extensions)
* [Management Dashboard - Extensions](https://developer.emporix.io/ce/management-dashboard/extensions)
* [Management Dashboard - Modules](https://developer.emporix.io/ce/management-dashboard/administration/modules)
* [Management Dashboard - Perspectives](https://developer.emporix.io/ce/management-dashboard/administration/perspectives)
{% endhint %}
# Extension and Cloud Function Hosting
Emporix offers a built-in hosting model for custom extensions and cloud functions. Learn how the hosting works, what you can deploy, and how to manage the full deployment lifecycle.
Emporix provides a built-in, secure, and scalable hosting environment for custom extensions and cloud functions built on top of the Emporix Management Dashboard. Instead of maintaining your own cloud infrastructure, you can deploy and operate your custom code directly within the Emporix environment — with versioning, rollback, monitoring, and tenant isolation included out of the box.
{% hint style="danger" %}
Hosting of the extensions and cloud functions is not included in standard billing plans and is billed separately on a pay-as-you-go basis. If you're interested in getting access to the feature, contact the [Sales Team](mailto:support@emporix.com).
{% endhint %}
## How it works
The hosting model is project-based. It means that each tenant initializes a single hosting project as a one-time action. The project receives a unique Project ID and acts as the container for all hosted extensions and cloud functions on that tenant.
Emporix supports lazy hosting, which means no pre-configuration is required per tenant before the project is initialized. Once the project is set up, you can add any number of extensions and cloud functions to it.
Each hosted resource follows the same lifecycle:
1. You upload the code either from a GitHub repository or as a `zip` / `tar.gz` archive.
2. The system automatically triggers a build process.
3. A successful build produces a versioned release that is immediately available for use.
4. For extensions hosting — all previous releases are retained, enabling rollback to any earlier version at any time.
## What you can host
### Extensions
Extensions are custom UI add-ons built on the [MD Module Template](https://github.com/emporix/md-module-template), which is based on the module federation concept. A hosted extension integrates directly into the Emporix Management Dashboard and can be registered in one of two ways:
* As a **module** — visible in the **Extensions** section of the Management Dashboard.
* As a **perspective** — accessible with a dedicated URL path in the Dashboard navigation.
Each extension is identified by a unique **Hosting ID**, which becomes part of its hosting URL. Display names can be localized to support multiple languages.
{% hint style="warning" %}
The Emporix infrastructure supports up to 20 extensions per hosting project.
{% endhint %}
### Cloud functions
Cloud functions are serverless units of custom logic that can be triggered by events, Emporix APIs, or other platform processes. Unlike extensions, they are not UI components; they operate in the background and can exposed in the [Partner Library](https://app.gitbook.com/o/z8MNPigQv25NZe33g3AV/s/aAxCFK0JJRlhIPufuXz8/) or consumed through custom API integrations.
Supported runtimes:
* Node.js 24
* Python 3.14
Cloud functions support **environment variables**, which can be defined as key-value pairs and used within the function code to securely decode credentials and configuration data.
Full invocation logs are available in the hosting details of each cloud function, showing when and how it was called and what the outcome was.
**Example cloud function**
Here is the example of a simple cloud function that returns a welcome message and the headers injected by Emporix.
{% file src="" %}
## Deployment and versioning
Every deployment — whether an initial upload or an update — triggers a build. The **Build History** tracks all builds with the following details: deployment ID, build ID, status, and timeline.
For extensions, all published versions are retained in the **Releases** panel. Each release shows its version ID, status, and timeline. If a new deployment introduces a regression, you can use the **Rollback** option to revert to any previous release — this results in the release of the selected version.
{% hint style="info" %}
To set up hosting and deploy your first extension or cloud function, refer to the step-by-step instructions in the Management Dashboard: [Hosting](https://developer.emporix.io/ce/management-dashboard/administration/hosting).
{% endhint %}
## Invoking cloud functions
Once you have enabled a cloud function hosting in Emporix, you can call the cloud function within your integration through API.
* **HTTP Methods**
To invoke a cloud function, send an `HTTP` request to the function endpoint. Standard `HTTP` methods are available, so depending on what you need, you can call one of the following: `POST`, `GET`, `PUT`, `DELETE`.
* **Endpoint path**
The root endpoint path:
```
https://api.emporix.io/cloud-functions/{TENANT}/functions/{FUNCTION_ID}
```
If your cloud function exposes internal endpoints in addition, you can extend the path. For example:
```
https://api.emporix.io/cloud-functions/{TENANT}/functions/{FUNCTION_ID}/products
```
* **Authentication and authorization**
All the requests are routed through the Emporix platform. This means that the platform validates the provided tokens (service, customer, or anonymous). You do not need to implement any additional token validation inside your cloud function.
* **Request headers**
Emporix enriches each request with additional headers that can be used within your function:
| Header | Description |
| ------------------------- | ------------------------------------------------------------------------------------------------------------------------------------------- |
| `emporix-scopes` | Contains the list of scopes assigned to the requester. Use this header to verify whether the user has permission to trigger specific logic. |
| `emporix-user-id` | Available for customer tokens. Identifies the customer who triggered the function. |
| `emporix-token` | The token used for invocation. It can be reused to call Emporix APIs on behalf of the requester. |
| `emporix-legal-entity-id` | Present when the customer token is associated with a legal entity. Identifies the related legal entity. |
* **Environment variables**
If your cloud function uses environment variables, you can access them in your code as follows:
```
process.env.{ENV_KEY}
```
For example, `process.env.client_id`.
* **Example**
See the example request calling a cloud function:
```bash
curl --location --request POST 'https://api.emporix.io/cloud-functions/{{tenant}}/functions/{{FUNCTION_ID}}' \
--header 'Content-Type: application/json' \
--header 'Authorization: Bearer {{EMPORIX_TOKEN}}' \
--data-raw '{
"name":"John"
}'
```
# Integrations
See how Emporix facilitates integration with other tools and systems with the pre-built functionalities.
Our system is built with flexibility in mind and offers a wide range of integration options. Whether you're connecting third-party tools, internal platforms, or external services, we provide APIs and event-driven capabilities to make integration smooth and reliable. This documentation covers the available methods and practical examples to help you get started quickly.
Check the following guides:
* [Auth Integrations](https://developer.emporix.io/ce/extensibility-and-integrations/integrations/auth-integrations)
* [ERP Integrations](https://developer.emporix.io/ce/extensibility-and-integrations/integrations/erp-integrations)
* [Customer Communication Integrations](https://developer.emporix.io/ce/extensibility-and-integrations/integrations/communication-integration)
# Auth Integrations
See how Emporix facilitates integration with other tools and systems with the pre-built functionalities.
You can configure our system to work with various authentication and authorization providers. This is part of the standard system management and tenant configuration process. For details on supported integrations and setup instructions, refer to the [System Management – Authentication and Authorization](https://developer.emporix.io/ce/system-management/authentication-and-authorization) guides.
# ERP Integrations
See how Emporix facilitates integration with other tools and systems with the pre-built functionalities.
Integrating two systems can be a complex task, especially when it comes to ensuring consistent data synchronization across platforms. Emporix is designed to simplify this process with its robust and flexible APIs. Its extensible data models, together with mixins possibilities, allow for seamless customization to meet specific business needs. Most importantly, Emporix reduces the challenges of integration by providing an integration-friendly API architecture, streamlining the process and enabling efficient connections between systems.
To facilitate integration with other systems, Emporix offers the following capabilities:
## Custom ID
Typically, the integration layer and ERP systems lack visibility into the entity IDs generated by the Commerce Engine during creation. Emporix resolves this issue by enabling the configuration of custom IDs.
{% hint style="info" %}
To learn more about Custom ID, check our [API Standard Practices](https://app.gitbook.com/s/d4POTWomuSS7d3dnh4Dg/standard-practices/custom-id) documentation.
{% endhint %}
## Upsert
`UPSERT` is a database operation that combines `update` and `insert`. It allows a single command to either insert a new record if it doesn’t exist in the database or update an existing record if it does. This is particularly useful in databases where you may want to avoid checking if a record exists before deciding to insert or update it.
{% hint style="info" %}
To learn more about Upsert, check our [API Standard Practices](https://app.gitbook.com/s/d4POTWomuSS7d3dnh4Dg/standard-practices/upsert) documentation.
{% endhint %}
## Checkout and Price calculation
Emporix supports two main pricing scenarios based on business requirements: asynchronous pricing and synchronous pricing, where prices are retrieved directly from the ERP system.
### Asynchronous pricing
In this scenario, product prices are stored in the product catalog. Prices are replicated asynchronously from the ERP system to the Commerce Engine during master data synchronization. These prices can be tailored for customers using price lists, discounts, and other customizations.
### Synchronous pricing
In more complex use cases, Emporix external pricing functionality enables the storefront’s backend (BFF) to define custom prices, taxes, and external fees for individual cart items. This allows the BFF to fetch real-time pricing from the ERP system and apply it directly to the Emporix cart. These prices and fees are then utilized during checkout to finalize the order.
{% hint style="info" %}
Additionally, Emporix supports adding products to the cart that do not exist in the product catalog. For more information, see the [External Products, Pricing and Fees](https://developer.emporix.io/ce/extensibility-and-integrations/extensibility-cases/external-pricing-and-products) documentation.
{% endhint %}
## Order simulation
In scenarios where synchronous pricing is insufficient, such as when delivery options and prices need to be dynamically retrieved from the ERP, the storefront backend can use the cart to gather products and addresses. Final price calculations, however, are managed by the ERP system. In this setup, checkout price calculations are bypassed, and the storefront backend creates the order using the ERP-provided pricing.
{% hint style="info" %}
To see an example of the Emporix and ERP system integration, check the [SAP Integration](https://developer.emporix.io/ce/extensibility-and-integrations/integrations/erp-integrations/sap-integration) documentation.
{% endhint %}
# SAP Integration
Learn the possibilities for integration of Emporix with an ERP system, such as SAP, and replicating data properly.
Emporix is designed to integrate seamlessly with ERP systems. To integrate an ERP system like SAP with Emporix, an integration layer (such as a middleware solution or API management platform) can be utilized to handle data exchange efficiently. This layer can collect and transform data, for example IDocs from SAP, into a suitable format, such as JSON, and make the necessary API calls to Emporix.\
Options for integration include using an IPaaS platform or an API management layer that supports OData, REST API, or other protocols, enabling flexible and scalable integration tailored to the specific requirements of the ERP and target systems.
Given SAP’s significant presence in the ERP software space, we highlight a scenario in which asynchronous pricing and order replication occur from the Emporix Commerce Engine to SAP ERP.\
In this example, we selected SAP BTP Integration Suite (formerly known as SCPI) to streamline the integration process, leveraging Emporix flexible API capabilities.
## Emporix - SAP integration
The video and the diagram show high level overview of the data replication between Emporix and S/4Hana using SAP Integration Suite.
{% hint style="warning" %}
This demo is a presentation of one potential approach to integrate with SAP. Alternatively, REST APIs or OData can be utilized for integration purposes.
{% endhint %}
{% embed url="" %}
## Master data replication
To create an order from Emporix into SAP, the following master data must be replicated to provide the information for the transactional IDoc:
| IDoc | SAP Name | Types in Emporix |
| ----------------------------- | -------------- | ----------------------------- |
| `MATMAS05` | Material | Product |
| `COND_A04` | Condition | Price, PriceModel, PriceList |
| `DEBMAS07` | Customer | Company |
| `ADRMAS03` | Contact Person | Customer |
| `ADR2MAS03` | Address | Location |
| `ADR3MAS03` | Address | Location |
| Transactional IDoc: | | |
| `SALESORDER_CREATEFROMDAT202` | Transaction | Order created Webhook payload |
Here's how the replication process looks like:
### Product replication
Product replication uses the MATMAS IDoc generated by SAP ERP, which holds essential product details, for example, localized product name, tax type, and product code. Emporix can use the same product code as the ERP, allowing the upsert API to create or update the product as needed, thereby simplifying the integration process.
### Price replication
Product prices are replicated through the COND\_A IDoc, known as `conditions` in SAP, which contains details such as price validity, minimum quantity, and customer-specific price lists. Prices are assigned to either net or gross price models, depending on the price type, and customer assignments are made at the ship-to level.
### Customer data replication
Customer data is distributed across multiple IDocs. The diagram below shows SAP/Emporix object relations:
To accurately reflect this data in the Emporix Commerce Engine, the following entities must be created:
* **Company**
The DEBMAS IDoc contains core company information, including functional assignments such as Sold To, Ship To, Bill To, Payer, and the Contact Person relationship.
Address details are provided through the ADRMAS IDoc.
* **Location**
Company location details, along with communication information, are derived from data in the DEBMAS and ADRMAS IDocs. Depending on the functional assignments of the addresses, locations are tagged as either shipping or billing.
* **Customer**
The Emporix customer entity is created based on the Contact Person relationship from the ERP system. This relationship includes the customer’s assigned email, phone number, and address details. As illustrated in the diagram, the DEBMAS, ADR2MAS, and ADR3MAS IDocs are required for customer creation within the Emporix Commerce Engine.
### Order replication
Order replication from Emporix to SAP ERP is achieved through order creation webhooks, which are sent to the SAP BTP Integration Suite. The necessary company details (e.g., sold-to, ship-to) are added to the order using mixins, ensuring they are included in the webhook payload. The SAP BTP Integration Suite then converts the webhook data into a SALESORDER\_CREATEFROMDAT202 IDoc, which is sent to the SAP ERP system through the iFlow.
# Customer Communication Integrations
Learn how you can improve the communication with your customers.
Emporix comes with the out-of-the-box service that is responsible for sending automated emails to your customers. The email communication is triggered upon certain events happening in the system, such as for example registering a new customer, submitting an order from the storefront, or many more. The service takes care of keeping the customers in the loop and up-to-date with the operations happening in the system, concerning their accounts, orders, etc.
Apart from the default setup, you can enable your custom emailing service and maintain the automated email templates in your database. Emporix allows you to integrate your custom Mailjet account to take care of customer communication.
For more details, see the [Mailjet](https://developer.emporix.io/ce/extensibility-and-integrations/integrations/communication-integration/mailjet) doc.
{% hint style="success" %}
For some mailing automation cases, you might consider using the [Value Streams](https://app.gitbook.com/s/8dAaH7DfB59pzZwLxmur/value-streams/working-with-value-streams) functionality. You can create a workflow process that reacts on some trigger points in the system and takes care of subsequent steps, which can also involve sending information to your customers.
{% endhint %}
# Mailjet
Learn how you can connect your Mailjet account with Emporix.
[Mailjet](https://www.mailjet.com/) provides email sending services that help you stay connected with your customers. If you already use Mailjet to send company-related emails of any type, you can also use the Mailjet account in the Emporix platform. By default, Emporix provides email service that holds all email templates for communication between your store and your customers. But, it is possible to integrate your custom Mailjet account so that you keep your company theme in the emails related to commerce operations and keep your email templates in one place.
## Enabling custom Mailjet account
To connect your Mailjet account with Emporix email service, contact the [Emporix Support Team](mailto:support@emporix.com) and provide the following information:
* credentials:
* `publickey`
* `secretkey`
* `sender` - optionally, if you'd like to send the emails from a specific email address:
* `emailAddress`
* `name`
* `template ID` numbers - if you want to use your custom email templates, the ID numbers for each language version to be used
The Support Team enables the Mailjet account on the Emporix side, according to your preferences.
## Languages
It is possible to create a template for each language version you commonly use in your setup. Provide Emporix with the template IDs for each of them so that we can configure the mailing service accordingly.
For example:
```
{ //...
"languages": {
"en": 2464336,
"de": 2472042,
"fr": 6542186,
"pt": 9877541,
"pl": 7412588
}
//...
}
```
## Custom email templates
Using your own Mailjet account allows you to create custom email templates to inform about different actions in the system, apart from the default email templates delivered by Emporix. You can prepare email templates, that are sent out upon different triggers, both internally within your company or externally to your customers. Among other triggers, the emails may concern:
* new customer in the system
* order confirmation
* invoice generation
* password reset
* shipping confirmation
* coupons received
You can adjust the templates according to your needs and preferences. However, if you want to include information coming directly from the Emporix system, like order ID, delivery times etc, make sure your templates use the appropriate Emporix **variables** to display the information properly.
### Common variables
{% hint style="success" %}
If you want to include some more information in your templates, that is not listed below, please contact the [Emporix Support Team](mailto:support@emporix.com) to help you find the appropriate variables.
{% endhint %}
| Variable | Description |
| ------------------------------ | -------------------------------------------- |
| **Change Email Request** | |
| `customer` | customer's name |
| `newEmail` | new email address to be updated |
| `oldEmail` | previous email address used |
| **Coupon** | |
| `customer` | customer's details |
| `coupon` | coupon id |
| `couponIsValidUntil` | end date of coupon validity period |
| **Customer** | |
| `additionalBillingEmail` | email address for billing purposes |
| `birthday` | customer's birthday |
| `customerEmail` | customer's email address |
| `customerGeneralAttributes` | customer-related information |
| `customerNumber` | customer's id number |
| `customerToken` | customer token generated at login |
| `firstName` | customer's first name |
| `invoiceNotDeliveryAddress` | address for invoicing purposes |
| `lastDeliveryDate` | date of last delivery to customer |
| `lastName` | customer's last name |
| `mobilePhone` | customer's mobile phone number |
| `tenant` | tenant associated with the customer |
| `title` | customer's title |
| `token` (`activateAccountUrl`) | token used for customer's account activation |
| **Delivery** | |
| `deliveryDate` | date of delivery |
| `errorMessage` | error notification message content |
| `orderNumber` | order id |
| `triggeredAction` | action taken on the delivery failure |
| **Invoice** | |
| `orderNumber` | order id number |
| `archiveEmail` | email address for invoice archiving |
| `documentType` | type of document |
| `linkToInvoice` | invoice link |
| **Order** | |
| `billingAddress` | address associated with billing |
| `comment` | comment made on order |
| `computedDeliveryTime` | time of delivery |
| `customer` | customer associated with the order |
| `customerGeneralAttributes` | customer's details |
| `customerName` | name of the customer |
| `customerTitle` | customer's title |
| `date` | date of creating the order |
| `deliveryDate` | date of delivery |
| `deliveryTimeFrom` | time of delivery range - from |
| `deliveryTimeFromAmPm` | time of delivery range - from AM/PM |
| `deliveryTimeTo` | time of delivery range - to |
| `deliveryTimeToAmPm` | time of delivery - to AM/PM |
| `discounts` | discounts assigned to the order |
| `entries` | order entries |
| `feeTotal` | all fees applied to the order |
| `firstName` | customer's first name |
| `lastName` | customer's last name |
| `linkToInvoice` | link to the invoice |
| `orderNumber` | order id number |
| `orderReplaces` | id of replaced order |
| `packaging` | packaging details |
| `paymentCosts` | costs associated with payment |
| `paymentMethod` | payment method chosen for the order |
| `pickup` | info if pickup was chosen for delivery |
| `pickupAddress` | address for the order pickup |
| `shippingAddress` | address for shipping the order |
| `shippingCosts` | costs associated with shipping goods |
| `substituteProduct` | product substituted by |
| **Password Reset** | |
| `customer` | customer requesting a password reset |
| `fullResetLink` | link to reset the password |
| **Support** | |
| `message` | content of a message to support |
| `subject` | subject of the message to support |
{% hint style="success" %}
To better understand how to construct the custom email templates, refer to the [Mailjet Syntax Reference](https://dev.mailjet.com/email/template-language/reference/) guide.
{% endhint %}
# Payment Systems
Integrate a payment provider system to your e-commerce system.
## Introduction
The Payment Gateway service is a B2B and B2C functionality that you can use for multiple payment methods configuration. Having the integration with Spreedly, Emporix offers a lot of flexibility and possibilities to use a variety of payment providers. Depending on the needs, payments can be configured as on-site and off-site possibilities with no data kept on the Emporix side.
## Features
| Features | Benefits |
| --------------------------------------- | ---------------------------------------------------------------------------------------------------------------------------------------------------------------------------------------------------------------------------------------- |
| **Configuration of payment strategies** | Simplified integration with payment providers and easy configuration of the solutions using Spreedly as the orchestrator. |
| **Payment configuration per site** | You can configure the relevant payment method on site level within the Management Dashboard. |
| **Transaction log** | Have a transparent overview within the Management Dashboard about the transaction history for every order. |
| **Refund creation** | The merchant customer service can trigger refunds from the Management Dashboard without logging in to several payment provider backoffices. |
| **Payment cancellation** | Cancel the payment within the Management Dashboard. |
| **Capture** | Provides the flexibility to adapt the capture trigger based on your business, for example: digital products you might want to capture instantly. In other cases, you might need to reserve an amount and capture the final amount later. |
## Prerequisites
To enable a payment gateway solution on the storefront, you need to have a Spreedly environment (except for Unzer integration). To get the Spreedly environment, contact the [Emporix support team](mailto:support@emporix.com). After the team creates the environment, you receive the following details:
* **Environment key** - public value, you can use it on frontend side
* **Access secret** - secret value, you should never reveal it and keep it secure
* **Signing secret** - secret value, you should never reveal it and keep it secure
Using Spreedly, it's possible to configure a variety of payment gateways, in this section you can check who to work with sample gateways, among others Spreedly gateway or Paypal Commerce.
{% hint style="info" %}
To learn more about gateways supported by Spreedly, see the [Spreedly Gateways](https://developer.emporix.io/ce/extensibility-and-integrations/payments/spreedly-test-gateway) documentation.
{% endhint %}
## Payment approaches
With the payment solution, you can use two different approaches:
* In-checkout - when the payment is done before an order is placed
* Post-checkout - when the payment is done after the order is placed
### In-checkout
Payment done during the checkout requires an POST request, with the `paymentMethod` field including the following information:
```json
paymentMethods : [
{
"provider": "payment-gateway",
"method": "card",
"customAttributes": {
"token": "Akon8nPXtz0oahVYEqPsoI7pz4l",
"modeId": "92d77b2b-9385-43ad-a859-55176fbcbd2f",
"customer": "61443563",
"browserInfo": null
}
}
]
```
* `provider` - Should always be set to payment-gateway.
* `method` - Reflects one of the payment mode codes, depending on the method that you want to choose. You can see the list of available modes after sending the GET request: .
* `customAttributes` - It's a set of attributes specific for the particular payment mode
* `token` - Credit card token for a tokenized approach.
* `modeId` - Payment mode identifier, the ID should reflect the payment mode ID that you receive from GET: .
* `customer` - Identifier of a customer that does the checkout and payment.
* `browserInfo` - It’s required for 3DS2 approach only. For details check [Spreedly payment gateway](https://developer.emporix.io/ce/extensibility-and-integrations/payments/spreedly-test-gateway).
With this flow, the payment authorization is done during the checkout process. The response to the checkout request contains the `paymentDetails` object:
```json
{
"orderId": "EON1772",
"paymentDetails": {
"externalPaymentHttpMethod": "GET",
"authorizationToken": "AVTqLLj26KFCVQtfOXrAkymfpR9",
"externalPaymentRedirectURL": "https://www.paypal.com/checkoutnow?token=2KY55219L2352861G"
},
"checkoutId": null
}
```
The `externalPaymentRedirectURL` field is populated only in case when a redirect is required. The URL is used to navigate the user in order to finish the payment process.
The diagram shows how the in-checkout flow looks like when it's integrated with Emporix:
### Post-checkout
Payment done after the checkout requires an POST request, with the `paymentMethod` field including the following information:
```json
paymentMethods : [
{
"provider": "payment-gateway",
"customAttributes": {
"customer": "61443563",
"deferred": true
}
}
]
```
* `provider` - Should always be set to payment-gateway.
* `customAttributes` - It's a set of attributes specific for the particular payment mode:
* `customer` - ID of the customer who does the checkout and payment
* `deferred` - should be set to `true` as it indicates the payment is done after the order is placed
For this flow, the payment authorisation is NOT done automatically during the checkout process. Therefore, as a response to the checkout request, you can receive the following response without the `paymentDetails` information.
```json
{
"orderId":"EON1775",
"paymentDetails":null,
"checkoutId":null
}
```
When the order is placed, the storefront should display payment options and allow the users to choose the appropriate one. Having the payment option chosen and all payment details provided, storefront should invoke the payment-gateway endpoint:
```json
{
"order": {
"id":"EON1775"
},
"paymentModeId":"ef48f439-1c3c-42ff-807d-ef4cac237745",
"creditCardToken":"9QpMHzNNZDCHVF47hL9ZDP18RFr"
}
```
* `Order id` - A mandatory field, the ID has to be an order ID created by a customer that invokes the authorization endpoint. Otherwise a validation error is returned.
* `paymentModeId` - A payment mode identifier, it should reflect the payment mode ID that you received from GET:
* `creditCardToken` - A mandatory field when a tokenized payment method is used.
Response from the endpoint:
```json
{
"successful": true,
"paymentTransactionId": "afddff82-de4e-45b8-8de5-3f722b81116b",
"authorizationToken": "2IKNTd5K2HlYqjmGt8n7JgICWuG",
"requiresExternalPayment": true,
"externalPaymentRedirectURL": "https://www.paypal.com/checkoutnow?token=49C50265AF458692S",
"externalPaymentHttpMethod": "GET"
}
```
The `externalPaymentRedirectURL` field is populated only in case when a redirect is required. The URL is used to navigate the user in order to finish the payment process.
The diagram shows how the post-checkout flow looks like when it's integrated with Emporix:
## Gateways configuration
Spreedly allows for configuration of multiple payment gateways. For the full list, see the [Supported Gateways](https://docs.spreedly.com/reference/supported-gateways/) documentation.\
For examples of configuration possibilities with Emporix, see:
* [Spreedly Gateway](https://developer.emporix.io/ce/extensibility-and-integrations/payments/spreedly-test-gateway)
* [Saferpay](https://developer.emporix.io/ce/extensibility-and-integrations/payments/saferpay)
## Storefront implementation
This is an example of how you can configure your storefront payment support for the Payment Gateway service.
1. Execute the following request:
```js
curl --location --request GET 'https://api.emporix.io/payment-gateway/my-tenant/paymentmodes/frontend' \
--header 'Content-Type: application/json' \
--header 'Accept: application/json' \
--header 'Authorization: Bearer {CUSTOMER_TOKEN}'
```
* CUSTOMER\_TOKEN - The customer token generated on a storefront.
Response:
```json
[
{
"id": "f44f71a4-b632-4c9e-a9fc-27b97551d1d7",
"code": "credit_card",
"integrationType": "TOKENIZED",
"javascriptUrl": "https://core.spreedly.com/iframe/iframe-v1.min.js",
"paymentMethodType": "credit_card",
"environmentKey": "NfNg5nQUbBhunpVotluOxQRzOdN"
},
{
"id": "3005fcfc-8e5e-4253-8309-39e6045970e0",
"code": "credit_card_3ds",
"integrationType": "TOKENIZED",
"javascriptUrl": "https://core.spreedly.com/iframe/iframe-v1.min.js",
"paymentMethodType": "credit_card",
"environmentKey": "NfNg5nQUbBhunpVotluOxQRzOdN",
"scaProviderToken": "a1mCvrg0KDAKtopnvubApHpPRE6"
},
{
"id": "227fed5b-e91a-473e-88ea-3b0e85db8408",
"code": "sprel",
"integrationType": "OFFSITE",
"paymentMethodType": "sprel",
"environmentKey": "NfNg5nQUbBhunpVotluOxQRzOdN"
}
]
```
For the configured payment gateways, you can implement the relevant support for them. For details, see the [Spreedly Express](https://docs.spreedly.com/guides/adding-payment-methods/express/) documentation.
For examples of configuration possibilities with Emporix, see:
* [Spreedly Gateway](https://developer.emporix.io/ce/extensibility-and-integrations/payments/spreedly-test-gateway)
* [Saferpay](https://developer.emporix.io/ce/extensibility-and-integrations/payments/saferpay)
### Site specific payment methods
You can configure available payment methods separately for every site.
1. Go to Emporix Management Dashboard -> **Settings** -> **Site Settings**.
2. Invoke two endpoints on your storefront to display the payment methods.
* Get a list of the payment methods configured for your tenant:
```js
curl 'https://api.emporix.io/payment-gateway/my-tenant/paymentmodes/frontend' \
-H 'Accept: application/json, text/plain, */*' \
-H 'Authorization: Bearer {CUSTOMER_TOKEN}' \
```
Response:
```json
[ {
"id" : "92d77b2b-9385-43ad-a859-41176fbcbd2f",
"code" : "credit_card",
"integrationType" : "TOKENIZED",
"javascriptUrl" : "https://core.spreedly.com/iframe/iframe-v1.min.js",
"paymentMethodType" : "credit_card",
"environmentKey" : "Rrg7UfAqQefDY1KGvU4b8OKnhz"
}, {
"id" : "a8c96773-1cdf-4ea7-b1a2-1453d17f5374",
"code" : "sprel",
"integrationType" : "OFFSITE",
"paymentMethodType" : "sprel",
"environmentKey" : "Rrg7UfAqQefDY1KGvU4b8OKnhz"
}, {
"id" : "9a33c7a5-9535-42af-a936-2fa6ece27579",
"code" : "cash_on_delivery",
"integrationType" : "EXTERNAL"
}, {
"id" : "46a76ccc-4a20-471e-9219-e92bba8067e9",
"code" : "invoice",
"integrationType" : "EXTERNAL"
}, {
"id" : "ef48f439-1c3c-42ff-807d-ef4cac237745",
"code" : "paypal",
"integrationType" : "OFFSITE",
"paymentMethodType" : "paypal",
"environmentKey" : "Rrg7UfAqQefDY1KGvU4b8OKnhz"
}, {
"id" : "82d77b2b-9385-43ad-a859-55176fbcbd5f",
"code" : "credit_card_3ds",
"integrationType" : "TOKENIZED",
"javascriptUrl" : "https://core.spreedly.com/iframe/iframe-v1.min.js",
"paymentMethodType" : "credit_card",
"environmentKey" : "Rrg7UfAqQefDY1KGvU4b8OKnhz",
"scaProviderToken" : "EyMV4wnFe7xLASdg1DAVA4w7K0W"
}
]
```
* Get the site settings:
```js
curl 'https://api.emporix.io/site/my-tenant/sites/DE' \
-H 'Accept: application/json, text/plain, */*' \
-H 'Accept-Language: de' \
-H 'Authorization: Bearer {CUSTOMER_TOKEN}' \
```
Response:
```json
{
...
"code": "DE",
"payment": [
{
"id": "92d77b2b-9385-43ad-a859-55176fbcbd2f",
"name": "credit_card",
"serviceType": "SPREEDLY",
"serviceUrl": "",
"active": true
},
{
"id": "a8c96773-1cdf-4ea7-b1a2-1453d17f5374",
"name": "sprel",
"serviceType": "SPREEDLY",
"serviceUrl": "",
"active": true
},
{
"id": "ef48f439-1c3c-42ff-807d-ef4cac237745",
"name": "paypal",
"serviceType": "SPREEDLY",
"serviceUrl": "",
"active": true
},
],
...
}
```
With the two lists, you can configure the payment methods for a given site.
# PayPal
See example of integrating Paypal.
## Introduction
The integration with PayPal supports both in-checkout and post-checkout payment approaches. To learn about the details, see the [PayPal Commerce Platform Gateway Guide](https://docs.spreedly.com/payment-gateways/paypal-commerce-platform/) documentation.
### In-checkout flow
Payment done during the checkout requires an `https://api.emporix.io/checkout/{TENANT}/checkouts/orders` `POST` request, with the `paymentMethods` field including the following information:
```json
paymentMethods : [
{
"provider": "payment-gateway",
"method": "paypal",
"customAttributes": {
"token": "Akon8nPXtz0oahVYEqPsoI7pz4l",
"modeId": "92d77b2b-9385-43ad-a859-55176fbcbd2f",
"customer": "61443563"
}
}
]
```
* `provider` - Should always be set to payment-gateway.
* `method` - Reflects one of the payment mode codes, depending on the method that you want to choose. You can see the list of available modes after sending the `GET` request: `https://api.emporix.io/payment-gateway/{TENANT}/paymentmodes/frontend`.
* `customAttributes` - It's a set of attributes specific for the particular payment mode.
* `token` - Credit card token for a tokenized approach.
* `modeId` - Payment mode identifier, the ID should reflect the payment mode ID that you receive from `GET`: `https://api.emporix.io/payment-gateway/{TENANT}/paymentmodes/frontend`.
* `customer` - Identifier of a customer that does the checkout and payment.
With this flow, the payment authorization is done during the checkout process. The response to the checkout request contains the `paymentDetails` object:
```json
{
"orderId": "EON1772",
"paymentDetails": {
"externalPaymentHttpMethod": "GET",
"authorizationToken": "AVTqLLj26KFCVQtfOXrAkymfpR9",
"externalPaymentRedirectURL": "https://www.paypal.com/checkoutnow?token=2KY55219L2352861G"
},
"checkoutId": null
}
```
The `externalPaymentRedirectURL` field is populated only in case when a redirect is required. The URL is used to navigate the user in order to finish the payment process.
When the user finishes the whole flow on the PayPal side, the Emporix payment gateway is notified about the result of the operation by a callback. It may take around one minute as this is an asynchronous operation.
The diagram shows how PayPal sequence looks like when it's integrated with Emporix for the in-checkout flow:
### Post-checkout flow
The post-checkout approach assumes that a customer does a checkout without pointing to any payment methods. This stage happens after the checkout, when an actual order is already created.
Payment done after the checkout requires an `https://api.emporix.io/checkout/{TENANT}/checkouts/orders` `POST` request, with the `paymentMethods` field including the following information:
```json
paymentMethods : [
{
"provider": "payment-gateway",
"customAttributes": {
"customer": "61443563",
"deferred": true
}
}
]
```
* `provider` - Should always be set to payment-gateway.
* `customAttributes` - It's a set of attributes specific for the particular payment mode.
* `customer` - Identifier of the customer that does the checkout and payment.
* `deferred` - Should be set to `true`.
For this flow the payment authorization is **NOT** done automatically during the checkout process. Therefore, as a response of the checkout request you can receive the following response with missing `paymentDetails` fields:
```json
{
"orderId":"EON1775",
"paymentDetails":null,
"checkoutId":null
}
```
When an order is placed, the storefront should display all the available payment options and allow the user to choose the relevant one, in this case PayPal.\
Having the payment option chosen and all payment details provided, storefront should invoke the following payment-gateway endpoint: `https://api.emporix.io/payment-gateway/{TENANT}/payment/frontend/authorize`\
`POST`:
```json
{
"order": {
"id":"EON1775"
},
"paymentModeId":"ef48f439-1c3c-42ff-807d-ef4cac237745",
"creditCardToken":"9QpMHzNNZDCHVF47hL9ZDP18RFr"
}
```
* `Order id` - A mandatory field, it needs to be an order created by a customer that invokes the authorization endpoint. Otherwise, a validation error is returned.
* `paymentModeId` - payment mode identifier - Reflect the payment mode ID that you received from `GET`: `https://api.emporix.io/payment-gateway/{TENANT}/paymentmodes/frontend`.
* `creditCardToken` - The field should contain the token received by the Spreedly library.
**Response**:
```json
{
"successful": true,
"paymentTransactionId": "afddff82-de4e-45b8-8de5-3f722b81116b",
"authorizationToken": "2IKNTd5K2HlYqjmGt8n7JgICWuG",
"requiresExternalPayment": true,
"externalPaymentRedirectURL": "https://www.paypal.com/checkoutnow?token=49C50265AF458692S",
"externalPaymentHttpMethod": "GET"
}
```
Pay attention to the `paymentDetails.externalPaymentRedirectURL` value. To finish the payment, you should redirect the user to the relevant URL, payment flow on the PayPal website.
When the user finishes the whole flow on the PayPal side, the Emporix payment gateway is notified about the result of the operation by a callback. It may take around one minute as this is an asynchronous operation.
The diagram shows how PayPal sequence looks like when it's integrated with Emporix for the post-checkout flow:
### Gateway configuration
1. To start with the gateway configuration, execute the following request:
```js
curl https://core.spreedly.com/v1/gateways.xml \
--header 'Authorization: Basic {SPREEDLY_TOKEN}' \
-H 'Content-Type: application/xml' \
-d 'paypal_commerce_platformclient idsecret'
```
* `SPREEDLY_TOKEN` - Is a result of the base64 of `environment_key:access_secret`.
* `client_id` and `secret` can be fetched directly from your PayPal account. For more information, see [PayPal Gateway Credentials](https://docs.spreedly.com/payment-gateways/paypal-commerce-platform/#gateway-credentials) documentation.
**Result**:
```js
5S0kV27BrZ0Z47TdGK4v1OI7ojB
...
```
{% hint style="danger" %}
Store the token value for the next steps in the configuration.\
If you lose the token value at any point, use the following request to get it:
```js
curl --location --request GET 'https://core.spreedly.com/v1/gateways.json' \
--header 'Authorization: Basic {SPREEDLY_TOKEN}'
```
{% endhint %}
2. To configure the Emporix Payment Gateway service, execute the following request:
```js
curl --location --request POST 'https://api.emporix.io/payment-gateway/{TENANT}/paymentmodes/config' \
--header 'Content-Type: application/json' \
--header 'Accept: application/json' \
--header 'Authorization: Bearer {EMPORIX_AUTH_TOKEN}' \
--data-raw '{
"code": "paypal",
"active": true,
"provider": "SPREEDLY",
"configuration": {
"Spreedly/GatewayToken": "{SPREEDLY_GATEWAY_KEY}",
"Spreedly/EnvironmentKey": "{SPREEDLY_ENVIRONMENT_KEY}",
"Spreedly/AccessSecret": "{SPREEDLY_ACCESS_SECRET}",
"Spreedly/PaymentMethodType": "paypal",
"Spreedly/RedirectURL": "{REDIRECT_URL}",
"Spreedly/SignatureSecret": "{SPREEDLY_SIGNATURE_SECRET}"
}
}'
```
* EMPORIX\_AUTH\_TOKEN - The standard access token. To check how to get the token see [OAuth Service](https://app.gitbook.com/s/d4POTWomuSS7d3dnh4Dg/api-guides/authentication/oauth-service) documentation.
* SPREEDLY\_GATEWAY\_KEY - Spreedly gateway token that was returned when you configured the payment gateway on the Spreedly side.
* SPREEDLY\_ENVIRONMENT\_KEY - Spreedly environment key that you got from the Emporix support team.
* SPREEDLY\_ACCESS\_SECRET - Spreedly secret key that you got from the Emporix support team.
* REDIRECT\_URL - The URL to your storefront where the user is redirected when the payment is done.
* SPREEDLY\_SIGNATURE\_SECRET - Spreedly signature secret that you got from the Emporix support team.
## Storefront implementation
To use Paypal payment, you have to generate a token in Spreedly.\
You can do this in two ways:
* Display a button that does the form submission - as described in [PayPal Commerce Platform Offsite Payments](https://docs.spreedly.com/guides/offsite-payments/ppcp/).
* Execute the following (an example in react):
```js
const generateToken = () => {
var formData = new FormData();
formData.append("redirect_url", window.location.href)
formData.append("environment_key", {SPREEDLY_ENVIRONMENT_KEY})
formData.append("payment_method_type", "paypal")
axios({
method: "post",
url: "https://core.spreedly.com/v1/payment_methods.json",
data: formData,
headers: { "Content-Type": "multipart/form-data" },
})
.then(function (response) {
storeToken(response)
})
.catch(function (response) {
storeToken(response)
});
}
const storeToken = (response) => {
const url = new URL(response.request.responseURL)
const token = url.searchParams.get("token")
window.console.log("TOKEN", token)
setPayment({
provider: 'payment-gateway',
mode: "offsite",
method: 'paypal',
displayName: 'Paypal',
customAttributes: {
token : token,
modeId : paymentMode.id,
customer : props.customerId
}
})
}
```
The payment information is stored because it's needed during the checkout call. The payment object during the checkout request should look like:
```json
{
...
"paymentMethods": [
{
"provider": "payment-gateway",
"method": "paypal",
"customAttributes": {
"token": "8Ny2OGn1dwzPBuBdwSej95qAuHN",
"modeId": "227fed5b-e91a-473e-88ea-3b0e85db8408",
"customer": "17071158"
}
}
]
...
}
```
**Result**:
```json
{
"orderId": "EON1011",
"paymentDetails": {
"externalPaymentHttpMethod": "GET",
"authorizationToken": "nzQPTC2skR6Fb3LgOagBmVGCBC",
"externalPaymentRedirectURL": "https://www.paypal.com/checkoutnow?token=2KY55219L2352861G"
},
"checkoutId": null
}
```
# Saferpay
See example of integrating Saferpay.
### Introduction
Saferpay can be used if you want to have a solution that supports the post-checkout payments. It allows the users to pay after they submit the order, within the next 30 minutes.
It's not possible to use Saferpay for the payments done before the checkout is completed.
The diagram shows how Saferpay sequence looks like when it's integrated with Emporix:
### Gateway configuration
1. To create the Spreedly receiver, execute the following request:
```js
curl --location --request POST 'https://core.spreedly.com/v1/receivers.json' \
--header 'Content-Type: application/json' \
--header 'Authorization: Basic {SPREEDLY_BASIC_AUTH}' \
--data-raw '{
"receiver": {
"receiver_type": "saferpay",
"hostnames": "https://test.saferpay.com",
"credentials": [
]
}
}'
```
**Result**:
```json
{
"receiver": {
"company_name": "SIX Payment Services",
"receiver_type": "saferpay",
"token": "CwFlWAMQaOfUqcsP8Gce2iyzNIU",
"hostnames": "https://test.saferpay.com,https://www.saferpay.com",
"sub_merchant_key": null,
"state": "retained",
"created_at": "2023-07-16T20:18:48Z",
"updated_at": "2023-07-16T20:18:48Z",
"credentials": [
],
"ssl_certificate_token": null
}
}
```
{% hint style="danger" %}
Save the token, it's needed for the payment mode configuration. Use this token as the {SPREEDLY\_RECEIVER\_ID} variable.
{% endhint %}
2. Create the new payment mode, execute the following request:
```js
curl --location --request POST 'https://api.emporix.io/payment-gateway/{TENANT}/paymentmodes/config' \
--header 'Content-Type: application/json' \
--header 'Accept: application/json' \
--header 'Authorization: Bearer {EMPORIX_AUTH_TOKEN}' \
--data-raw '{
"code": "saferpay",
"active": true,
"provider": "SPREEDLY_SAFERPAY",
"configuration": {
"Spreedly/EnvironmentKey": "{SPREEDLY_ENV_KEY}",
"Spreedly/AccessSecret": "{SPREEDLY_ACCESS_SECRET}",
"Spreedly/ReceiverId" : "{SPREEDLY_RECEIVER_ID}",
"Saferpay/BasicAuth" : "{SAFERPAY_BASIC_AUTH}",
"Saferpay/CustomerId" : "{SAFERPAY_CUSTOMER_ID}",
"Saferpay/TerminalId" : "{SAFERPAY_TERMINAL_ID}",
"Saferpay/TestEnvironment" : "{SAFERPAY_TEST_ENV}",
"Saferpay/RedirectUrl" : "{SAFERPAY_REDIRECT_URL}"
}
}'
```
* SPREEDLY\_ENVIRONMENT\_KEY - Spreedly environment key that you got from Emporix support team.
* SPREEDLY\_ACCESS\_SECRET - Spreedly secret key that you got from Emporix support team.
* SPREEDLY\_RECEIVER\_ID - The token from the receiver creation request.
* SAFERPAY\_BASIC\_AUTH - The `base64` of a user:password of Saferpay JSON API Basic Authentication.\
You can create new credentials on the Saferpay page.
* SAFERPAY\_CUSTOMER\_ID - The customer ID of your Saferpay account. You can find the information on the Saferpay page.
* SAFERPAY\_TERMINAL\_ID - The terminal ID of your Saferpay account.
* SAFERPAY\_TEST\_ENV : expected values: true or false. Indicates whether the configuration is related to the test account or not. Based on the flag the following url is used:
* true -
* false -
* SAFERPAY\_REDIRECT\_URL - The URL to which the user should be redirected after 3DS2 operation. Usually it’s the merchant's storefront. For example [Emporix Demo Storefront](https://storefront.emporix.io/my-tenant/saferpay-callback).\
The following query params are automatically attached to the [redirect URL](https://storefront.emporix.io/my-tenant/saferpay-callback?orderId=E4131\&transactionId=e3686fe2-e30d-4425-9b2e-75a8d5215dae\&paymentModeId=1cdf30e6-3479-4f54-ac7d-e48ba3b0b6b0):
* orderId
* transactionId
* paymentModeId
### Storefront implementation
Saferpay is available only for the post-checkout approach, after the actual order is done.
{% hint style="warning" %}
Make sure that you have Spreedly scripts included in your index.html:
* ``
* ``
{% endhint %}
{% hint style="info" %}
You can find the examples in the [Emporix B2B Showcase](https://github.com/emporix/b2b-showcase) repository.
{% endhint %}
1. In the html part, create two buttons needed for the Saferpay:
* A button that opens Spreedly Express modal:
```js
```
* A button that triggers the payment process:
```js
PAY via Saferpay
```
2. In the same html, add also the JS part:
```js
const [spreedlyToken, setSpreedlyToken ] = useState(null)
useEffect(() => {
window['SpreedlyExpress'].init(paymentMode.environmentKey, {
"amount": props.grossValue + ' ' + props.currency,
"company_name": "PowerZone",
"sidebar_bottom_description": "Total Price",
}, {
"customerId": props.customerId
});
window['SpreedlyExpress'].onPaymentMethod(function(token, paymentMethod) {
setSpreedlyToken(token)
window['SpreedlyExpress'].unload()
});
}
}, [])
const openModal = (e) => {
window['SpreedlyExpress'].openView()
}
const executePayment = async () => {
const accessToken = localStorage.getItem(ACCESS_TOKEN)
const headers = {
Authorization: `Bearer ${accessToken}`
}
const body = {
order : {
id : props.orderId
},
paymentModeId: paymentMode.id,
creditCardToken: spreedlyToken
}
const res = await api.post(`${initializePayment()}`, body, { headers })
window.location.replace(res.data.externalPaymentRedirectURL)
}
```
**Result**: With this configuration, the user sees a button to provide their credit card data.
1. When a user completes the data, Spreedly sends a token via the `onPaymentMethod` js callback.
2. Having this token, it's possible to display a button where the user can trigger the payment initialization, where `${initializePayment()}` is resolved to /`payment-gateway/${getTenant()}/payment/frontend/initialize`. As a response you get an object that contains the `externalPaymentRedirectURL` property.
3. You have to redirect the user to the URL. The user has to do the 3DS2 flow right on the Saferpay page.
4. After the operation, Saferpay redirects to the `SAFERPAY_REDIRECT_URL` configured in payment-mode, with additional query parameters.
An example of the redirect page:
```js
{!authorizationFinished ?
(
<>We're authorizing the request...
) :
(
<>
{authorizationSuccess ? (
<>
Authorization finished with success
) : (<>Authorization failed)}
)
}
```
```js
const authorize = async (orderId, paymentModeId) => {
const accessToken = localStorage.getItem(ACCESS_TOKEN)
const headers = {
Authorization: `Bearer ${accessToken}`
}
const body = {
order : {
id : orderId
},
paymentModeId: paymentModeId
}
try {
const res = await api.post(`${authorizePayment()}`, body, { headers })
setAuthorizationFinished(true)
setAuthorizationSuccess(res.data.successful)
} catch(ex) {
setAuthorizationFinished(true)
setAuthorizationSuccess(false)
}
}
useEffect(() => {
const orderId = searchParams.get('orderId')
const paymentModeId = searchParams.get('paymentModeId')
authorize(orderId, paymentModeId)
},[])
```
5. When the user is redirected to callback page, you should read query parameters related to the `orderId` and `paymentModeId`.
6. Having the two parameters, you can invoke the authorize method, where `${authorizePayment()}` is resolved to `/payment-gateway/${getTenant()}/payment/frontend/authorize`.
**Result**:
* If the 3DS2 finishes with success, then the authorization response is `successful: true`.
* If the 3DS2 doesn't finish with success, the authorization response is `successful: false`.
# Spreedly Gateway
See example of integrating Spreedly Gateway.
A single Spreedly gateway provides many methods, like: credit\_card, credit\_card with 3DSecure, sprel (for offsite payment). Therefore, you can use one Spreedly gateway for all the payment types.\
To learn about the details, see [Spreedly Gateway](https://docs.spreedly.com/payment-gateways/test/) documentation.
## Gateway configuration
1. To start with the configuration, make sure you have the Spreedly environment credentials prepared.
2. To create a gateway on Spreedly side, execute the following request:
```js
curl --location --request POST 'https://core.spreedly.com/v1/gateways.xml' \
--header 'Content-Type: application/xml' \
--header 'Authorization: Basic {SPREEDLY_TOKEN}' \
--data-raw 'test'
```
The `SPREEDLY_TOKEN` is a result of `base64` of `environment_key:access_secret`.\
Result: after sending the request you should get a response that contains the token value.
```
5S0kV27BrZ0Z48TdGK7v10Y7ojB
...
```
{% hint style="danger" %}
Store the token value for the next steps in the configuration.\
If you lose the token value at any point, use the following request to get it:
```js
curl --location --request GET 'https://core.spreedly.com/v1/gateways.json' \
--header 'Authorization: Basic {SPREEDLY_TOKEN}'
```
{% endhint %}
### Credit card configuration
To configure a new payment mode in the payment gateway service, execute the following request:
```json
curl --location --request POST 'https://api.emporix.io/payment-gateway/my-tenant/paymentmodes/config' \
--header 'Content-Type: application/json' \
--header 'Accept: application/json' \
--header 'Authorization: Bearer {EMPORIX_AUTH_TOKEN}' \
--data-raw '{
"code": "credit_card",
"active": true,
"provider": "SPREEDLY",
"configuration": {
"Spreedly/GatewayToken": "{SPREEDLY_GATEWAY_TOKEN}",
"Spreedly/EnvironmentKey": "{SPREEDLY_ENVIRONMENT_KEY}",
"Spreedly/AccessSecret": "{SPREEDLY_ACCESS_SECRET}",
"Spreedly/PaymentMethodType": "credit_card"
}
}'
```
* EMPORIX\_AUTH\_TOKEN - The standard access token. To check how to get the token see [OAuth Service](https://app.gitbook.com/s/d4POTWomuSS7d3dnh4Dg/api-guides/authentication/oauth-service) documentation.
* SPREEDLY\_GATEWAY\_KEY - Spreedly gateway token that was returned when you configured the payment gateway on the Spreedly side.
* SPREEDLY\_ENVIRONMENT\_KEY - Spreedly environment key that you got from Emporix support team.
* SPREEDLY\_ACCESS\_SECRET - Spreedly secret key that you got from Emporix support team.
### Credit card configuration with 3DS
#### Prerequisite
To start with the 3DS configuration, you need to create a Merchant Profile and an SCA Provider.
1. Obtain the Merchant Profile token by executing the following request:
```json
curl --location --request POST 'https://core.spreedly.com/v1/merchant_profiles.json' \
--header 'Authorization: Basic {SPREEDLY_TOKEN}' \
--header 'Content-Type: application/json' \
--data-raw '{
"merchant_profile": {
"description": "Spreedly",
"visa": {
"acquirer_merchant_id": "spreedlys_mid",
"merchant_name": "Spreedly",
"country_code": "276",
"mcc": "5978"
},
"mastercard": {
"acquirer_merchant_id": "spreedlys_mid",
"merchant_name": "Spreedly",
"country_code": "276",
"mcc": "5978"
}
}
}'
```
Response: you should get a json with the `merchant_profile.token` value. Make sure to save the value as it's needed in the next configuration steps.
2. Obtain the SCA provider token by executing the following request:
```json
curl --location --request POST 'https://core.spreedly.com/v1/sca/providers.json' \
--header 'Authorization: Basic {SPREEDLY_TOKEN}' \
--header 'Content-Type: application/json' \
--data-raw '{
"sca_provider": {
"merchant_profile_key": "{MERCHANT_PROFILE_TOKEN}",
"type": "test",
"sandbox": true,
"mastercard": {
"acquirer_bin": "4444444444",
"merchant_url": "https://spreedly.com",
"merchant_password": "optional"
},
"visa": {
"acquirer_bin": "4444444444",
"merchant_url": "https://spreedly.com",
"merchant_password": "optional",
"merchant_brand_id": "optional"
}
}
}'
```
**Response**: you should get a json with the `sca_provider.token` value. Make sure to save the value as it's needed in the next configuration steps.
#### Configuration
To configure a new payment method with the 3DS in the payment gateway service, execute the following request:
```json
curl --location --request POST 'https://api.emporix.io/payment-gateway/my-tenant/paymentmodes/config' \
--header 'Content-Type: application/json' \
--header 'Accept: application/json' \
--header 'Authorization: Bearer {EMPORIX_AUTH_TOKEN}' \
--data-raw '{
"code": "credit_card_3ds",
"active": true,
"provider": "SPREEDLY",
"configuration": {
"Spreedly/GatewayToken": "{SPREEDLY_GATEWAY_TOKEN}",
"Spreedly/EnvironmentKey": "{SPREEDLY_ENVIRONMENT_KEY}",
"Spreedly/AccessSecret": "{SPREEDLY_ACCESS_SECRET}",
"Spreedly/SignatureSecret": "{SPREEDLY_SIGNATURE_SECRET}",
"Spreedly/PaymentMethodType": "credit_card",
"Spreedly/SCAProviderToken": "{SPREEDLY_SCA_PROVIDER}",
"Spreedly/TestScenario" : "{TEST_SCENARIO}"
}
}'
```
* EMPORIX\_AUTH\_TOKEN - The standard access token. To check how to get the token see [OAuth Service](https://app.gitbook.com/s/d4POTWomuSS7d3dnh4Dg/api-guides/authentication/oauth-service) documentation.
* SPREEDLY\_GATEWAY\_KEY - Spreedly gateway token that was returned when you configured the payment gateway on the Spreedly side.
* SPREEDLY\_ENVIRONMENT\_KEY - Spreedly environment key that you got from Emporix support team.
* SPREEDLY\_ACCESS\_SECRET - Spreedly secret key that you got from Emporix support team.
* SPREEDLY\_SIGNATURE\_SECRET - Spreedly signature secret that you got from Emporix support team.
* SPREEDLY\_SCA\_PROVIDER - The `sca_provider.token` you got in the previous request.
* TEST\_SCENARIO - This value should be provided only for testing purposes (it shouldn’t be provided for production configuration). Valid options are: `authenticated`, `not_authenticated` and `challenge`. We recommend testing the flow especially with the `challenge` mode, where an additional offsite step is required when an order is being created.
{% hint style="info" %}
To learn more about 3DS2, see the [Spreedly 3DS2 Global](https://docs.spreedly.com/guides/spreedly-3dsecure2-intro/) documentation.
{% endhint %}
### Spreedly Sprel
Spreedly Sprel is an off-site payment, which means that the payment is finished outside of your storefront. In this situation, the payment provider needs to know where the end user should be redirected when the payment is done. Therefore, you need to provide a {REDIRECT\_URL} value in the configuration, for example: .
To create this payment method, execute the following request:
```json
curl --location --request POST 'https://api.emporix.io/payment-gateway/my-tenant/paymentmodes/config' \
--header 'Content-Type: application/json' \
--header 'Accept: application/json' \
--header 'Authorization: Bearer {EMPORIX_AUTH_TOKEN}' \
--data-raw '{
"code": "sprel",
"active": true,
"provider": "SPREEDLY",
"configuration": {
"Spreedly/GatewayToken": "{SPREEDLY_GATEWAY_TOKEN}",
"Spreedly/EnvironmentKey": "{SPREEDLY_ENVIRONMENT_KEY}",
"Spreedly/AccessSecret": "{SPREEDLY_ACCESS_SECRET}",
"Spreedly/SignatureSecret": "{SPREEDLY_SIGNATURE_SECRET}",
"Spreedly/PaymentMethodType": "sprel",
"Spreedly/RedirectURL": "{REDIRECT_URL}"
}
}'
```
* EMPORIX\_AUTH\_TOKEN - The standard access token. To check how to get the token see [OAuth Service](https://app.gitbook.com/s/d4POTWomuSS7d3dnh4Dg/api-guides/authentication/oauth-service) documentation.
* SPREEDLY\_GATEWAY\_KEY - Spreedly gateway token that was returned when you configured the payment gateway on the Spreedly side.
* SPREEDLY\_ENVIRONMENT\_KEY - Spreedly environment key that you got from Emporix support team.
* SPREEDLY\_ACCESS\_SECRET - Spreedly secret key that you got from Emporix support team.
* SPREEDLY\_SIGNATURE\_SECRET - Spreedly signature secret that you got from Emporix support team.
* REDIRECT\_URL - The URL of your storefront, where the user should be redirected after the payment is completed.
## Storefront implementation
This is an example of how you can configure your storefront payment support for the Payment Gateway service.
### Credit cards
1. Add a button that opens Spreedly Express modal.
```json
```
There's a 'onClick' handler configure, the handler should open the Spreedly modal:
```json
const openModal = (event) => {
window['SpreedlyExpress'].openView()
}
```
2. Configure an `init` function, it should be invoked when a page/component is rendered.
```json
window['SpreedlyExpress'].init(paymentMode.environmentKey, {
"amount": cart.subtotalAggregate.grossValue + ' ' + cart.subtotalAggregate.currency,
"company_name": "PowerZone",
"sidebar_bottom_description": "Total Price",
}, {
"customerId": cart.customerId
});
```
3. Configure Spreedly listener.
```json
window['SpreedlyExpress'].onPaymentMethod(function(token, paymentMethod) {
// store token, because it should be send in the checkout request
window['SpreedlyExpress'].unload()
});
```
4. Adjust the checkout request, by adding the following payment information to the payload:
```json
{
...
"paymentMethods" : [
{
"provider": "payment-gateway",
"customAttributes": {
"token": "HXCA1VgWm2EYDdhZ8gFgUxUhwlI",
"modeId": "f44f71a4-b632-4c9e-a9fc-27b97551d1d7",
"customer": "17071158"
}
}
]
...
}
```
* The provider should always be `payment-gateway` if you’re using payment-gateway service.
* The token is the token returned by Spreedly express.
* The `modeId` is the payment-mode identifier - the id returned by [Payment Gateway service](https://github.com/emporix/emporix-documentation-portal/blob/master/content/user-guides/extensibility-and-integrations/payment-gateway/broken-reference/README.md).
* The customer is the customer identifier.
Response:
```json
{
"orderId": "EON1005",
"paymentDetails": {
"externalPaymentHttpMethod": null,
"authorizationToken": "aPF9mGbmqApxWmCBeMHduxccL9G",
"externalPaymentRedirectURL": null
},
"checkoutId": null
}
```
The thing that may be needed for you is `paymentDetails` section. In case of on-site payment no further action is required.
### Credit cards with 3DS
1. Adjust Spreedly listener.
```json
window['SpreedlyExpress'].onPaymentMethod(function(token, paymentMethod) {
let browserInfo = window['Spreedly'].ThreeDS.serialize('4')
// store the browserInfo, because it should be send in the checkout
// store token, because it should be send in the checkout request
window['SpreedlyExpress'].unload()
});
```
2. Adjust the checkout request by adding the following payment information to the payload:
```json
{
...
[
{
"provider": "payment-gateway",
"method" : "credit_card",
"customAttributes": {
"token": "YqLX1WVg7lUpTaJWFOVkL6XxNJq",
"modeId": "3005fcfc-8e5e-4253-8309-39e6045970e0",
"customer": "17071158",
"browserInfo": "eyJ3aWR0aCI6Mzg0MCwiaGVpZ2h0IjoyMTYwLCJkZXB0aCI6MjQsInRpbWV6b25lIjotMTIwLCJ1c2VyX2FnZW50IjoiTW96aWxsYS81LjAgKE1hY2ludG9zaDsgSW50ZWwgTWFjIE9TIFggMTBfMTVfNykgQXBwbGVXZWJLaXQvNTM3LjM2IChLSFRNTCwgbGlrZSBHZWNrbykgQ2hyb21lLzExNC4wLjAuMCBTYWZhcmkvNTM3LjM2IiwiamF2YSI6ZmFsc2UsImxhbmd1YWdlIjoiZW4tR0IiLCJicm93c2VyX3NpemUiOiI0IiwiYWNjZXB0X2hlYWRlciI6InRleHQvaHRtbCxhcHBsaWNhdGlvbi94aHRtbCt4bWwsYXBwbGljYXRpb24veG1sIn0="
}
}
]
...
}
```
* The provider should always be `payment-gateway` if you’re using payment-gateway service.
* The token is the token returned by Spreedly express.
* The `modeId` is the payment-mode identifier - the id returned by [Payment Gateway service](https://app.gitbook.com/s/d4POTWomuSS7d3dnh4Dg/api-guides/checkout/payment-gateway).
* The customer is the customer identifier.
* The `browserInfo` is the one that was generated in the `onPaymentmethod` listener.
3. When the checkout is done and the order is completed, it should be checked if the 3DS challenge is needed. You can check that by adding the `html` code and JS part.
Html code:
```json
```
JS part:
```json
const [challenge, setChallenge] = useState(true)
useEffect(() => {
if(payment?.paymentMode?.scaProviderToken) {
var lifecycle = new window['Spreedly'].ThreeDS.Lifecycle({
environmentKey: {SPREEDLY_ENVIRONMENT_KEY},
hiddenIframeLocation: 'device-fingerprint',
challengeIframeLocation: 'challenge',
transactionToken: {AUTHORIZATION_TOKEN},
challengeIframeClasses: '3dsModal'
})
var on3DSstatusUpdatesFn = function(threeDsStatusEvent) {
if (threeDsStatusEvent.action === 'succeeded') {
setChallenge(false)
} else if (threeDsStatusEvent.action === 'error') {
// present an error to the user to retry
} else if (threeDsStatusEvent.action === 'finalization-timeout') {
// present an error to the user to retry
} else if (threeDsStatusEvent.action === 'challenge') {
setChallenge(true)
document.getElementById('challenge-modal').classList.remove('hidden');
}
}
window['Spreedly'].on('3ds:status', on3DSstatusUpdatesFn)
lifecycle.start()
} else {
setChallenge(false)
}
}, [])
```
If a challenge is needed, then an appropriate modal is displayed. Emporix system is notified about the result of the operation by an appropriate callback that is sent directly to the payment-gateway service by Spreedly.
### Spreedly Sprel
To use Spreedly Sprel as the off-site payment solution, you have to generate a token in Spreedly.\
You can do this in two ways:
* Display a button that does the form submission - as described in [PayPal Commerce Platform Offsite Payments](https://docs.spreedly.com/guides/offsite-payments/ppcp/).
* Execute the following (an example in react):
```java
const generateToken = () => {
var formData = new FormData();
formData.append("redirect_url", window.location.href)
formData.append("environment_key", {SPREEDLY_ENVIRONMENT_KEY})
formData.append("payment_method_type", "sprel")
axios({
method: "post",
url: "https://core.spreedly.com/v1/payment_methods.json",
data: formData,
headers: { "Content-Type": "multipart/form-data" },
})
.then(function (response) {
storeToken(response)
})
.catch(function (response) {
storeToken(response)
});
}
const storeToken = (response) => {
const url = new URL(response.request.responseURL)
const token = url.searchParams.get("token")
setPayment({
provider: 'payment-gateway',
mode: "offsite",
method: 'sprel',
customAttributes: {
token : token,
modeId : paymentMode.id,
customer : cart.customerId
}
})
}
```
All the payment information is stored, because we need this value during the checkout call. The payment object during the checkout request should look like:
```json
{
...
"paymentMethods": [
{
"provider": "payment-gateway",
"mode": "offsite",
"method": "sprel",
"customAttributes": {
"token": "8Ny2OGn1dwzPBuBdwSej95qAuHN",
"modeId": "227fed5b-e91a-473e-88ea-3b0e85db8408",
"customer": "17071158"
}
}
]
...
}
```
**Response**:
```json
{
"orderId": "EON1011",
"paymentDetails": {
"externalPaymentHttpMethod": "GET",
"authorizationToken": "nzQPTC2skR6Fb3LgOagBmVGCBC",
"externalPaymentRedirectURL": "https://core.spreedly.com/sprel/5S0kV27BrZ0Z47TdGK4v1OI7ojB/checkout/nzQPTC2skR6Fb3LgOagBmVGCBC"
},
"checkoutId": null
}
```
Pay attention to the `paymentDetails.externalPaymentRedirectURL` value. To finish the payment, you should redirect the user to the URL. Emporix payment gateway is notified about the result of the payment process by Spreedly callback functionality.
# Unzer
See example of integrating Unzer.
## Introduction
The Emporix system allows to integrate with [Unzer](https://www.unzer.com/en/) as the payment provider.
What we support, is the [Pay by Invoice](https://www.unzer.com/en/unzer-invoice/) solution as the post-checkout approach. No other Unzer integration is possible at the moment.
{% hint style="info" %}
To enable Uzer, you do not need Spreedly environment.
{% endhint %}
The diagram shows how Unzer sequence looks like when it's integrated with Emporix:
## Gateway configuration
### Prerequisite
For the Emporix and Unzer configuration, you need to have the **private key** and the **public key** from your Unzer account.
### Creating the payment mode
To create the new payment mode, execute the following request:
```json
curl --location --request POST 'https://api.emporix.io/payment-gateway/{TENANT}/paymentmodes/config' \
--header 'Content-Type: application/json' \
--header 'Accept: application/json' \
--header 'Authorization: Bearer {EMPORIX_AUTH_TOKEN}' \
--data-raw '{
"code": "unzer",
"active": true,
"provider": "UNZER",
"configuration": {
"Unzer/PaymentMethodType": "{UNZER_PAYMENT_METHOD_TYPE}",
"Unzer/PublicKey": "{UNZER_PUBLIC_KEY}",
"Unzer/PrivateKey": "{UNZER_PRIVATE_KEY}",
"Unzer/CustomerType": "{UNZER_CUSTOMER_TYPE}",
"Unzer/ReturnURL" : "{UNZER_RETURN_URL}"
}
}'
```
* UNZER\_PAYMENT\_METHOD\_TYPE - PAYLATER\_INVOICE is the supported payment method.
* UNZER\_PUBLIC\_KEY - The public key from your Unzer account.
* UNZER\_PRIVATE\_KEY - The private key from your Unzer account.
* UNZER\_CUSTOMER\_TYPE - Either B2B or B2C.
* UNZER\_RETURN\_URL - The URL to which the customer should be redirected after an external payment.
## Storefront implementation
The integration with Unzer does not require any specific implementation on the storefront side. Emporix implements the `server-side-only` integration with Unzer, therefore there is no need to generate any token - it's done by the Emporix Payment Gateway service.
The only thing you need to ensure is that you’re providing the following data during the authorization request:
```json
{
"order":
{
"id":"{ORDER_ID}"
},
"paymentModeId":"{PAYMENT_MODE_ID}"
}
```
* ORDER\_ID - Identifier of an order.
* paymentModeId - Identifier of the payment mode that you got from endpoint.
{% hint style="info" %}
To learn more about the Unzer solution, see the [Unzer](https://docs.unzer.com/payment-methods/unzer-invoice-upl/accept-unzer-invoice-upl-server-side-only-integration/) documentation.
{% endhint %}
# Invoice
See example of enabling invoice payment method.
Apart from payment gateways, Emporix supports **invoice (post-checkout)** as a payment mode. This is common in B2B flows, for example net terms.
Invoice is configured through the Payment Gateway Service API.
{% hint style="info" %}
Invoice does **not** collect the actual funds. You invoice the customer outside of Emporix.
{% endhint %}
### Create the invoice payment mode
Create an `invoice` payment mode with `POST /payment-gateway/{TENANT}/paymentmodes/config`. For the full endpoint reference, see [Payment modes configuration](https://developer.emporix.io/api-references/api-guides/checkout/payment-gateway/api-reference/payment-mode).
#### Example request
```bash
curl --location --request POST 'https://api.emporix.io/payment-gateway/{{TENANT}}/paymentmodes/config' \
--header 'Content-Type: application/json' \
--header 'Accept: application/json' \
--header 'Authorization: Bearer {EMPORIX_AUTH_TOKEN}' \
--data-raw '{
"code": "invoice",
"active": true,
"provider": "INVOICE",
"configuration": {}
}'
```
#### Payload notes
* `code`: Your storefront uses this as the method identifier (for example `invoice`).
* `provider`: Must be `INVOICE`.
* `configuration`: Empty for invoice.
### What to do next
After configuration, the mode shows up in `GET /payment-gateway/{TENANT}/paymentmodes/frontend`. Use that list to render available payment options in your storefront.
# Third Party Add-Ons
Third-party add-ons can boost the effectiveness of building and managing your online store.
Emporix makes it possible to seamlessly integrate your store with external systems, such as Content Management Systems (CMSs) or support platforms. These systems play crucial roles in enhancing your store's functionality. For example, a CMS is software that enables you to create, edit, and publish your store's content. Similarly, a support system allows you to manage customer interactions, resolve issues, and provide assistance efficiently, ensuring a smooth customer experience.
See what you can connect to:
* [Emporix Contentful App](https://developer.emporix.io/ce/extensibility-and-integrations/add-ons/emporix-contentful-app) - integrate your product data from Emporix to Contentful platform
* [Emporix Builder.io Plugin](https://developer.emporix.io/ce/extensibility-and-integrations/add-ons/builderio) - create websites using the data from Commerce Engine
* [Magnolia Emporix Connector](https://developer.emporix.io/ce/extensibility-and-integrations/add-ons/magnolia) - integrate product data using Magnolia CMS
* [Zendesk Emporix Connect](https://developer.emporix.io/ce/extensibility-and-integrations/add-ons/zendesk) - integrate with Zendesk to enhance customer support experience
* [Emporix Storyblok Plugin](https://developer.emporix.io/ce/extensibility-and-integrations/add-ons/storyblok) - integrate with Storyblok to create content displaying your products and categories
# Emporix Contentful App
Emporix Contentful App provides external product management functionalities.
The Emporix Contentful App allows you to visually select your store's products from Emporix and reference them in Contentful entries.
## Prerequisites
To use the Emporix Contentful App, you need:
* A [Contentful content type](https://www.contentful.com/help/contentful-101/#step-3-create-the-content-model). It needs to include at least one field with its type set to either `Short text` or `Short text, list`.
Emporix credentials for integrating with Contentful:
* Search API Key
* Index Name
## Installing the Emporix app on Contentful
1. Log in to [Contentful](https://be.contentful.com/login).
2. Navigate to **Apps** -> **Manage** apps.
3. Select the **Emporix app** and click **Authorize access**.
4. Fill out the Emporix app fields with your Algolia credentials.\
a. Paste your Search API Key in the **Search Key** field.\
b. Paste your **Index Name** in the **Index name** field.\
c. Paste your **Application Id** in the **Application id** field. This field is optional. If **Algolia Application** is provided by Emporix then this field should be empty. If custom **Algolia Application** is used then this field should be provided.
5. Mark checkboxes next to the fields for which you would like to install the Emporix app.
6. Click **Install**.
## Using the product picker to select products
1. Navigate to the **Content** tab.
2. Select or create a new entry of the content type for which you installed the app.
3. Find the field and click **Select products**.
4. Use the search bar to search for products by name.
5. Select the products and click **Save products**.
6. Selected products should now appear in the content editor.
{% hint style="info" %}
To facilitate finding relevant products, the products that have not been published yet are tagged with the `[UNPUBLISHED]` label. It helps you differentiate whether you select the right items. The information whether a product is published or not comes from the configured search index provider.
{% endhint %}
# Emporix Builder.io Plugin
Builder.io plugin provides external content management functionality.
[Builder.io](https://www.builder.io/) is a visual and headless CMS platform that allows you to build webpages faster thanks to predefined building elements. You might want to use this solution to create or enhance your online store website or application. To facilitate integration between Emporix Commerce Engine and Builder.io, we have created a plugin that helps you connect your data and build your store even faster. The Builder.io Emporix plugin is made available through [Builder.io Integrations](https://www.builder.io/m/integrations).
Within the Builder tool, you can find the plugin on the plugins list:
### Purpose
The Emporix Builder.io plugin provides a standardized and fast integration of data from Commerce Engine. The Builder.io can use data like product and categories when creating data models within Builder.io. Therefore, using the plugin when working on your storefront, you are able to fetch the product data from Commerce Engine and add it to your webpage straightaway.
### Configuration
If you want to use Builder.io and the Emporix Builder.io plugin to build your webpage, only configuration is required.\
All the steps how to enable the plugin and start working with it are described in [Builder.io](https://github.com/BuilderIO/builder/tree/main/plugins/emporix) documentation.\
When enabling the plugin, you need to provide:
* your tenant name
* your Storefront API ClientID
{% hint style="info" %}
Find your Storefront API ClientID within your API Keys.
{% endhint %}
To learn about the plugin, see [Emporix Builder.io Plugin](https://github.com/BuilderIO/builder/tree/main/plugins/emporix).
# Magnolia Emporix Connector
Magnolia Emporix Connector provides external CMS functionalities.
Magnolia CMS is a content management system (CMS) designed to help businesses manage and deliver digital content across multiple channels.
The Magnolia eCommerce Connector developed by Arvato Systems Switzerland, enables seamless integration of products managed in directly into the Magnolia CMS. The [connector](https://www.magnolia-cms.com/marketplace/detail/emporix-connector.html) provides several out-of-the-box features, such as apps that allow users to view and manage products, catalogs, and categories from directly within Magnolia. It also includes searchable products and categories, a local cache mechanism and an e-commerce integration registry.
Each catalog contains a list of products that have been assigned to it.
Selecting a specific product allows you to view all the relevant details associated with it.
{% hint style="info" %}
For further information about the Magnolia Emporix Connector, refer to the [Magnolia guide - Emporix Connector](https://www.magnolia-cms.com/marketplace/detail/emporix-connector.html).
{% endhint %}
# Zendesk Emporix Connect
Integration with Zendesk can enhance your customer support service.
Zendesk is a customer service and engagement platform designed to help businesses improve their customer support operations. Emporix enhances the support workflow by connecting seamlessly with the platform.
With Emporix Connect for Zendesk Support, order information is integrated directly into the ticket view, providing support agents with instant access to key details such as ordered products or shipping and billing addresses.
By eliminating the need to switch between systems, this integration streamlines the process, enabling faster, more accurate responses. The outcome is a more efficient support operation and higher customer satisfaction.
To start working with Emporix Connect for Support:
1. Download the application from [Zendesk App Marketplace](https://www.zendesk.co.uk/marketplace/apps/support/1071457/emporix-connect-for-support/?queryID=1158fbca6ec968847d284b10a71fef1d).
2. Get your Emporix API Credentials. Go to [Emporix Developer Portal](https://developer.emporix.io/ce/getting-started/developer-portal) -> [Manage API Keys](https://developer.emporix.io/ce/getting-started/developer-portal/manage-apikeys). In the API Key section you can check your **clientID** and **Secret** values.
{% hint style="danger" %}
Make sure you're checking your credentials for the right Emporix tenant. The tenant details are visible in the top-left corner. If you want to check the full list of your tenants, you can do so in the [Tenant List](https://developer.emporix.io/ce/getting-started/developer-portal/tenant-list) section.
{% endhint %}
3. Copy your credentials (Client ID, Secret, and tenant) as they are required in the next installation steps.
4. Install the Emporix Connect for Support and provide the Emporix API keys credentials when requested.
5. During the installation process you can also set the `OrderDisplayLimit`. By default, the limit is set to 3.
{% hint style="info" %}
For all the information about Zendesk Emporix Connect, refer to the [Zendesk - Emporix Connect for Support](https://www.zendesk.co.uk/marketplace/apps/support/1071457/emporix-connect-for-support/).
{% endhint %}
# Emporix Storyblok App
Learn about integration possible with the Emporix Storyblok app.
Emporix partners with [Storyblok](https://www.storyblok.com/) which is a headless CMS that combines developer flexibility with an intuitive visual editor, making it easy to create and deliver content across any digital platform. The integration between Emporix and Storyblok is established with the [field plugin](https://www.storyblok.com/docs/plugins/field-plugins/introduction). This plugin connects to the Emporix Commerce API to retrieve products and categories that are later displayed for the customers.
The key features are:
* **Product Search** – finding products by name
* **Category Filtering** – narrowing search results by category
When adding items to the story through the field plugin, you can browse through products and categories using either a list view or grid:
If you want to filter the results, you can narrow the search by categories:
## Configuration
The Storyblok integration setup requires different steps that need to be combined between the customer and Emporix support team.
### Preparation steps
To start your integration between Storyblok and Emporix, as a customer go through the following steps:
{% stepper %}
{% step %}
**Add Emporix user to your Storyblok account**
Log in to your Storyblok account and add **** as a user.
{% hint style="info" %}
To learn how to add a new user, see the [Adding new team members](https://www.storyblok.com/faq/add-new-team-members) Storyblok documentation.
{% endhint %}
{% endstep %}
{% step %}
**Contact Emporix about the integration**
Inform the [Emporix Support Team](mailto:support@emporix.com) that **** has been added as a user to your Storyblok account.
Once notified, the Emporix team completes the installation steps on their side.\
After the installation is finished, the Emporix Support Team will notify you about the completion.
{% hint style="success" %}
When contacting the Emporix Support Team, also provide the **name** and **region** of your Storyblok Space. This is needed for the installation process.
{% endhint %}
{% endstep %}
{% step %}
**Remove the Emporix user**
When the previous steps are done, you can remove **** from your Storyblok account.\
Then, continue with the next steps to configure the field plugin.
{% endstep %}
{% endstepper %}
### Field plugin configuration
The Storyblok field plugin requires the following details to connect to the Emporix API:
* `tenant` - Your Emporix tenant identifier
* `clientId` - Client ID for API authentication
* `clientSecret` - Client secret for API authentication
* `baseUrl` - Emporix API base URL, the default is
You can find all the data in your Emporix developer portal in the [Manage API Keys](https://developer.emporix.io/ce/getting-started/developer-portal/manage-apikeys) section.
When you have the data, these values are configured using **Storyblok UI** when adding the field plugin in Storyblok:
{% stepper %}
{% step %}
**Create a new field plugin**
Go to the field plugin design in your Storyblok account.
{% endstep %}
{% step %}
**Define values in the field configuration**
Enter the `tenant`, `clientID`, `clientSecret` and `baseUrl` values as **Options** in the **Settings** section.
{% endstep %}
{% step %}
**Add the items**
When the values are defined, use the **Add items** in the **Preview** block within the field plugin UI editor and select the products or categories that you want to have displayed. When you select the products for your story, they are later visible in the preview list:
{% endstep %}
{% step %}
**Save the story**
After you save the story, you can review it and check if everything is displayed correctly.
{% endstep %}
{% endstepper %}
# Introduction
Learn about Emporix core commerce features.
The **Core Commerce** category contains overviews of the Emporix e-commerce solutions. Each document describes the way that a particular concept is designed in our system and how it can benefit your business.
{% hint style="info" %}
If you're looking for documentation on how to configure specific e-commerce functionalities for your Emporix tenant, check out [API Docs](https://app.gitbook.com/o/z8MNPigQv25NZe33g3AV/s/d4POTWomuSS7d3dnh4Dg/).
{% endhint %}
# AI Assistance
Learn about AI capabilities in Emporix.
Here you can find an overview of the Emporix AI Assistance, along with its features and benefits.
{% hint style="info" %}
* Looking for user guides? Check out the [AI for a Product Description - Management Dashboard](https://developer.emporix.io/ce/management-dashboard/products-module/ai) and [AI System Preferences](https://developer.emporix.io/ce/management-dashboard/settings/system-preferences) documentation.
* Looking for API reference? Check out the [AI Service](https://app.gitbook.com/s/d4POTWomuSS7d3dnh4Dg/api-guides/artificial-intelligence/ai-service) documentation.
{% endhint %}
## Purpose
Emporix builds loyalty and trust by responding to the current customer and market needs. With our innovative approach, the AI Assistant makes it possible to rapidly address changing e-commerce needs and requirements.
Using artificial intelligence you can work on your products and enhance their descriptions so that they address audience in a better way and get more focus.
| Business Aspect | Customer Value |
| -------------------------------- | ------------------------------------------------------------------------------------------------------------------------------------------------------------------------------------------------------------------ |
| Higher conversion rates | Our use of AI service makes it possible to create captivating and compelling product descriptions that pique customers' interest and lead to higher conversion rates. |
| Time and resource efficiency | By using AI service, we can create product descriptions faster without compromising on quality. This allows using time and resources more efficiently. |
| Consistency and branding | We ensure consistent brand communication by perfectly matching the tone and language in the product descriptions to the brand. AI service helps to convey a clear and consistent message across all product lines. |
| Diversity of approaches | AI service allows us to try different approaches to product descriptions. From humorous to informative, from technical to emotional - find the style that suits the products best and hits the target audience. |
| Search Engine Optimisation (SEO) | Our product descriptions are formulated to not only appeal to customers, but are also optimised for search engines. This helps to increase our visibility in search results. |
| Customer-focused information | With the help of AI service, we can provide detailed information about our products. Customers receive clearly understandable details that help them in their purchase decision. |
# Carts
Carts are one of the core concepts of online commerce.
Here you can find an overview of the Emporix carts concept, along with its features and benefits.
{% hint style="info" %}
* Looking for code tutorials? Check out the [Cart Service guide](https://app.gitbook.com/s/d4POTWomuSS7d3dnh4Dg/api-guides/checkout/cart/cart).
* Looking for API reference? Check out the [Cart Service](https://app.gitbook.com/s/d4POTWomuSS7d3dnh4Dg/api-guides/checkout/cart) in the Emporix API Reference.
{% endhint %}
## Purpose
Carts allow your customers to compile a list of items for purchase. The Emporix carts concept aims to simplify cart management by introducing features such as cart merging or automatic deleting of inactive carts.
## Features
The Emporix carts concept introduces a set of features that make cart management easier:
| Feature | Description |
| -------------------------------- | --------------------------------------------------------------------------------------------------------------------------------------------------------------------------------------------------------------------------------------------------------------------------------------------------------------------------------------------------------------------------------------------------------------------------------------------------------------------------------------------------------------------------------------- |
| **Anonymous and customer carts** |
The Emporix e-commerce system distinguishes two types of carts:
Anonymous carts for customers who are browsing the store without logging in.
Customer carts for logged-in customers.
|
| **Cart merging** |
You can merge a customer's anonymous cart with their customer cart to preserve the shopping flow.
|
| **Inactivity time** | If a cart is inactive for over 30 consecutive days, it is automatically deleted from the database. |
| **Statuses** |
A cart can either be active (OPEN) or inactive (CLOSED). A cart's status is automatically set to CLOSED in the following cases:
The cart belonged to an anonymous customer, and it was merged with a logged-in customer's cart.
The cart went through the checkout process.
⚠️ You can only perform operations on OPEN carts.
|
## Overview
The following section provides more information on cart management features in the Emporix e-commerce system.
### Cart merging
Sometimes a customer will browse products and add them to the cart before logging in. In such a case, you can merge their anonymous cart with their customer cart to preserve the shopping flow.
Once the carts are merged, the anonymous cart's status is set to `CLOSED`.
You can use the merging functionality to perform the following actions:
* Merge an anonymous cart with a customer cart.
* Merge multiple anonymous carts with a customer cart.
{% hint style="danger" %}
You cannot use the merging functionality to perform the following actions:
* Merge a customer cart with an anonymous cart.
* Merge a customer cart with another customer cart.
* Merge two non-empty carts that use different currencies.
{% endhint %}
Common conflicts that may occur while merging carts are described in the table below.
| Conflict | Approach of the merging functionality |
| ----------------------------------------------------------------------------------------------------- | -------------------------------------------------------------------------------------------------------------------------------------------------------------------------------------------------------------------------------------------------------------------------------------- |
| Both carts contain the same items. | The quantities of the items are added together. |
| The same item is added to both carts, but one is added as an `itemYrn` and one as a `Product` object. | The item is treated as two separate entries. The quantities of the item are not added together. |
| The carts use different currencies. Both carts are empty. | The currency of the customer cart is preserved. |
| The anonymous cart includes items that are out of stock. |
The items are preserved.
⚠️ If a customer proceeds to checkout, an error message appears, prompting the customer to remove said items from their cart.
|
| The carts use different custom attributes. | The custom attributes are consolidated. |
| The carts use the same custom attributes, but their values are different. | The anonymous cart's custom attribute values are preserved. |
# Catalogs
Catalogs serve as a tool to structure your products.
The catalog concept allows you to create and manage catalogs.
{% hint style="info" %}
* Looking for code tutorials? Check out [Catalog Service guide](https://app.gitbook.com/s/d4POTWomuSS7d3dnh4Dg/api-guides/catalogs-and-categories/catalog/catalog).
* Looking for API reference? Check out the [Catalog Service](https://app.gitbook.com/s/d4POTWomuSS7d3dnh4Dg/api-guides/catalogs-and-categories/catalog) in the Emporix API Reference.
{% endhint %}
## Purpose
Catalogs allow you to manage categories with products and product-related information efficiently. With this feature, you can group categories into a logical structure with a specified name, description, and other additional properties.\
Both Catalog and Category Services are compatible with our existing Product Service. Emporix aims to provide a flexible and scalable solution for our customers so that they can manage and sell their products more efficiently.
## Features
As part of our redesign of how products are stored, categorized, and managed in the Emporix platform, we have introduced a new catalog feature, which acts as a container for categories and products.
{% hint style="success" %}
You can have multiple catalogs representing a products range available for different sites so that complex requirements may be modelled in the system.
{% endhint %}
The Emporix catalog concept comes with a set of features, described in the table below:
| Feature | Description |
| ---------------------------------------------- | -------------------------------------------------------------------------------------------------------------------------------------------------------------------------------------------------------------------------------------------------------------------------------------------------------------------------------------------------------------------------------------------------------------------------------- |
| **Localized catalog names and descriptions** | Deliver catalog names and descriptions in languages that your business operates in. |
| **Synchronized Catalog and Category Services** |
Every time you make any changes in the Category Service, they are automatically reflected in the Catalog Service.
✅ The Catalog Service automatically checks for any category-deleted events. Every time a root category is deleted, it is automatically removed from all catalogs it belonged to.
|
| **Category assignments** | Assign categories to a catalog. |
| **Visibility statuses** | Decide which catalogs should appear on the storefront by setting their statuses to `visible`. |
| **Time-limited catalogs** |
Along with enabling catalog visibility, set the specific timeframe for the catalogs to appear on the storefront.
✅ For example, promotional or seasonal catalogs visible on the storefront based on pre-set timeframes.
|
| **Multiple catalogs per tenant** |
Create and manage multiple catalogs for different purposes.
Supplier and seller catalogs
One catalog per product line or division
Seasonal catalogs
|
| **Multiple catalogs per site** |
Publish a number of catalogs on a site, available at the same time.
✅ Product catalog and promotional seasonal catalog.
|
### Features and benefits for B2B commerce
The Emporix catalog and category concepts constitute a flexible classification solution that helps B2B companies manage and display their product offerings more efficiently. With our Emporix Commerce Engine, you can be sure that your potential customers find specific products and product information easily.\
Our brand new Catalog Service allows you to create complex catalog structures with categories that can represent your business offering at a given time.
# Categories
Categories gather together products of similar properties.
The category management concept allows you to create and manage categories, subcategories, and category trees.
{% hint style="info" %}
* Looking for code tutorials? Check out the [Category Service guide](https://app.gitbook.com/s/d4POTWomuSS7d3dnh4Dg/api-guides/catalogs-and-categories/category-tree/category).
* Looking for API reference? Check out the [Category Service](https://app.gitbook.com/s/d4POTWomuSS7d3dnh4Dg/api-guides/catalogs-and-categories/category-tree) in the Emporix API Reference.
{% endhint %}
## Purpose
Categories are essential to every online business — they organize products and help employees and customers find what they need. Emporix aims to make category management easier by providing you with a customizable classification solution.
## Features
Our newly improved Category Service provides you with enhanced performance and scalability. Enriched, redesigned features allow you to build efficient classification solutions with guaranteed performance.
The Emporix category concept comes with a set of features, described in the table below:
| Feature | Description |
| --------------------------------------------- | ---------------------------------------------------------------------------------------------------------------------------------------------------------------------------------------------- |
| **Localized category names and descriptions** | Deliver category names in languages that your business operates in. |
| **Category customization** | Adjust the category model to suit your business needs with the help of mixins. |
| **Category trees** | Build category and subcategory structures for better product management. |
| **Assignments** | Assign products to a category. |
| **Visibility statuses** | Decide which categories should appear on the storefront by setting them as `published`. |
| **Time-limited categories** | Along with using the `published` status, decide which categories should be visible in a specific timeframe by setting a date range for their validity. |
| **Sorting** | Sort and rearrange the categories according to your needs. There is a convenient functionality that allows you to easily move the categories and change the order in which they are displayed. |
### Features and benefits for B2B commerce
For a B2B company that offers a wide variety of products, it is essential to provide a robust and flexible classification solution for employees and customers. Thanks to the Emporix Commerce Engine, you can group products into a flexible classification structure using categories that are most suitable for your business offering.
Our brand new Category Service allows you to freely nest categories and create as many subcategories as you need, along with the attributes assigned to them. Categories can be represented either as a flat list or as a hierarchical category tree to suit the needs of your employees and customers. These views are created and updated automatically.
{% hint style="info" %}
To find out more about managing categories, see [Categories](https://developer.emporix.io/ce/management-dashboard/catalogs-module/categories).
{% endhint %}
# Classifications
Learn how classification categories organize products with consistent attributes.
Here you can find an overview of Classification functionality, along with its features and benefits.
{% hint style="info" %}
* Looking for code tutorials? Check out the [Classification Tutorial](https://app.gitbook.com/s/d4POTWomuSS7d3dnh4Dg/api-guides/catalogs-and-categories/category-tree/classification) in the Emporix API Reference.
* Looking for API reference? Check out the [Category Service](https://app.gitbook.com/s/d4POTWomuSS7d3dnh4Dg/api-guides/catalogs-and-categories/category-tree) in the Emporix API Reference.
{% endhint %}
## Purpose
In B2B commerce, classification is essential for organizing and managing products with consistent attributes across your catalog. Classification categories allow you to define reusable attribute schemas that are automatically inherited by products assigned to those categories, reducing manual work and ensuring consistency.
By leveraging classification categories, you can improve data quality and simplify product management in your B2B commerce platform.
## Features
The Emporix classification for catalogs and products comes with a set of features:
| Feature | Description |
| ------------------------------------- | ---------------------------------------------------------------------------------------------------------------------------------------------------------------- |
| **Product attribute standardization** | Define consistent schemas for products within specific categories. Create better product data for integration with external systems, marketplaces, and partners. |
| **Enhanced search and filtering** | Enable better product discovery by allowing customers to filter products based on standardized classification attributes. |
| **Complex product hierarchy support** | Handle products that belong to multiple categories with different attribute requirements. |
| **Category-specific workflows** | Apply different business rules and validations based on product classifications. |
| **Automatic mixin application** | Automatically apply classification mixins to products based on category assignment. |
| **Emporix and custom mixin schemas** | You can use Emporix mixins or your own mixin schemas. |
| **Required attribute validation** | Validate that products have required classification attributes, maintaining data quality. |
| **Mixin inheritance** | Inherit classification mixins through category hierarchies, simplifying product management. |
| **Automatic schema URL population** | Automatically populate schema URLs in product updates. |
## How classification works
Categories can be one of two types:
* **STANDARD**: Default type, a regular category without classification mixins
* **CLASSIFICATION**: Category that can define classification mixins for product classification
Classification categories are special categories that define **classification mixins** — reusable schemas that specify what attributes products inside a category should have. Unlike standard categories, classification categories can define their own classification mixins and inherit mixins from parent classification categories.
{% hint style="info" %}
To find out more about managing classifications in the Management Dashboard, see [Classifications](https://developer.emporix.io/ce/management-dashboard/catalogs-module/classifications).
{% endhint %}
# Coupons
Enhance customers loyalty by offering coupons.
The coupon management functionality allows you to create and manage coupons with discounts.
{% hint style="info" %}
* Looking for object descriptions and code tutorials? Check out the [Coupon Service guide](https://app.gitbook.com/s/d4POTWomuSS7d3dnh4Dg/api-guides/rewards-and-promotions/coupon/coupon).
* Looking for API reference? Check out the [Coupon Service](https://app.gitbook.com/s/d4POTWomuSS7d3dnh4Dg/api-guides/rewards-and-promotions/coupon) in the Emporix API Reference.
{% endhint %}
## Purpose
Emporix offers you the possibility to create coupons every time you want to provide your existing or potential customers with discounts.
## Features
Our coupon management solution is a customizable model of coupon creation and configuration. The features are described in the table below.
| Feature | Description |
| -------------------------------------------------------- | ---------------------------------------------------------------------------------------------------------------------------------------------------------------------------------------------------------------------------------------------------------------------------------------------------------------------------------------------------------------------------------------------------------------------------------------------------------------------------------------------------- |
| **Various coupon types** |
Free shipping.
A fixed discount amount applied to a cart total.
A percentage discount applied to a cart total.
Category coupons applied in a form of fixed amount or percentage discount.
|
| **Coupons applicable to product categories in the cart** | You can decide which product categories are on sale at given time. Subcategories of products or other categories can be excluded. The discount code can be applied at checkout in a form of a fixed money amount, or a percentage of the original price. |
| **Multiple coupons applied to cart** | You can apply several different coupons to a cart. The number of coupons that can be applied all at once can be specified in the global configuration settings through API or in the [System Preferences](https://developer.emporix.io/ce/management-dashboard/settings/system-preferences) in the Management Dashboard. |
| **Customizable discount audiences** | You can offer discounts to all customers, logged-in customers only, specific customers by their Ids, or specified customer segments. |
| **Restrictions** | The minimum order value can be applied to ensure that the discount codes are applicable only above certain sum total. Coupon validity date can also be set in the restrictions section. |
| **Hypermedia links in coupons** | Links included in the coupons let you inform the customers of the actions they can take with the coupon. |
### Features and benefits for B2B commerce
Coupons for discounts are very attractive to customers who want to save money. By offering discount codes, you can win clients from outside of your usual pool of customers. What's more, your business becomes more popular and is visible online, thus generating more revenue in the long run. With time, you can create a large base of loyal customers thanks to your competitive offering.
### Coupon types
You can offer discounts both in a form of coupon codes and discounted product prices displayed directly on your business's website.
{% hint style="info" %}
Looking for sale price configuration? Check out the [Price Service guide](https://app.gitbook.com/s/d4POTWomuSS7d3dnh4Dg/api-guides/prices-and-taxes/price-service/price).
{% endhint %}
With the Emporix API Coupon Service, you can easily create and manage coupons that can later be offered in the form of codes. The following discounts are available:
* Free shipping.
* Fixed amount discount on the order total (for example, a $10 discount).
* Percentage discount on the order total (for example, a 10% discount).
* Fixed amount/percentage discount for a specific product category. You can decide which product categories are on sale at a given time. Subcategories of products or other categories can be excluded.
{% hint style="warning" %}
You cannot add category restrictions to the coupons that are applicable to specific customer segments.
{% endhint %}
All coupons can be set to work only above a certain minimum order amount. Coupons may be distributed through emails or newsletters in a form of text code that can be applied to a customer's cart at checkout.
### Referral coupons
The Emporix e-commerce system makes it possible to set up a referral coupon program for your business's customers. Referral coupons provide a fixed discount that can be applied at checkout.
{% hint style="info" %}
* Looking for object descriptions and code tutorials? Check out the [Referral Coupon Management in Coupon Service](https://app.gitbook.com/s/d4POTWomuSS7d3dnh4Dg/api-guides/rewards-and-promotions/coupon/coupon).
* Looking for API reference? Check out the [Referral Coupon Management in Coupon Service](https://app.gitbook.com/s/d4POTWomuSS7d3dnh4Dg/api-guides/rewards-and-promotions/coupon) in the Emporix API Reference.
{% endhint %}
When a customer's referral coupon is redeemed, they receive a referrer coupon as a reward. Referrer coupons provide the same discount as referral coupons.
The referral coupon functionality covers the following scenario:
1. Customer A places their first order.
2. Once the order is paid, a referral code is generated and sent to customer A through e-mail.
3. Customer A gives their referral code to customer B.
4. Customer B places their first order and uses customer A's referral code.
5. Once customer B's order is paid, a referrer code is generated and sent to customer A through e-mail.
Once referral coupons are configured, the Emporix API Coupon Service periodically checks placed orders and redeemed coupons and performs the following actions:
* Sends out referral codes to customers who have placed their first orders but haven't received their referral codes yet.
* Sends out referrer codes to customers whose referral codes have been redeemed.
{% hint style="warning" %}
The Coupon Service generates referral codes automatically based on your referral coupon settings.
{% endhint %}
# Customer Management
Customer Management Service brings the tools to administer information about your customers easily.
Here you can find an overview of the Emporix Customer Management Service, along with its features and benefits.
{% hint style="info" %}
* Looking for APIs documentation? Check out the [Customer Management](https://app.gitbook.com/s/d4POTWomuSS7d3dnh4Dg/api-guides/companies-and-customers/client-management/customer-management) and [Approval Service](https://app.gitbook.com/s/d4POTWomuSS7d3dnh4Dg/api-guides/companies-and-customers/approval-service/approval).
* To check how the Customer Management and Approval Process can be configured in Management Dashboard, check out the [Customer Management](https://developer.emporix.io/ce/management-dashboard/customer-management) guides.
{% endhint %}
### Purpose
The Emporix API Customer Management Service is designed to make customer management easier for B2B Commerce and improve approval processes for better business coordination.
The Customer Management Service divides company information into entities that are reusable and manageable. These entities include the companies' subsidiaries, locations, customers, and contacts, as shown in the diagram:
By using customer management and user groups with specified permissions, it's possible to set up a convenient approval flow within a company.
### Features
The Emporix API Customer Management Service introduces a set of features that make managing your business customers in your commerce channels easier:
| Feature | Description |
| ----------------------------------------- | ---------------------------------------------------------------------------------------------------------------------------------------------------------------------------------------------------------------------------------------------------------------------------------------------- |
| **Automatically-created customer groups** | Offer personalized pricing to your business customers' employees by adding them to automatically created company customer groups. |
| **Contact assignments** | Allow your employees to assign your business customer employees as contacts representing legal entities they work for. Since contacts may perform different roles within those entities, it is possible to specify the type of contact assignment, for example primary, logistics, or billing. |
| **Comprehensive data model** | Store detailed data about companies, such as legal information, physical locations, or contacts. |
| **Customer and contact assignments** | Manage data about customers and contact persons for specific companies. |
| **Company relationship structures** | Store information about subsidiaries of your business customers. |
| **Purchasing limits** | Specify the maximum purchase limits at the company level. |
| **Approval groups** | Create groups of business customers' employees who can approve purchases made by other buyers in their company. For the approval process you can use the admin, buyer or requester roles. As a customer you can also create new users and assign them with specific roles. |
| **Approval validity** | Set expiry dates for the approval requests. |
| **Approval transparency** | Relevant statuses are set automatically and reflect the state of the approval requests. |
{% hint style="warning" %}
The Customer Management Service is primarily designed to bring information about your business customers\
close to where it is needed to manage your commerce channels. If your single source of truth about the customers is stored within a third-party-solution it can be integrated into our application.
{% endhint %}
# Approvals
In B2B segment, having an appropriate approval process in place is crucial.
Here you can find an overview of the Emporix Approval Service, along with its features and benefits. The approval process is relevant only for the B2B customers.
{% hint style="info" %}
* Looking for Management Dashboard guides? Check out the [System Preferences](https://developer.emporix.io/ce/management-dashboard/settings/system-preferences) and [Customers](https://developer.emporix.io/ce/management-dashboard/customer-management/customers) guides.
* Looking for related API documentation? Check out the [Approval Service](https://app.gitbook.com/s/d4POTWomuSS7d3dnh4Dg/api-guides/companies-and-customers/approval-service) API.
{% endhint %}
## Purpose
An approval process is necessary for the organization to define the correct purchasing flow and budget limits. Depending on the role of the customer who creates an order, some orders are approved automatically, while others require additional confirmation from eligible users.
The approval flow starts when a customer uses the storefront to add products to the cart. Depending on the customer rights and user group they belong to, they either need or need not an approval for the purchase.
## User groups
To improve management of the approval process, the following roles are introduced:
* Customer Administrator - `Admin`
* Purchaser of the Customer - `Buyer`
* Material Manager - `Requester`
### Admin
When the customer is assigned to the `Admin` group, the checkout triggers in a standard way. There is no additional step to create an order.
### Buyer
When the customer is assigned to the `Buyer` group, the approval service checks if the customer has permission to trigger the checkout.
* If the cart price is within the company limit, the customer can finish the order themselves.
* If the cart price exceeds the company limit, the customer creates the approval for the customer approver - the approvers list can be fetched from the approval service. When the approval is created, the approver can finish the checkout process and create the order.
### Requester
The requester is a material manager. When the customer is assigned to the `Requester` group, the approval service checks if the customer has permission to trigger the checkout. The requester customer cannot trigger the checkout, so the approval needs to be created.
* If the cart price exceeds the company limit, the customer can only assign a customer approver, who belongs to the `Admin` group.
* If the cart price is within the company limit, the customer can only assign a customer approver, who belongs to the `Admin` or `Buyer` groups.
{% hint style="warning" %}
The approvers list can be fetched from the approval service.
{% endhint %}
## Working with approvals
When the approval is created in the storefront, the approving customer receives an email with a notification that the approval request was created. If any additional comments were provided by the requester, they are also sent to the approver.
After a customer creates an approval, the following data is automatically populated:
* Requester - the value is populated based on a customer token.
* Approver - `firstName` and `lastName` values are populated based on the customer ID.
* Resource - refers to an order, the value is populated based on cart data.
* Expiry date - by default the expiry date is set to +10 days from the day when the approval was created.
* Approval status - the status is set to `PENDING` by default.
Within the existing approval, the following scenarios are possible:
* A requester can update data from the approval: comments, details, delivery windows, statuses. The update is possible only when the approval status is `PENDING.`
* A requester can change status to `CLOSED.`
* An approver can change status to the `APPROVED` or `DECLINED.`
* After expiry date, the approval status is changed automatically to `EXPIRED.`
# Assisted Buying
Assist your customers remotely by using the Assisted Buying feature.
Here you can find an overview of the Emporix Assisted Buying, along with its features and benefits.
{% hint style="info" %}
* Looking for Management Dashboard guides? Check out the [Sites](https://developer.emporix.io/ce/management-dashboard/settings/sites) and [Customers](https://developer.emporix.io/ce/management-dashboard/customer-management/customers) guides.
* Looking for related API documentation? Check out the [Site Settings Service](https://app.gitbook.com/s/d4POTWomuSS7d3dnh4Dg/api-guides/configuration/site-settings-service), [Customer Service](https://app.gitbook.com/s/d4POTWomuSS7d3dnh4Dg/api-guides/companies-and-customers/customer-service), [Orders Service](https://app.gitbook.com/s/d4POTWomuSS7d3dnh4Dg/api-guides/orders/order) and [Returns Service](https://app.gitbook.com/s/d4POTWomuSS7d3dnh4Dg/api-guides/orders/returns).
{% endhint %}
### Purpose
Assisted Buying is a feature focusing on providing faster and better customer support. Whenever customers have any issues with orders or just ask to act on their behalf, merchant employees can address their requirements in a convenient way.
#### Overview video
{% embed url="" %}
### Features
| Feature | Description |
| ---------------------------------------------------- | ------------------------------------------------------------------------------------------------------------------------------------------------------- |
| **Activation on site level in Management Dashboard** | Easy activation done by adding a relevant storefront URL to site settings. |
| **Acting on behalf of the customer** | The feature allows an employee to log in as a customer and perform specific actions on a storefront, for example: creating an order, returns or quotes. |
### Enabling and using the assisted buying
To enable the feature, you need to provide a storefront URL for each site where assisted buying should work. This can be done in the Management Dashboard UI, in Site Settings.
{% hint style="info" %}
To see the details, check the [Assisted Buying in Sites](#enabling-and-using-the-assisted-buying) guide.
{% endhint %}
After enabling the feature for a specific site, you can now log in as a customer and perform the requested actions on their behalf.
{% hint style="warning" %}
The Assisted Buying functionality works only if the logged in user is a member of the support group.
{% endhint %}
1. In **Management Dashboard**, go to **Customer Management** -> **Customers** and choose the customer on behalf of whom you want to log in to the storefront.
2. In the Details view, open the **Assisted Buying** dropdown list and choose the site.
When you choose the site that you want to use, it opens a new browser tab with the storefront. You can now do any purchases that were requested by the customer.
### Storefront implementation
When you log in to the configured storefront site, you're invoking the following request to authenticate as a customer:
{% hint style="warning" %}
Please note that the `employee token` is required to complete this request to assure that an authorized person logs in as a customer. The endpoint doesn't work with API key.
{% endhint %}
```json
curl --location --request POST 'https://api.emporix.io/customer/{TENANT}/login' \
--header 'Authorization: Bearer 4eqtOqb8TUhWPz65m3sRa9PY4UWG' \
--header 'Content-Type: application/json' \
--data-raw '{
"email": "",
"password": ""
}'
```
The response includes the following details:
```json
{
"accessToken": "wOxp8G6vLiz3S2QYJMzRglFRRprI",
"saasToken": "eyJhbGciOiJIUzI1NiJ9.eyJzdWIiOiIwNjI0ODM3NiIsImV4cCI6MTY5Nzk1NjcyOX0.HYksa0G9LUXEfRx6DvFsugtcuv2FvC7QDbSQ51Aqr50",
"expiresIn": 2591999,
"refreshToken": "VmjmyVumjt5AD1WfN7nAp5kmfzcJAcgS",
"refreshTokenExpiresIn": 86399
}
```
This information is visible in the URL and attached as query parameters, like in this example:
Storefront URL configured in Management Dashboard for the site:
```
https://storefront.emporix.io?tenant=MyTenant&clientId=StorefrontApiKey
```
URL of the storefront after you open the site:
```
https://storefront.emporix.io?tenant=MyTenant&clientId=StorefrontApiKey&customerToken=wOxp8G6vLiz3S2QYJMzRglFRRprI&customerTokenExpiresIn=2591999&saasToken=eyJhbGciOiJIUzI1NiJ9.eyJzdWIiOiIwNjI0ODM3NiIsImV4cCI6MTY5Nzk1NjcyOX0.HYksa0G9LUXEfRx6DvFsugtcuv2FvC7QDbSQ51Aqr50
```
Set the values in your storefront and use them when making the https calls.
# Customer Groups
Group your B2B customers to allow the right access and scope.
Here you can find an overview of the customer groups feature and its benefits.
{% hint style="info" %}
Looking for API reference? Check out the [Customer Service API](https://app.gitbook.com/s/d4POTWomuSS7d3dnh4Dg/api-guides/companies-and-customers/client-management) reference.
{% endhint %}
### Purpose
B2B scenarios require applying more structure to the management of your end customers.\
With Customer Groups, you can easily manage your customers to ensure the right level of authorization and access is granted to the customers within a company (legal entity).
### Features
The Emporix customer groups functionality combines a set of features:
| Feature | Description |
| -------------------------------------- | ------------------------------------------------------------------------------------------------------------------------------------------------------------------------------------------------------------------------------------------------ |
| **Granular permission control** | As a seller, you can set different access levels within groups, ensuring the right people have the right permissions from their customers. |
| **Stronger data security** | Restricting access to relevant team members of the end customer minimizes the risk of unauthorized data breaches. |
| **Improved organizational management** | As a B2B seller, you have a tool to manage the end customers organizations on their behalf, ensuring the structured and controlled access to business-critical information. |
| **Self-service for end customers** | End customers can independently manage their organization and users without relying on your support teams. Reduced dependency on manual administrative approvals leads to quicker role assignments and modifications within the user management. |
### Overview
Customer groups are automatically created for each legal entity in the system. They are legal entity aware, which means that you can easily administer the company-related permissions. You can manage the customer groups from the Management Dashboard which facilitates assigning the right access to the right group members.
{% hint style="info" %}
To learn more how to manage customer groups, see the [Customer Groups User Guide](https://developer.emporix.io/ce/management-dashboard/customer-management/customer-groups).
{% endhint %}
# Customer Segments
Customer segments allow you to enhance customers experience and target the right group people with the right assortment.
Learn more about the **Customer Segments** feature in the Emporix Commerce Engine.
{% hint style="info" %}
* Looking for Management Dashboard guides? Check out the [Segments](https://developer.emporix.io/ce/management-dashboard/customer-management/segments).
* Looking for related API documentation? Check out the [Customer Segment Service](https://app.gitbook.com/s/d4POTWomuSS7d3dnh4Dg/api-guides/companies-and-customers/customer-segments).
{% endhint %}
## Purpose
Successful business strategies should follow the customer-first approach. Taking into account the individual needs of each customer is the key to gaining trust and loyalty. Customer segments are a critical component of any commerce application as it allows businesses to deliver more personalized, efficient, and effective experiences. Tailored marketing campaigns ensure that the right message reaches the right audience. Customer segments also enable more efficient and targeted communication with relevant customers.
In essence, customer segments transform raw data into strategic insights, driving growth and fostering long-term customer relationships in your commerce application.
### Overview video
{% embed url="" %}
## Features
| Feature | Description |
| --------------------------------------------- | -------------------------------------------------------------------------------------------------------------------------------------------------------------------------------------------------------------------------------------------------------------------------------------------------------------------------------------------------------------------- |
| **Content personalization** | Customer segments enable tailored marketing campaigns, ensuring that the right message reaches the right audience. This personalization increases engagement and drives conversions, as customers are more likely to respond to offers that resonate with their preferences and needs. |
| **Configuration in the Management Dashboard** | The Segments module within the Management Dashboard facilitates creating and managing customer segments to respond to your individual requirements. |
| **Targeted products** | Choose specific products to connect with a particular segment to be able to promote them within the target group. |
| **Targeted categories** | Choose specific categories to connect with a particular segment to be able to run relevant campaigns with whole categories of products. |
| **Members assignment** | Select the customers you'd like to include in each segment so that they serve your business purposes. You are able to target the segments based on the customers purchasing history, geography, or other factors, to create customized campaigns. Segments like *frequent purchasers* or *discount-seekers* allow for tailored loyalty programs or exclusive offers. |
| **Easy activation** | By toggling a segment on and off, you've got full control over the marketing campaigns you're running. |
| **Site-awareness** | Customer segments are site-aware, which means that each site can have different segmentation strategies and you can cover different business needs for each one of them. |
| **Storefront readiness** | The storefront of your online shop can use the segments data so that you can provide a personalized experience to your customers. Segmenting customers helps refine recommendation engines, ensuring that the suggested products or services are relevant. This not only boosts sales but also enhances customer satisfaction and loyalty. |
| **Dedicated coupons** | Create a coupon that is valid for a specific segment to target your customers better. If a segment specifies products or categories, a coupon is valid only for these items. |
## Overview
Simplified segments usage:
# Vendor Management
Vendor Management Service make it possible to easily manage the suppliers and order splitting.
Here you can find an overview of the Emporix Vendor Management Service, along with its features and benefits.
{% hint style="info" %}
* Looking for APIs documentation? Check out the [Vendor Service](https://app.gitbook.com/s/d4POTWomuSS7d3dnh4Dg/api-guides/companies-and-customers/vendor-service).
* To check how the Vendor Management works in Management Dashboard, see the [Vendor Management](https://developer.emporix.io/ce/management-dashboard/vendors) guides.
{% endhint %}
### Purpose
The Vendor Management feature in Emporix enables efficient management of the relationships with external suppliers. It offers a structured way to onboard, maintain, and govern vendors while ensuring proper access control and data integrity. Vendors and their employees are granted restricted access, allowing them to interact only with their own products, orders, and data.
### Features
The Emporix API Vendor Management Service introduces a set of features that make managing your orders and suppliers easier:
| Feature | Description |
| ------------------------------ | -------------------------------------------------------------------------------------------------------------------------------------------------------------------------------------------------------------------------------------------------- |
| **Centralized vendor data** | All vendor information (legal, contact, and custom attributes) is stored in one secure, unified system. |
| **Controlled access** | Vendors and their employees can only view and manage their own products and orders ensuring data privacy and integrity. They can manage product media, availability and simple base prices. Additionally, they can publish and unpublish products. |
| **Flexible vendor management** | Update vendor statuses, maintain profiles, and adapt vendor data as business needs to evolve. |
| **Order Splitting** | Orders containing products from multiple vendors can be split into suborders by vendor. |
| **API-Driven Integration** | Integrates with other systems enabling automated workflows and data exchange. |
| **Secure and compliant** | OAuth2-based access controls and tenant-specific scoping ensure secure and compliant vendor interactions. |
# Data Localization
Data localization allows you to reach the international customers.
## Purpose
The localization concept in the Emporix e-commerce system helps you adapt your business's content to international audiences.
## Localizable data
Resources that can be localized are described in their respective sections.
### Countries
Countries where your business operates are stored in country configurations.
{% hint style="info" %}
For more information on managing country configurations, check out the [Country Service guide](https://app.gitbook.com/s/d4POTWomuSS7d3dnh4Dg/api-guides/configuration/country-service/country).
{% endhint %}
### Currencies
Currencies accepted by your business are stored in currency configurations. You can specify the default currencies for particular sites as well as the whole tenant.
{% hint style="info" %}
For more information on managing currency configurations, check out the [Currency Service guide](https://app.gitbook.com/s/d4POTWomuSS7d3dnh4Dg/api-guides/configuration/currency-service/currency).
{% endhint %}
You can also define static exchange rates for currencies and calculate product prices based on these rates.
{% hint style="info" %}
For more information on currencies and exchange rates, check out the [Pricing guide](https://app.gitbook.com/s/d4POTWomuSS7d3dnh4Dg/api-guides/prices-and-taxes/price-service/price).
{% endhint %}
### Dates and times
Dates and times are stored as instantaneous moments in the UTC timezone.
{% hint style="warning" %}
To localize dates and times for your customers, you need to configure the UTC offset on your storefront.
{% endhint %}
### Languages
While the Emporix e-commerce system is designed in English, you can specify languages in which your business communicates with suppliers and customers through language configurations. You can specify the default languages for particular sites as well as the whole tenant.
{% hint style="info" %}
For more information on managing language configurations, check out the [Language Configuration guide](https://app.gitbook.com/s/d4POTWomuSS7d3dnh4Dg/api-guides/configuration/configuration-service/language).
{% endhint %}
### Measurement units
The Emporix e-commerce system supports all types of measurement units and measurement systems.
{% hint style="info" %}
For more information on measurement units, check out the [Measurement units guide](https://app.gitbook.com/s/d4POTWomuSS7d3dnh4Dg/api-guides/configuration/unit-handling-service/unit-handling).
{% endhint %}
You can further localize measurement units by translating their names to different languages.
### Names and descriptions
You can localize information-rich text fields — such as names or descriptions — by translating them into languages of your choice.
{% hint style="info" %}
For information on localizing object names and descriptions, check out the *Translations* section in the [Standard practices guide](https://app.gitbook.com/s/d4POTWomuSS7d3dnh4Dg/standard-practices).
{% endhint %}
# Delivery Cycle Management
Delivery Cycle Management facilitates shipping your goods to customers.
Here you can find an overview of the Emporix Delivery Cycle Management, along with its features and benefits.
{% hint style="info" %}
* Looking for code tutorials? Check out the [Shipping Services guide](https://app.gitbook.com/s/d4POTWomuSS7d3dnh4Dg/api-guides/delivery-and-shipping/shipping/shipping).
* Looking for API reference? Check out the following sections in the Emporix API Reference:
* [Delivery Service](https://developer.emporix.io/ce/core-commerce/broken-reference)
* [Shipping Service](https://app.gitbook.com/s/d4POTWomuSS7d3dnh4Dg/api-guides/delivery-and-shipping/shipping)
* To check how the Delivery Cycle Management can be configured in Management Dashboard, check out the [Delivery Times](https://developer.emporix.io/ce/management-dashboard/settings/delivery-times) and [Shipping Methods](https://developer.emporix.io/ce/management-dashboard/settings/shipping-methods).
{% endhint %}
## Purpose
To facilitate the delivery process and support diverse customer scenarios, Emporix provides you with multiple delivery and shipping configuration options, such as customizable delivery areas, zones, delivery windows, and shipping methods.
## Features
| Feature | Description |
| --------------------------- | -------------------------------------------------------------------------------------------------------------------------------------------------------------------------------------------------------------------------------------------------------------------------------------------------------------------------------------------------------------------------------------------- |
| **Delivery times** | Create multiple delivery times using the bulk create feature. |
| **Delivery dates** |
Customize the delivery dates for the orders in a number of ways:
Single or multiple weekdays
Single or multiple calendar days
Date periods
|
| **Non-delivery dates** |
Set the dates when the orders cannot be delivered, similarly to the delivery dates, the non delivery dates can be:
Single or multiple weekdays
Single or multiple calendar days
Date periods
|
| **Multiple delivery slots** | You can set up many delivery slots for the same day, for the same or different zones and shipping methods. |
| **Shipping zones** | Shipping zones are countries and postal codes for areas that your business delivers products to. |
| **Shipping methods** |
You can set shipping methods in relation with zones and delivery times. For each of the methods, you can define the following settings:
Shipping cost
Tax class
Minimum order value
Shipping groups
|
| **Shipping groups** | You can assign customers to groups and define different shipping costs for these groups, for example B2B customers, or companies/customers that order regularly. |
| **Shipping fees** | Depending on the shipping costs specified for shipping zones and methods, shipping fees are added to the order value. |
| **Cut-off days** |
General cut-off day: refers to the specific day and time (cut-off time) by which an order must be placed to be processed and shipped on the specific delivery day.
Specific cut-off day: refers to the specific slot within the delivery window and time (cut-off time) by which an order must be placed to be processed and shipped on the specific delivery day.
|
| **Cut-off time** | Define the cut-off time after which it won't be possible to create orders for a specified delivery time. |
| **Capacity** | Define how many orders can be created for the delivery time. |
## Delivery times
Well-functioning delivery and shipping features are the core elements of any e-commerce business. The following sections provide more information on this functionality in Emporix - for example customization of delivery settings and a description of what you can achieve with those features.
### Delivery dates calculation
By default, the end customer can set a delivery date for 90 days ahead. When the payment method is specified as credit card, the date is set to 7 days.
### Delivery and non-delivery days
You can customize the delivery and non-delivery days and periods of time in many different options:
* Weekdays
* Calendar days
* Customized periods
For every delivery configuration you can set up multiple slots for every day.
### Delivery windows
Using delivery windows you can specify the following:
* Delivery window for a **single day**, for example: 06/06/2023
* Non-delivery window for a single day
* Delivery window for a defined **period of time,** for example: 06/06/2023-10/07/2023
* Non-delivery window for a defined period of time
* Delivery window for a **weekday**, for example: Monday
* Non-delivery window for a weekday
You can set up different combinations for the delivery windows, but it's not possible to create opposite rules for the same delivery time.
**Examples of acceptable combinations**:
| One period of time | with another period of time |
| ------------------------------------------------------------------------------------------------------------------------- | --------------------------------------------------------------------------------------------------------------------------------------------------------------------------- |
| Delivery on a single date: 22/12/2023 | and non-delivery on a different single date: 23/12/2023. |
| Delivery period: 25-26/12/2023 | and a different non-delivery period: 27-28/12/2023. |
| Delivery on a single date: 22/12/2023 | which overrides a non-delivery period: 21-28/12/2023. |
| Non-delivery on a single date: 22/12/2023 | which overrides a delivery period: 21-28/12/2023. |
| Delivery on a weekday on every Monday | and non-delivery on Sunday. |
| Delivery on a weekday on every Monday with two delivery windows for different time slots: 08:00 - 10:00 and 13:00 - 15:00 | and a delivery on a specific date for Mondays, with for example one delivery window from 08:00 - 15:00, which overrides the general cut-off time configuration for Mondays. |
| Delivery on a single date: 31/12/2023 (Sunday) | and non-delivery on a weekday on Sunday - all Sundays are non-delivery days, excluding 31/12/2023, which is a delivery date. |
| Delivery period: 30-31/12/2023 (Saturday-Sunday) | and a non-delivery weekday Sunday - all Sundays are non-delivery days, excluding 31/12/2023, which is a delivery date. |
**Examples of non-acceptable combinations**:
| One period of time | with another period of time |
| ------------------------------------- | ------------------------------------------------------------------------------- |
| Delivery on a single date: 22/12/2023 | and non-delivery on the same single date: 22/12/2023. |
| Delivery period: 25-26/12/2023 | and non-delivery period: 25-26/12/2023. |
| Delivery period: 22-26/12/2023 | and non-delivery period which partially overlaps another period: 25-29/12/2023. |
| Delivery on a weekday on Monday | and non-delivery on Monday. |
### Cut-off days
You can use the cut-off day functionality to specify by what day the customers have to check out to receive their order in the defined delivery time. There are two possibilities to set up the cut-off day:
* **General cut-off day**: Sets the cut-off day for all the slots available for the delivery time. The general cut-off day can be set up to 6 days before the delivery of the order, you can select from a range between `-1` and `- 6` days. If you choose `-6`, it means you have 6 days to prepare the order and to deliver it to the customer.
* **Specific cut-off day**: Sets the cut-off day for single delivery slots. This option is only active for Weekday deliveries, not for single dates or periods. The specific cut-off day can be set up to 6 days before the configured weekday delivery, you can select from a range between `-1` and `- 6` days. If you choose `-3`, it means you have 3 days to prepare the order and to deliver it to the customer. Both weekdays and weekends are counted.
The default value for the cut-off days is `0`, which means the cut-off day is not set. If one of the cut-off day options is selected, the other one is hidden.
Examples of the cut-off days configurations:
| Delivery day | General cut-off day | Specific slot cut-off day |
| -------------------------------- | ---------------------------------------------------------------------------------------------------------------------------------------------------------------- | ------------------------------------ |
| Delivery on a weekday: Wednesday | For example: `-2`, which means the cut-off day is Monday. It can be any single day up to 10 days before the delivery day. | Not available |
| Delivery on a weekday: Wednesday | Not set. | Can be set for every slot separately |
| Delivery day: 22/12/2023 | For example: `-1`, which means the cut-off day is 21/12/2023. | Not available |
| Delivery period: 22-26/12/2023 | For example: `-5`, which means the cut-off day is 17/12/2023 for 22/12/2023 delivery, 18/12/2023 for 23/12/2023, 19/12/2023 for 24/12/2023 delivery and further. | Not available |
### Cut-off time
Cut-off time is the exact hour of the cut-off day that ends the order placement period, for the specific delivery window. The cut-off time is always specified in the UTC time zone.
**Examples of usage**
Defined delivery time with the cut-off set to 9:00 AM:
| User's action | Result |
| -------------------------------------------------------------- | ---------------------------------------------------------------------------------------------------------- |
| A user creates an order at 8:55AM (UTC). | The delivery window contains the order for the current day. |
| A user creates an order at 9:05AM (UTC). | The delivery window does not contain the order for the current day, but only for the next day. |
| A user creates an order from CET zone (UTC+1) at 9:55AM (CET). | The delivery window contains the order for the current day, because in the UTC zone there is still 8:55AM. |
### Product lead times
Product lead time defines how much time your supplier needs to prepare a product for delivery. In the Emporix e-commerce system, lead times are specified for individual products and are expressed in hours.
When calculating the delivery date at checkout, the lead times and non-delivery days of products in the cart affect the next possible delivery date.
## Preorders
You can allow customers to order goods in advance by setting appropriate lead times for products. The set value is then calculated into the next possible delivery date at checkout.
## Maximum number of deliveries per day
You can specify how many deliveries your business can complete in a day per slot. If the number of orders per slot reaches the set **capacity**, the delivery slot automatically closes. In case all the slots' capacities are reached, the delivery date is closed. Whenever a customer cancels an order or chooses a different delivery date, the originally chosen delivery slot becomes available again.
# Mixin Schemas
Mixins are custom properties that you can define in Emporix to adapt the system to your specific needs.
## Mixin Schemas
Emporix Commerce Engine provides an extensibility mechanism that allows you to customize the platform adjusting it to the customers needs. The mixin schemas concept allows you to easily extend the data model so that you can boost default objects with customer-specific fields.
{% hint style="info" %}
* Looking for code tutorials? Check out [Schema Service](https://app.gitbook.com/s/d4POTWomuSS7d3dnh4Dg/api-guides/utilities/schema/schema).
* Looking for API reference? Check out the [Schema Service](https://app.gitbook.com/s/d4POTWomuSS7d3dnh4Dg/api-guides/utilities/schema) in the Emporix API Reference.
{% endhint %}
## Purpose
To meet customer-specific requirements, it is sometimes necessary to extend the default entities and provide additional information. The mixin schemas feature offers a simple and centralized way of adding customized fields to different objects that provide more industry-specific context.\
The customized fields are displayed in the Management Dashboard and can be managed from there.
### Overview video
{% embed url="" %}
The diagram shows in a nutshell how creating a schema works:
## Features
Mixin schemas come with a few features that make the management of customized schemas easier:
| Feature | Description |
| ---------------------------------------------------------- | --------------------------------------------------------------------------------------------------------------------------------------------------------------------------------------------------------------------- |
| **Management Dashboard support for all relevant entities** | Manage the additional fields easily ensuring that the data is consistent. |
| **Supported entities** | Define and generate data schemas for the following entities: cart, category, classification, company, coupon, customer, customer address, custom entity, order, price list, product, quote, return, site, and vendor. |
| **Management Dashboard supported types** | Add fields of the following types: array, boolean, date, date\_time, decimal, enum, number, object, text, and time. |
| **Upload of json files to create schemas** | Define a schema with customized fields by uploading a json file that defines the data model you need. The json file is validated during the upload reducing the errors number. |
| **Different versions per entity** | Extend a basic schema by individual fields per entity and maintain valid versions of their schemas. |
| **Unassign mixin schema** | Control which mixin schemas are assigned to the entities to ensure consistency. With unassign feature, the backend users can define which version is the current one for which object. |
| **Localization** | Provide translations for the custom specific sections, descriptive fields and define if a field itself should be translated into multiple languages. |
{% hint style="info" %}
To learn about the service and see how it works, see the following documentation:
* Management Dashboard User Guide — [Mixin Schema Guide](https://developer.emporix.io/ce/management-dashboard/settings/mixin-schemas)
* Developer Guide — [Schema Service Tutorial](https://app.gitbook.com/s/d4POTWomuSS7d3dnh4Dg/api-guides/utilities/schema/schema)
* API Reference — [Schema Service](https://app.gitbook.com/s/d4POTWomuSS7d3dnh4Dg/api-guides/utilities/schema)
{% endhint %}
# Media Management
Media Service allows you to provide rich content to improve your products visibility.
Here you can find an overview of the Emporix API **Media Management Service**, along with its features and benefits.
{% hint style="info" %}
* Looking for code tutorials? Check out the [Media Management Service guide](https://app.gitbook.com/s/d4POTWomuSS7d3dnh4Dg/api-guides/media/media/media).
* Looking for API reference? Check out the [Media Management Service](https://app.gitbook.com/s/d4POTWomuSS7d3dnh4Dg/api-guides/media/media) in the Emporix API Reference.
{% endhint %}
## Purpose
You can upload media files, such as images or video, and/or documents, for example contracts or specification sheets, by using the Emporix Media Management Service. By specifying the\
access types of the files, you can decide whether they should be accessible to the public on your storefront, or meant for internal purposes only.
The assets, either linked from an external webpage, or uploaded directly from your internal storage, can serve to better reflect the categories and products your business offers, and to facilitate category and product management within your company.
{% hint style="danger" %}
Currently, this functionality is fully integrated with the Category and Product Services.
{% endhint %}
## Features
| Feature | Description |
| -------------------------------------------------- | --------------------------------------------------------------------------------------------------------------------------------------------------------------------------------------------------------------------------------------------------------------------------------------------------------------------------------------------------------------------------------------------------------------------------- |
| **Asset types** | All file types are supported. You can upload media files, such as videos or images, as well as contracts, technical specifications, or any other documents. |
| **Upload types** | You can upload files directly from local storage, or link to external assets by using a URL. When you link to an asset, it is not downloaded to Emporix storage. Instead, only a reference to the external asset is kept. |
| **Access and storage types** | Depending on the access type, the assets can have different audiences. If a file's type is specified as "public", then it is stored on a public storage website and is available to access by both customers and employees. If it is a private type of an asset, then it is stored privately and thus only accessible to your tenant's employees through the Media Management Service and the Emporix Management Dashboard. |
| **Full asset management** | You can create, retrieve, update, and delete assets. |
| **Integration with Category and Product Services** | The uploaded and/or linked files can be associated with specific products and categories within the Emporix database, or remain unassigned. |
## Overview
The following combinations of assets are possible:
* Public access files linked from an external site
* Public access files uploaded directly from a local repository
* Private access files linked from an external site
* Private access files uploaded directly from a local repository
# Orders
Orders stand at the core of e-commerce solution.
Here you can find an overview of the Emporix orders concept, along with its features and benefits.
{% hint style="info" %}
* Looking for code tutorials? Check out the [Order Service](https://app.gitbook.com/s/d4POTWomuSS7d3dnh4Dg/api-guides/orders/order/order).
* Looking for API reference? Check out the [Order Service](https://app.gitbook.com/s/d4POTWomuSS7d3dnh4Dg/api-guides/orders/order) in the Emporix API Reference.
{% endhint %}
### Purpose
The orders functionality at Emporix manages the entire lifecycle of customer orders, ensuring a smooth experience for both customers and businesses. It allows customers to place, manage, and track their purchases effortlessly while enabling businesses to process and fulfill orders in a scalable, automated manner.
### Features
The Emporix orders functionality combines a set of features:
| Feature | Description |
| ------------------------------------ | ----------------------------------------------------------------------------------------------------------------------------------------------------- |
| **Customers orders** | Customers can place orders and view the orders history. |
| **Order management for employees** | Tenant employees can create, retrieve, delete, and update orders in the Management Dashboard. |
| **Order history** | Customers and employees can view past orders for reference and tracking. |
| **Reordering from last order** | Enables customers to reorder previous purchases quickly, improving convenience and efficiency. |
| **Orders with calculated prices** | Allows customers to place orders with products that have variable pricing (for example weight-based items where the final price is determined later). |
| **High volumes management** | Designed to handle large-scale order processing without performance troubles. |
| **Automatic / elastic scaling** | The system automatically scales resources to handle peak order volumes without performance issues. |
| **Order queues and virtual waiting** | Optimized order processing removes delays and virtual waiting times, enhancing user experience. |
### Overview
Orders operations can be handled end-to-end by Emporix or integrated with external systems, providing businesses with multiple approaches to order management.
The Order Service is built to support both B2B and B2C commerce. Additionally, the service offers dedicated endpoints for different use cases like allowing customers to create and retrieve their own orders, while also enabling employees to handle orders through tenant-managed processes.
To learn more about the different order management approaches and the service possibilities, see the [Order Service Tutorials](https://app.gitbook.com/s/d4POTWomuSS7d3dnh4Dg/api-guides/orders/order/order).
# Shared Orders
Company-shared orders facilitate order management on your B2B customers side.
Here you can find an overview of the company shared orders concept, along with its features and benefits.
{% hint style="info" %}
* Looking for code tutorials? Check out the [Order Service](https://app.gitbook.com/s/d4POTWomuSS7d3dnh4Dg/api-guides/orders/order/order).
* Looking for API reference? Check out the [Order Service](https://app.gitbook.com/s/d4POTWomuSS7d3dnh4Dg/api-guides/orders/order) in the Emporix API Reference.
{% endhint %}
## Purpose
Frequently in B2B scenarios, companies have a few or multiple customer representatives that make purchases at your online store. Therefore, there is a need for viewing orders made by other customers from the same organization. With the relevant scopes, you can grant access to a certain group of customers so that they can track and manage the shared orders. This feature brings transparency and efficiency to order management on the customers side, improving their workflows.
## Features
The Emporix orders functionality combines a set of features:
| Feature | Description |
| ------------------------------------ | ------------------------------------------------------------------------------------------------------------------------------------------------------------------------------------------------------------------------------- |
| **Company shared orders visibility** | With the right scopes, the end customers can see not only their own orders but also by other customers from the same organization. It improves the expenses transparency and better collaboration for the end users. |
| **Enhanced security and privacy** | Sensitive order information remains accessible to relevant users/user groups only, reducing data exposure as the visibility of the company related orders is possible only with the relevant scope granted to a customer group. |
| **Frontend readiness** | Maximize the efficiency of your storefront launch. Take advantage of pre-designed functionality and streamline implementation processes. |
## Overview
To enable the shared orders visibility for a certain group of customers, grant the access by setting the `read for legal entity` scope for a customer group.
The diagram visualizes how the orders can be shared among different customers:\\
{% hint style="info" %}
To learn more about the customer groups and how to manage them, see the Core Commerce guide [Customer Groups](https://developer.emporix.io/ce/core-commerce/customer-management/groups) and the Management Dashboard guide [Groups](https://developer.emporix.io/ce/management-dashboard/customer-management/customer-groups).
To see the example use case, refer to the [Company Related Orders and Customer Groups](https://developer.emporix.io/ce/customer-use-cases/scenarios-introduction/shared-orders).
{% endhint %}
# Pricing
Create the pricing models in Emporix.
Here you can find an overview of the Emporix API Price Service, along with its features and benefits.
{% hint style="info" %}
* Looking for code tutorials? Check out the [Price Service guide](https://app.gitbook.com/s/d4POTWomuSS7d3dnh4Dg/api-guides/prices-and-taxes/price-service/price).
* Looking for API reference? Check out the [Price Service](https://app.gitbook.com/s/d4POTWomuSS7d3dnh4Dg/api-guides/prices-and-taxes/price-service) in the Emporix API Reference.
{% endhint %}
### Purpose
The Emporix API Price Service aims to simplify price management by introducing customizable price models and automated price operations.
### Features
The Emporix API Price Service introduces a set of features that make product pricing easier:
| Feature | Description |
| ----------------------------------- | ----------------------------------------------------------------------------------------------------------------------------------------------------------------------------------------------------------------------------------------------------------------------------------------------------------------------------------------------------------------------------------------------------------------------------------------------- |
| **Automatic calculation of prices** |
You can automatically calculate net and gross values for prices.
You can define multiple price models and adjust them to your business's pricing strategies. We have included three common examples — basic, tiered, and volume pricing.
|
### Features and benefits for B2B commerce
The Emporix API Price Service comes with a set of features that specifically address the needs of B2B commerce. These features support complex pricing scenarios that are typically found in a B2B context:
| Feature | Benefits |
| ----------------------------- | --------------------------------------------------------------------------------------------------------------------------------------------------------------------------------------------------------------------------------------------------------------------------------------------------------------------------------------------------------------------------------------------------------------------------------------------------------------------------------------------------------------------------------------------------------- |
| **Multi-currency support** | Businesses that sell globally can take advantage of our multi-currency implementation by configuring multiple currencies that their customers can choose from. To make it easier to manage a global business, you can create multiple sites and define a different default currency for each of them or support multiple currencies on a single site. |
| **Net pricing mode** | In B2B commerce, businesses often use net pricing. With that in mind, we added a site setting that you can use to define the default pricing mode — net or gross — for particular sites. |
| **Tiered and volume pricing** |
Our customizable pricing model supports pricing strategies common in B2B commerce, such as tiered and volume pricing. You can experiment with these pricing strategies to find the most profitable way to sell your products.
You can set up prices that are exclusive to specific customers to improve your business's relationship with them. We have also introduced a price matching functionality that helps you determine the best prices for specific customers based on a number of inputs.
Currently, the price personalization functionality is limited to specific customers.
|
| **Price lists** |
Price lists can be used to offer personalized pricing to customers that match specific criteria, or to offer contract-specific pricing. You can configure predefined sets of prices and products for specific regions, countries, and customer groups. The Emporix price lists implementation is well-suited for international businesses as each price list can be expressed in a different currency.
|
|
The Emporix API Price Service has been designed to support the potentially high number of prices a B2B commerce company may require without impacting the system performance.
### Overview
In the Emporix e-commerce system, prices are not defined within products, but as separate entities that reference them.
Each price can be described with the following attributes:
| **Mandatory** | **Optional** |
| ---------------------------- | --------------- |
| Amount[^1] | Customers |
| Country | Date-time range |
| [Currency](#currencies) | Sale discount |
| [Price model](#price-models) | |
| Product | |
| Sites | |
| | |
You can manage prices through the Emporix API Price Service.
{% hint style="info" %}
Looking for API reference? Check out the [Price Service](https://app.gitbook.com/s/d4POTWomuSS7d3dnh4Dg/api-guides/prices-and-taxes/price-service) in the Emporix API Reference.
{% endhint %}
### Price models
Based on a number of factors — such as a diverse customer base or a variety of offered products — your business may incorporate multiple pricing models. To support such cases, we have introduced customizable price models with which you can define price structures.
You can create as many price models as you need. Each model can be described with the following attributes:
| Mandatory | Optional |
| ------------------------- | ----------- |
| Measurement unit | Description |
| Name | |
| Price type — net or gross | |
| Pricing strategy | |
| Pricing tiers | |
| Measurement unit | |
Each price model can specify one of three pricing strategies:
* **Basic** pricing, where the price per unit is constant, regardless of the ordered quantity.
* **Volume** pricing, where the price per unit depends on the ordered quantity.
* **Tiered** pricing, where the price per unit depends on the tiers that the ordered quantity falls into.
{% hint style="success" %}
Take a look at a comparison of pricing strategies:
{% endhint %}
| Tier | Basic pricing | Volume pricing | Tiered pricing |
| ---------------------- | ---------------------------------------------- | ---------------------------------------- | -------------------------------------------------------------------------- |
| 1-10 units | $1.50 | $1.50 | $1.50 |
| 11-20 units | $1.50 | $1.25 | $1.25 |
| 21+ units | $1.50 | $1 | $1 |
| **Total for 25 units** |
25 x $1.50 = $37.50
|
25 x $1 = $25
|
(10 x $1.50) + (10 x $1.25) + (5 x $1) = $32.50
|
{% hint style="warning" %}
Currently, our price models support basic, volume and tiered pricing.
{% endhint %}
### Price lists
You can create multiple sets of prices for the same products. If all criteria specified for a price list are met, prices from that list take precedence over catalog prices originally defined for products.
Each price list needs to indicate a site that it's applicable to. Additionally, you can narrow down the list's validity with the following factors:
* Customer groups
* Countries
* Date range
* Regions
Prices in lists can also be expressed in a different currency than originally defined for products.
#### Automated operations
To help automate price management, we have introduced the following functionalities:
* Price matching, which you can use to retrieve the lowest prices for desired products.
{% hint style="warning" %}
Currently, the price matching functionality is limited to finding the lowest defined price.
{% endhint %}
* Tax calculation, which you can use to calculate:
* Net prices to gross prices.
* Gross prices to net prices.
* Gross prices in one country to gross prices in another country.
{% hint style="info" %}
For more information on the tax calculation functionality, check out the [Tax classes guide](https://developer.emporix.io/ce/core-commerce/taxes-v2).
{% endhint %}
Additionally, you can specify whether prices assigned to a particular site should be — by default — presented as gross or net values.
{% hint style="info" %}
For more information on sites and how to configure them, check out the [Sites guide](https://developer.emporix.io/ce/core-commerce/sites) and the [Site Settings Service](https://app.gitbook.com/s/d4POTWomuSS7d3dnh4Dg/api-guides/configuration/site-settings-service) in the Emporix API.
{% endhint %}
### Related resources
#### Currencies
Your business may accept more than one currency. To make it easier to manage multiple currencies, we have introduced the Emporix API Currency Service.
{% hint style="info" %}
Looking for API reference? Check out the [Currency Service](https://app.gitbook.com/s/d4POTWomuSS7d3dnh4Dg/api-guides/configuration/currency-service) in the Emporix API Reference.
{% endhint %}
To minimize data redundancy, each currency needs to be defined in a separate configuration and then referenced in applicable prices.
{% hint style="danger" %}
Currently, the exchange rates are defined statically and are not influenced by actual currency exchange rates. If you want the statically defined exchange rates to reflect the actual rates more closely, you will need to manually update these on a regular basis.
See: [Currency exchange](https://app.gitbook.com/s/d4POTWomuSS7d3dnh4Dg/api-guides/configuration/currency-service) in the Emporix API Reference.
{% endhint %}
[^1]: If the price model uses tiered or volume pricing, this attribute defines amounts for specific tiers.
# Pricing (Legacy)
Create the pricing models in Emporix (legacy).
{% hint style="danger" %}
As of April 2022, this concept has been marked as **legacy**.
To learn about the current pricing concept, check out the [Pricing guide](https://developer.emporix.io/ce/core-commerce/pricing-v2).
{% endhint %}
In the Emporix e-commerce system, prices apply to products sold on your storefront.
## Price types
Each product's price information includes two price types. They are described in the table below.
| Price type | Description |
| ------------------ | --------------------------------------------------------------------------------------------------------------------------------------------------- |
| Presentation price | Price presented to the customers on the storefront. |
| Base price |
Price per base measurement unit (such as a kilogram or liter). It is often used by customers to compare the prices of different products.
|
## Examples of price setups
| Example of product | Bananas | Chocolate spread | Bottled juice |
| ------------------------------------------------------------------- | -------------------------------------------------------------------------------------------------------------------------------------------------------------------------------- | -------------------------------------------------------------------------------------------------------------------------------------------------------------------- | -------------------------------------------------------------------------------------------------------------------------------------------- |
| **Description** |
Customers can order bananas by pieces.
One banana weighs approximately 180 grams.
The final price of the product depends on its actual weight in kilograms.
|
Customers can order chocolate spread by packaging.
One packaging contains 450 grams of chocolate spread.
Base price is calculated per kilogram.
|
Customers can order juice by bottles.
One bottle contains 500 milliliters of juice.
Base price is calculated per liter.
|
| **Original and** [**effective**](#user-content-fn-1)[^1] **amount** | 0.36 EUR | 2.99 EUR | 0.99 EUR |
| **Measurement unit** | Piece | Piece | Piece |
| **Base price** | 1.99 EUR | 6.64 EUR | 1.98 EUR |
| **Base price unit** | Kilogram | Kilogram | Liter |
| **Presentation price** | 1.99 EUR | 2.99 EUR | 0.99 EUR |
| **Presentation price unit** | Kilogram | Piece | Piece |
## Sales promotions
You can put products on sale and specify the date range in which the sale price applies. Discounts can be applied either as a percentage of the original price or as a fixed amount.
See example of a Price object with the sale price configured
```json
{
"id": "61b9dcb2cfa47f0001e0e75d",
"productId": "61b9dc9ff5758b79d5815892",
"siteCode": "main",
"currency": "EUR",
"originalAmount": 0.3582,
"effectiveAmount": 0.2682,
"measurementUnit": {
"quantity": "1.0",
"unitCode": "H87"
},
"basePrice": {
"originalAmount": 1.99,
"effectiveAmount": 1.49,
"measurementUnit": {
"quantity": 1.0,
"unitCode": "KGM"
}
},
"presentationPrice": {
"originalAmount": 1.99,
"effectiveAmount": 1.49,
"measurementUnit": {
"quantity": 1.0,
"unitCode": "KGM"
}
},
"customAttributes": {},
"salePrice": {
"discountRate": 25.0,
"description": "25% off!"
},
"metadata": {
"mixinMetadata": {
"mixins": {}
}
}
}
```
See example of a Product object with the sale price configured
```json
{
"id": "61b9dc9ff5758b79d5815892",
"code": "SALEPRICE",
"name": {
"localizedMap": {
"en": "Product on sale"
},
"multiLanguage": true
},
"description": {
"localizedMap": {
"en": "Product created for documentation purposes."
},
"multiLanguage": true
},
"published": true,
"mixins": {
"salePricesData": {
"salePrices": [
{
"enabled": true,
"salePriceAmount": 1.49,
"salePriceEnd": "2021-12-31T23:59:00.000+0000",
"salePriceStart": "2021-12-23T00:00:00.000+0000"
}
]
},
"productCustomAttributes": {
"activeTab": "ProductDescription",
"categoryPath": {
"categoryLevel1": "example-category-1",
"prettyName": "product-on-sale",
"categoryLevel2": "",
"categoryLevel3": ""
},
"defaultOrderQuantity": 1,
"inStock": true,
"maxOrderQuantity": 10,
"minOrderQuantity": 1,
"orderUnit": "H87",
"pricingMeasure": {
"unitCode": "KGM",
"value": 1
},
"pricingMeasurePrice": 1.99,
"productState": "prepare",
"taxClass": "FULL",
"unitPricingBaseMeasure": {
"unitCode": "KGM",
"value": 1
},
"unitPricingMeasure": {
"unitCode": "GRM",
"value": 180
},
"weightDependent": true
}
},
"metadata": {
"mixinMetadata": {
"mixins": {
"salePricesData": "https://res.cloudinary.com/saas-ag/raw/upload/schemata/salePriceData.json",
"productCustomAttributes": "https://res.cloudinary.com/saas-ag/raw/upload/v1560527845/schemata/CAAS/productCustomAttributesMixIn-v38.json"
}
},
"schema": "https://res.cloudinary.com/saas-ag/raw/upload/v1544786405/schemata/CAAS/product.v2"
}
}
```
## Taxes
When you configure a product, you select its tax class from classes configured for a particular site.
Product prices are stored as gross values. Their net values are calculated when an invoice is created.
{% hint style="warning" %}
If you want to display net prices on your storefront, you need to deduct the tax from the gross price according to the following formula:
**Net price = Gross price / (1 + (Tax rate / 100))**
{% endhint %}
[^1]: Price that customers pay per order unit. If a product is on sale, this value is different from the original amount. Otherwise, both values are the same.
# Products
The Product Service empowers you to efficiently manage rich, customizable product data, such as templates, bundles, variants, and media.
Here you can find an overview of the Emporix Product Service, along with its features and benefits.
{% hint style="info" %}
* Looking for code tutorials? Check out the [Product Service guide](https://app.gitbook.com/s/d4POTWomuSS7d3dnh4Dg/api-guides/products-labels-and-brands/product-service/product).
* Looking for API reference? Check out the [Product Service](https://app.gitbook.com/s/d4POTWomuSS7d3dnh4Dg/api-guides/products-labels-and-brands/product-service) in the Emporix API Reference.
{% endhint %}
## Purpose
As part of our Catalog solution, Emporix provides you with a scalable product service that allows you to create and manage a vast collection of products along with rich product information and descriptive attributes. We want to ensure that you can offer the products on your website in the most efficient way and that you provide the best customer experience.
## Features
The Emporix API product service introduces a set of features that make product management easier:
| Feature | Description |
| ---------------------------------------------------------------------- | -------------------------------------------------------------------------------------------------------------------------------------------------------------------------------------------------------------------------------------------------------------- |
| **Bulk product creation** | With Emporix API, it is possible to create multiple products at once. |
| **Customizable product configuration with product templates** | You can create product templates that contain predefined schemas to specify additional attributes on top of the product features available by default. For more information, see [Product templates](#product-templates). |
| **Customizable product ID** | You can add custom ID for each product you create. For details, see [Creating a new product](https://developer.emporix.io/ce/management-dashboard/products-module/products#creating-a-new-product) documentation. |
| **Product bundles** | You can decide to sell products together as bundles. For example, a washing machine with washing machine tablets. A product bundle can have its own price, description, and images. For more information, see the [Product bundles](#product-bundles) section. |
| **Parent products and product variants** | Products of the same type can be sold in different variants. For example, they can differ in color, size, or fabric. Check out the [Parent products and product variants](#parent-products-and-product-variants) section. |
| **Media files** | You can attach media files, such as images, video, and documents, to provide a rich product and catalog experience for your customers. |
| **Easily configurable tax information for products using tax classes** | When you configure the correct tax classes in the Emporix API Tax Service, product prices can be retrieved as net or gross, depending on the market the product is sold in. |
| **Localization of product information** | You can define product names and descriptions in different languages, based on your store's language configuration. |
## Overview
When you want to create a product, first you need to ensure that the available product attributes will be sufficient to properly represent the product's characteristics. The following sections describe the basic product features and how you can further customize your products in the Emporix e-commerce system.
### Basic product
Basic product is the most basic product template that contains the following information:
* Product name
* Product description
* URL of the graphical representation of the product, such as an image or a video
### Product templates
If the above fields are not enough to properly describe a product, you can add your own attributes by creating product templates.
{% hint style="success" %}
For example, a template for a T-shirt can contain the following additional parameters:
* Size
* Color
{% endhint %}
By default, product templates contain the basic product template fields as well.
{% hint style="success" %}
For example:
A basic product that we applied a T-shirt template to contains the following fields:
* Size
* Color
* Name
* Description
* Image URL
* Product ID
{% endhint %}
{% hint style="warning" %}
Product ID is automatically generated when a product is created.
{% endhint %}
A basic product with a product template applied can itself constitute a product template that can be applied to other products. For example, a T-shirt product can be used as a template for a long-sleeved top and a sweatshirt.
If you want to create several instances of the same product that differ only in color, size, or any other specifications, you can create product variants.
### Parent products and product variants
To create a parent product, you need to perform the following steps:
* Create or update an existing basic product.
* Apply a template to the product.
* Mark the product as parent.
Every parent product can have different variants, which are by default created upon the parent product's creation and/or update. The variants contain the same fields as the parent product, but the contents are different. The parent product's price is automatically inherited, if not specified otherwise.\
Each of the variants is automatically assigned with a Variant ID.
It is also possible to create product variants separately by overriding the default variant creation mechanism.
### Product bundles
Product bundles serve as containers of two or more products that already exist in the system, allowing customers to buy those products together at a more attractive price. These bundles can have special descriptions, prices, and images.
{% hint style="success" %}
For example, you can advertise a product bundle that contains a printer, toner, and a ream of paper. The products are sold separately as well, but when bought as a bundle, they are sold at a different price, which is more attractive to the customer.
{% endhint %}
### Related products
You can link related products together to make it easier for customers to find them.
{% hint style="success" %}
For example, customers want to find consumables and accessories related to the main product:
* A power charger for a laptop
* Ink for the chosen printer
{% endhint %}
### Media files
With the Emporix Commerce Engine, you can add multiple images, video, and documents to enrich the shopping experience on your website. The documents that you can add may also provide a self-service capability to reduce the cost of sales by allowing your customers to access product manuals, safety data sheets, and PDF brochures at the click of a mouse.
# Availability, location, and stock levels
Availability service allows you to manage product availability, location, popularity, and stock levels.
Here you can find an overview of the Emporix API Availability Service, along with its features and benefits.
{% hint style="info" %}
* Looking for code tutorials? Check out the [Availability Service guide](https://app.gitbook.com/s/d4POTWomuSS7d3dnh4Dg/api-guides/orders/availability/availability).
* Looking for API reference? Check out the [Availability Service](https://app.gitbook.com/s/d4POTWomuSS7d3dnh4Dg/api-guides/orders/availability) in the Emporix API Reference.
{% endhint %}
### Purpose
The Availability Service helps you manage information about the availability of products sold by your business. To make picking and packing easier, you can also manage physical location of products on particular sites.
### Features
The Emporix API Availability Service introduces a set of features that make product management easier:
| Feature | Description |
| ------------------------ | --------------------------------------------------------------------------------------------------------------- |
| **Availability** | Manage information about availability of products sold by your business. |
| **Product bundles** | Automatically calculate a product bundle's stock level based on the lowest stock level of the bundled products. |
| **Location** | Manage the exact location of products inside a warehouse or a store — zones, racks, shelves, and bins. |
| **Popularity** | Store information about a product's popularity to recommend best-selling products to your customers. |
| **Stock levels** | Manage stock levels of products at different sites. |
| **Search functionality** | Quickly retrieve information about location and availability of desired products. |
# Brands
Manage the brands you deal with easily with Brand Service.
Here you can find an overview of the Emporix **Brand Service**, along with its features and benefits.
{% hint style="info" %}
* Looking for code tutorials? Check out the [Brand Service guide](https://app.gitbook.com/s/d4POTWomuSS7d3dnh4Dg/api-guides/products-labels-and-brands/brand-service/brand).
* Looking for API reference? Check out the [Brand Service](https://app.gitbook.com/s/d4POTWomuSS7d3dnh4Dg/api-guides/products-labels-and-brands/brand-service) in the Emporix API Reference.
{% endhint %}
### Purpose
With the Emporix API Brand Service, you can define brands for the products that your business offers to make product management easier and to allow your customers to find products quickly.
### Features
The Brand Service introduces the following features:
| Feature | Description |
| ------------------------------------------ | ------------------------------------------------------------------------------------------------------------------------------------------------------------------------------------------------ |
| **Brand management** | You can manage brands by creating, updating, or deleting brands for your products. By keeping the brand information up to date, you can help your customers find their favorite products easier. |
| **Media files and additional information** | You can define your brands by providing additional information, such as media files, descriptions, or SEO texts. |
# Labels
Product labels provide and make the important product information easily noticeable.
Here you can find an overview of the Emporix **Label Service**, along with its features and benefits.
{% hint style="info" %}
* Looking for code tutorials? Check out the [Label Service Tutorial](https://app.gitbook.com/s/d4POTWomuSS7d3dnh4Dg/api-guides/products-labels-and-brands/label-service/label).
* Looking for API reference? Check out the [Label Service](https://app.gitbook.com/s/d4POTWomuSS7d3dnh4Dg/api-guides/products-labels-and-brands/label-service) in the Emporix API Reference.
{% endhint %}
### Purpose
With the Emporix API Label Service, you add proper labels to your products.\
Labelling provides important information about a product, that helps the customer make an informed decision upon purchase and differentiate a product among others.\
Labels can serve as marking product ingredients, nutritional value, allergens usage, environmental sustainability, safety instructions, and many more.\
Adequate labelling can also increase the visibility of your brand and secure customers loyalty.
### Features
The Label Service introduces the following features:
| Feature | Description |
| ----------------------------------------------- | -------------------------------------------------------------------------------------------------------------------------------------------------------------------------------------------------------------------------------------------------------------------------------- |
| **Enhance product visibility** | Highlighting key product details directly on your storefront. This includes features such as "organic" or "eco-friendly," which help customers identify important features and make informed purchasing decisions. It also ensures compliance with relevant regulations. |
| **Customizable Labels for Improved Engagement** | Utilize your own icons and media to create visually impactful labels, such as "Gluten-Free", "A+++ energy class" or "Worldwide Shipping". This enables you to effectively showcase and sell your items by providing the information your customers are specifically looking for. |
# Quotes
The Quote Service enables you to offer personalized pricing for both B2B and B2C customers through automated quote management.
Here you can find an overview of the Emporix **Quote Management Service**, along with its features and benefits.
{% hint style="info" %}
* Looking for Management Dashboard documentation? Check out the [Quotes guide](https://developer.emporix.io/ce/management-dashboard/quotes).
* Looking for code tutorials? Check out the [Quote Service Tutorials](https://app.gitbook.com/s/d4POTWomuSS7d3dnh4Dg/api-guides/quotes/quote/quote).
* Looking for API reference? Check out the [Quote Service](https://app.gitbook.com/s/d4POTWomuSS7d3dnh4Dg/api-guides/quotes/quote) in the Emporix API Reference.
{% endhint %}
## Purpose
The Emporix API Quote Service allows you to create quotes for particular item amounts without going directly to checkout. The items grouped together in a quote can be sold at different, more attractive prices, for example when the number of items is substantially big.
At every step of the process, customer receives notifications about the quote status changes. The notifications, containing a PDF file with the quote's details (if configured), are fully automated, which significantly speeds up the whole operation and enhances customer experience.
## Features
| Feature | Description |
| --------------------------------------- | ------------------------------------------------------------------------------------------------------------------------------------------------------------------------------------------------------------------------------------------------------------------------------------------------------------------------------------------------------------------------------- |
| **B2B and B2C business models support** | Quotes can be created by and on behalf of both B2B and B2C customers. Not only companies, but also individual customers can benefit from such an option, which increases conversion potential for you as a merchant. |
| **Quote request placement** | Quotes can be requested both by customers through your business' storefront, or by your employees on the Management Dashboard, on behalf of a customer. |
| **Full quote management** |
Your customer service team can create, retrieve, update, and delete quote requests both through the Management Dashboard, or by using other applications that work with the Quote Service API. Customers can update the status of a quote they created, or request a change.
|
| **Configurable quote ID** | You can personalize the IDs of quotes within your system. |
| **Time-limited quote offers** | By default, all quote requests have a lifespan of 30 days. The expiration date can be updated by your employees on the Management Dashboard or directly through our API. |
| **Quote history** | With our API implemented in your storefront application, you can allow your users to view a full history of previously placed quotes. |
| **Quote changelog** | Selected employees, if granted access, can view the full changelog of a quote in the Management Dashboard application. |
| **Status change and decline reasons** |
Customers, when declining or changing a quote, have to choose a reason from a pre-configured list and provide any additional comments, if needed. Employees can update the list of default reasons for changing the quote status.
|
| **Process automation** | The quote management process requires minimum amount of manual work thanks to the automation mechanisms implemented in the Quote Service: instant email notifications, easy quote-to-order conversion, and possible integration with webhooks. |
| **Instant notifications** |
Any time a new quote is created, updated, or declined, either by a customer or by an employee, a notification email is sent to your customer. The email may contain a PDF generated for the quote (if configured).
If a quote is created, updated, or declined by a customer, or when a customer requests changes, employees receive email notifications as well.
|
| **Easy quote-to-order conversion** | Accepted quotes are easily converted to orders, which saves time and manual work. |
| **Webhook integration** | If integrated with webhooks, the Quote Service events can trigger actions in other systems (such as sending notifications to customers). |
| **Mixins** | Thanks to the mixins concept, it is possible to customize the Quote Management Service so that it is aligned with your business needs. |
| **Support for external pricing** | Quotes can be integrated with customer-specific prices from external systems to ensure transparency, strengthen loyalty, and support pricing for products outside of Emporix. |
## Overview
The following diagram presents the quote request process:
# Returns
Returns Service simplifies and automates the return process for both registered and guest customers, offering flexible return handling.
Here you can find an overview of the Emporix **Returns Service**, along with its features and benefits.
{% hint style="info" %}
* Looking for code tutorials? Check out the [Returns Service guide](https://app.gitbook.com/s/d4POTWomuSS7d3dnh4Dg/api-guides/orders/returns/returns).
* Looking for API reference? Check out the [Returns Service](https://app.gitbook.com/s/d4POTWomuSS7d3dnh4Dg/api-guides/orders/returns) in the Emporix API Reference.
{% endhint %}
## Purpose
With the Emporix API **Returns Service**, customers may return defective or unwanted products more easily.
Returns, connected to orders and products on the platform, can be created, updated, or deleted (closed) either by customers themselves through a form on a storefront, or on the Management Dashboard or directly through Emporix API by employees on behalf of a customer. It is also possible to show a list of returns for a particular customer. If integrated with the Emporix API Webhook service, the Return Service events can trigger actions in other systems, such as automated status updates and notifications.
## Features
| Feature | Description |
| ----------------------------------------------------------- | ---------------------------------------------------------------------------------------------------------------------------------------------------------------------------------------------------------------------------------------------------------------------------------------------------------------------------------------------------------------------------------------------------------------------------------------------------------------------------------------------------------------------------------------------------------------------------------------- |
| **Return management** | Thanks to the well-structured return management mechanism with a set of standard fields for each return order, your customers and employees can now return goods more easily. Your customer service team can use the Management Dashboard or another application integrated through the Return Service API to update the return status and other relevant fields. |
| **Multiple orders and products in a single return request** | We make it easy to return goods from different orders in a single return, while still maintaining the links to the original orders and the products in them. |
| **List of returns** | Our API makes it easy to publish a filterable list of returns in your storefront application, thus giving your customers an easy way to see their returns and the products in them. |
| **Webhook integration** | If integrated with webhooks, the Return Service events can trigger actions in other systems (such as sending notifications to customers). |
| **Support for returns of orders from guest customers** |
Even if a customer decides to shop anonymously (without creating an account), it is still possible for them to return the purchased items. The purchase history is associated with an email address provided while submitting an order, therefore there are two options available to make a return for a guest customer: - They can either call your support and the employee is able to find the relevant order and create a return. - They can register with the email address provided at guest checkout and create a return request themselves from the orders history.
|
## Overview
The following diagram presents the return process:
{% hint style="info" %}
For more information, see also [Returns Business Scenario](https://developer.emporix.io/ce/customer-use-cases/scenarios-introduction/returns-process).
{% endhint %}
# Reward Points Management
The Reward Points Service automates rewards management that drives customer loyalty and retention.
Here you can find an overview of the Emporix **Reward Points Service**, along with its features and benefits.
{% hint style="info" %}
* Looking for code tutorials? Check out the [Reward Points Service guide](https://app.gitbook.com/s/d4POTWomuSS7d3dnh4Dg/api-guides/rewards-and-promotions/reward-points/reward-points).
* Looking for API reference? Check out the [Reward Points Service](https://app.gitbook.com/s/d4POTWomuSS7d3dnh4Dg/api-guides/rewards-and-promotions/reward-points) in the Emporix API Reference.
{% endhint %}
### Purpose
With the Emporix API Reward Points Service, you can ensure customer engagement and satisfaction by giving your customers reward points for every successfully completed order, or regardless of the orders made. In the former case, the reward points are automatically added, which significantly minimizes the effort on the side of your employees. In the latter, your employees can add reward points manually as an additional form of rewarding your customers, for example on their birthday. Points can be exchanged to coupons, which then can be used for future purchases. Redemption options are not limited and can be configured by your employees. By that token, you can adjust the service to your and your customers' needs.
### Features
| Feature | Description |
| --------------------------------------------------------- | ------------------------------------------------------------------------------------------------------------------------------------------------------------------------------------------------------------------------------------------------------------------------------------------------------------------------------------------------------------ |
| **Reward points management** | Your team can add, delete, update, and retrieve reward points by using an application integrated with the Reward Points Service API. |
| **Storefront integration** | With this feature, reward points can be exchanged for coupons by customers on your business storefront. Customers can also check the balance of their points, along with a detailed summary of the points added, and a history of redemptions. When redeeming the points, customers can choose from several redemption options configured by your employees. |
| **Process automation and integration with Order Service** | By default, after a successful order placement, points are automatically added for the customer who placed the order. When a customer redeems points for a coupon, the points are automatically deducted from the customer's total sum of points. |
| **Coupon generation and integration with Coupon Service** | On your business storefront, customers can exchange certain amounts of reward points for coupons of a specified value, based on the available redemption options. |
| **Configurable redemption options** | It is possible to create numerous coupon redemption options for your customers, along with specific conditions that have to be met, for example the number of points necessary for the redemption. The available coupons have to be of the `absolute` or `percentage` type. |
| **Money to reward points ratio** | You can set a factor that allows you to calculate the number of reward points assigned to a customer after every successful purchase. |
| **Reward points validity** | The reward points gathered by your customers are only valid for a specified amount of time. By default, their lifespan is set to three years. |
# Sites
Sites correspond to your online shops or warehouses with location-specific settings, such as currencies, taxes, and delivery options.
In the Emporix e-commerce system, a site represents a specific shop, warehouse, or another independent facility.
You can create multiple sites depending on your business needs, such as in the following scenarios:
* You own stores in multiple locations, where each store handles a different delivery area.
* You own stores in multiple locations, where taxes vary between each location.
* You own stores in multiple locations, where delivery options vary between each location.
You can manage your sites through the Emporix API Site Settings Service.
{% hint style="info" %}
For more information, see also:
* API Tutorial [Site Settings Service Tutorial](https://app.gitbook.com/s/d4POTWomuSS7d3dnh4Dg/api-guides/configuration/site-settings-service/site-settings)
* API Reference [Site Settings Service Service](https://app.gitbook.com/s/d4POTWomuSS7d3dnh4Dg/api-guides/configuration/site-settings-service)
* Multi-sites setup [Multi-site Architecture](https://app.gitbook.com/s/d4POTWomuSS7d3dnh4Dg/quickstart/multisites)
{% endhint %}
## Properties
By default, each site is described by the following properties:
* Currency
* Default language
* Home base from which products are shipped
* Flag indicating whether the site is active
* Flag indicating whether the site is your business's default site
* Flag indicating whether prices assigned to the site are expressed as gross or net values
* List of countries that the site ships products to
* List of supported languages
* Name
* Unique site code
## Custom attributes
You can use [mixins](https://app.gitbook.com/s/d4POTWomuSS7d3dnh4Dg/standard-practices/mixins) to configure custom site attributes.
{% hint style="info" %}
See also the [How to add custom attributes to a site](https://app.gitbook.com/s/d4POTWomuSS7d3dnh4Dg/api-guides/configuration/site-settings-service/site-settings#how-to-add-custom-attributes-to-a-site) guide.
{% endhint %}
Predefined mixins available in the Emporix e-commerce system are described in the table below.
| Mixin name | Purpose |
| ------------------------- | ------------------------------------------------------------------------------------------------------------------------------------------------------------------------------------------------------------------------------------------------------------------------------------------------------------------------------------------------------------------------------------------------------------------------------------------------------------------------------------------------------------------------------------------------------------------------------------------------ |
| Coupon settings | Defines settings for regular, referral, and reward points coupons. |
| Customer settings |
Defines regular expressions which validate the following customer account information:
Account password
Bank account owner's name
BIC
Email address
Phone number
|
| Debit settings |
Specifies your business's financial information needed to enable direct debit payments on your storefront.
|
| Delivery process settings | Defines settings related to delivery, such as expected time for a delivery vehicle to spend at one stop. |
| General shop settings | Specifies business information related to your storefront, such as the business's brand name, logo, or Facebook page. |
| Image size | Defines image resolutions for desktop, tablet, and mobile versions of your storefront. |
| Linkable pages | Specifies relations between pages on your storefront and in your Content Management System. |
| Maps API key | Specifies your Google Maps API key. |
| Merchant address | Specifies your business's address information. |
| Merchant information |
Specifies your business's information such as company address, contact information, or financial information.
⚠️ You need to configure your merchant information if you want to enable direct debit payments on your site.
|
| Order process settings |
Defines settings related to checkouts, orders, payments, and delivery.
⚠️ Emporix e-commerce system supports the following payment methods:
|
| Pickup settings | Specifies addresses where customers can pick up their orders. |
| Product settings |
Specifies custom packaging and cutting options for products.
✅ Examples of custom packaging options include paper, vacuum, or loose packaging.
✅ Custom cutting options are often used for grocery-related products. Examples of custom preparation options include cutting options such as slices or preparation options such as marinade.
|
| Template settings | Defines conditions for templates used by your business. |
## Site-specific resources
Resources are configured either globally or on the site level. The following resources need to indicate a site that they apply to:
* Carts
* Delivery-related information:
* Groups
* Fees
* Methods
* Time windows
* Zones
* Orders
* Payment methods
* Picklists and packlists
* Pickup points
* Product-related information:
* Availabilities
* Physical locations on sites
* Promotions
* Prices
* Stock levels
* Tax rates
* Shipping services
{% hint style="success" %}
You can enable site permissions feature that limits visibility of restriction-aware entities, such as company (legal entity), customer, cart, order, and quote for employees. Site code values serve as a tool to determine access to these entities for employee groups. Learn more in the [Site Permissions](https://developer.emporix.io/ce/system-management/authentication-and-authorization/authorization/site-permissions) guide.
If you're interested in the recommended sites and data setup, check out the [Multi-site Architecture](https://app.gitbook.com/s/d4POTWomuSS7d3dnh4Dg/quickstart/multisites) guide.
{% endhint %}
# Tax Classes
Depending on the countries where your business operates, you need to configure relevant tax classes.
Here you can find an overview of the Emporix API Tax Service, along with its features and benefits.
{% hint style="info" %}
* Looking for code tutorials? Check out the [Tax Service guide](https://app.gitbook.com/s/d4POTWomuSS7d3dnh4Dg/api-guides/prices-and-taxes/tax-service/tax).
* Looking for API reference? Check out the [Tax Service](https://app.gitbook.com/s/d4POTWomuSS7d3dnh4Dg/api-guides/prices-and-taxes/tax-service) in the Emporix API Reference.
{% endhint %}
### Purpose
Based on where your business operates and what types of products you sell, the rates of sales tax may differ. The Emporix Tax Service provides the APIs to help your business cover diverse tax scenarios.
Tax classes are required to set product prices. In order to define a price for an item, you need to have a tax class configured first. You have to define a tax class for each tax rate and for each country you operate in to determine correct tax calculation according to the given country's regulations.\
Then, when setting a price for a product, you need to select the correct tax class for a given country and apply the price for a given site. The system calculates the due tax based on the defined tax classes for the countries you sell in.
For example, on your site you sell books worldwide. In Germany, books are taxable according to `REDUCED` tax class of 7% tax rate. In Ireland, the biding `IE-ZERO` tax class for books is with 0% tax rate. So the gross price for a book in each country is calculated according to the chosen tax classes for the product.
Similarly, tax classes are used in calculating shipping costs or fees, so you need to define a tax class designated to the shipping and other fees your charge, for each country you deliver your goods to.\
In other words, you need to define the tax classes to properly manage prices, display them on the storefront and to enable proper calculations in the cart and checkout.
### Features
The Tax Service API introduces a set of features that make tax management easier:
| Feature | Description |
| ----------------------------------- | ------------------------------------------------------------------------------------------------------------------------------------------------------- |
| **Automatic calculation of prices** | You can automatically calculate net and gross values for prices. See more in the [Automated operations](#automated-operations) section. |
| **Customizable tax configurations** | You can create your own tax configurations and adjust them to your business's needs. See more in the [Tax class modeling](#tax-class-modeling) section. |
### Overview
#### Tax class modeling
To minimize data redundancy, tax classes are defined in separate, country-specific configurations and then referenced in applicable products.
You can manage your tax configurations through the [Emporix Tax Service](https://app.gitbook.com/s/d4POTWomuSS7d3dnh4Dg/api-guides/prices-and-taxes/tax-service) or you can also define them directly in the Management Dashboard, in the **Settings -> Tax** module.\
Learn more in the [Tax](https://developer.emporix.io/ce/management-dashboard/settings/tax) documentation.
You can create as many tax configurations as you need. Each configuration can be described with the following attributes:
| Mandatory | Optional |
| ------------------------------------------------------------------------ | --------------------------------------------------------------------------------------------------- |
|
Country code
Tax class:
Code
Rate
|
Tax class:
Description
Name
Order on the tax class list
|
Based on the defined tax classes, here's the example pricing:
| Product | Base Price | Country | Tax Class | Final Price |
| ------- | ---------- | ------------ | ------------------------------------------------------------------------------- | ----------- |
| Book A | EUR 20.00 | Germany (DE) |
Reduced:
Tax Code: REDUCED
Tax Rate: 7%
| EUR 21.40 |
| Book A | EUR 20.00 | Ireland (IE) |
Zero:
Tax Code: IE-ZERO
Tax Rate: 0%
| EUR 20.00 |
Explanation:
* Base Price: Price of the product before tax.
* Tax Class: A category that groups products with similar tax treatments
* Tax Code: A unique identifier for the tax class in each country.
* Tax Rate: Percentage of tax applied to the base price.
* Final Price: Calculated as Base Price + (Base Price × Tax Rate).
{% hint style="warning" %}
Decide how the product prices are displayed on your storefront. Specify whether all the product prices are shown as gross or net values by updating the given site's `includesTax` parameter. The `true` value means that the site displays gross prices, while the `false` value means the net prices are visible. If the `includesTax` parameter for a site is not defined, the system defaults to the `includesTax` value specified at the given price model level.\
Learn more in the [Site Settings API](https://app.gitbook.com/s/d4POTWomuSS7d3dnh4Dg/api-guides/configuration/site-settings-service) and in the [Price Service API](https://app.gitbook.com/s/d4POTWomuSS7d3dnh4Dg/api-guides/prices-and-taxes/price-service) documentation.
{% endhint %}
#### Automated operations
To facilitate your custom implementations of additional B2B workflows, the Tax Service API supports conversion operations for prices. For that purpose, you can use the [Tax calculation](https://github.com/emporix/emporix-documentation-portal/blob/master/content/user-guides/core-commerce/taxes/broken-reference/README.md) endpoint. As an input in the request, you can provide a specific price value, specify the `includesTax` parameter, and provide a source and target tax class. Based on these, in the response you get the calculations of gross, and net price values, tax value, or a price calculated for another country (using a different tax class). The calculations might be helpful in your custom implementations.
Note that the Tax Service allows for calculations that are based on specific values you provide. If you want to make calculations based on the `Price` object, you should use the price matching mechanism of the Price Service.
{% hint style="info" %}
Refer to these resources for more information:
* API guide - [Tax Service API Tutorial](https://app.gitbook.com/s/d4POTWomuSS7d3dnh4Dg/api-guides/prices-and-taxes/tax-service/tax)
* Price matching - [Price Service Tutorial](https://app.gitbook.com/s/d4POTWomuSS7d3dnh4Dg/api-guides/prices-and-taxes/price-service/price)
* Cart calculations - [Cart Service Tutorial](https://app.gitbook.com/s/d4POTWomuSS7d3dnh4Dg/api-guides/checkout/cart/cart)
{% endhint %}
# Tax classes (Legacy)
Depending on the countries where your business operates, you need to configure relevant tax classes.
{% hint style="danger" %}
As of April 2022, this concept has been marked as **legacy**.
To learn about the current tax classes concept, check out the [Tax classes guide](https://developer.emporix.io/ce/core-commerce/taxes-v2).
{% endhint %}
## Tax configuration
Tax categories (classes) are defined globally and apply to all sites within a tenant. They are stored under the `taxConfiguration` key in the [Emporix API Configuration Service](https://app.gitbook.com/s/d4POTWomuSS7d3dnh4Dg/api-guides/configuration/configuration-service).
JSON example
```json
{
"key": "taxConfiguration",
"value": {
"taxClassOrder": [
"FULL",
"HALF",
"ZERO"
],
"taxClasses": {
"FULL": 19,
"HALF": 7,
"ZERO": 0
}
}
}
```
By default, the following tax categories are configured:
* 19% (`FULL`)
* 7% (`HALF`)
* 0% (`ZERO`)
## Custom tax categories
You can update the default tax categories' names and values according to your business's needs.
{% hint style="warning" %}
If you intend to generate invoices through dedicated Emporix API services, you need to keep the original tax naming convention. However, you can still freely change the tax values according to the market in which your business operates.
{% endhint %}
Updating the tax configuration does not impact already placed orders or carts with tax values overwritten for individual line items.
## Relations between tax categories and other resources
Tax categories are closely linked to products and product prices. The influence of tax configurations on these resources is described in their respective sections.
### Products
Tax categories can be assigned to specific products for the purposes of accounting and invoice creation. There can be only one tax category assigned to a particular product.
A product's tax category is referenced in the `taxClass` field inside the `productCustomAttributes` mixin.
See an example of a product with the tax category assigned
```json
{
"id": "61b779cff5758b79d5815890",
"name": "Apple Juice",
"metadata": {
"mixins": {
"productCustomAttributes": "https://res.cloudinary.com/saas-ag/raw/upload/v1560527845/schemata/CAAS/productCustomAttributesMixIn-v38.json"
}
},
"mixins": {
"productCustomAttributes": {
"taxClass": "HALF"
}
}
}
```
{% hint style="info" %}
To learn more about mixins and mixin schemas, check out the [Standard practices in Emporix API](https://app.gitbook.com/s/d4POTWomuSS7d3dnh4Dg/standard-practices/mixins).
{% endhint %}
### Prices
Currently, all prices in the Emporix e-commerce system are stored as gross values (regardless of the channel through which they had been configured). Net values are calculated based on products' gross prices and tax rates when you generate an invoice.
## Managing tax categories through Emporix API
{% hint style="danger" %}
API calls presented in the tutorials require authorization with a [service access token](https://app.gitbook.com/s/d4POTWomuSS7d3dnh4Dg/api-guides/authentication/oauth-service) and specific scopes. Required scopes are mentioned in each tutorial.
To learn more about authorization in Emporix API, check out the [Authorization and scopes guide](https://developer.emporix.io/ce/core-commerce/taxes-v2/broken-reference).
{% endhint %}
### How to check what tax rates are configured for your tenant
First, request a [service access token](https://app.gitbook.com/s/d4POTWomuSS7d3dnh4Dg/api-guides/authentication/oauth-service) with the `configuration.configuration_view` scope.
To retrieve your tenant's tax configuration, you need to call the [Retrieving a configuration](https://app.gitbook.com/s/d4POTWomuSS7d3dnh4Dg/api-guides/configuration/configuration-service) endpoint.
cURL example
```shell
curl --location --request GET 'https://api.emporix.io/configuration/{{tenant}}/configurations/taxConfiguration' \
--header 'Content-Type: application/json' \
--header 'Authorization: Bearer {{service_access_token}}'
```
Response example
```json
{
"key" : "taxConfiguration",
"secured" : false,
"value" : {
"taxClassOrder" : [ "FULL", "HALF", "ZERO" ],
"taxClasses" : {
"FULL" : 19,
"HALF" : 7,
"ZERO" : 0
}
},
"version" : 2
}
```
### How to change your tenant's tax categories
First, request a [service access token](https://app.gitbook.com/s/d4POTWomuSS7d3dnh4Dg/api-guides/authentication/oauth-service) with the `configuration.configuration_manage` scope.
To change your tenant's tax configuration, you need to call the [Updating a configuration](https://app.gitbook.com/s/d4POTWomuSS7d3dnh4Dg/api-guides/configuration/configuration-service) endpoint with updated tax categories in the request body.
cURL example
```shell
curl --location --request PUT 'https://api.emporix.io/configuration/{{tenant}}/configurations/taxConfiguration' \
--header 'Authorization: Bearer {{service_access_token}}' \
--header 'Content-Type: application/json' \
--data-raw '{
"key": "taxConfiguration",
"value": {
"taxClassOrder": [
"FULL",
"HALF",
"ZERO"
],
"taxClasses": {
"FULL": 20,
"HALF": 10,
"ZERO": 0
}
}
}'
```
Response example
```json
{
"key" : "taxConfiguration",
"secured" : false,
"value" : {
"taxClassOrder" : [ "FULL", "HALF", "ZERO" ],
"taxClasses" : {
"FULL" : 20,
"HALF" : 10,
"ZERO" : 0
}
},
"version" : 2
}
```
### How to assign a tax category to an existing product
First, request a [service access token](https://app.gitbook.com/s/d4POTWomuSS7d3dnh4Dg/api-guides/authentication/oauth-service) with the `configuration.configuration_manage` scope.
To assign a tax category to an existing product, you need to call the [Updating a product's details](https://app.gitbook.com/s/d4POTWomuSS7d3dnh4Dg/api-guides/products-labels-and-brands/product-service) endpoint with the tax category's name in the request body.
cURL example
```shell
curl --location --request PUT 'https://api.emporix.io/product/{{tenant}}/products/{{productId}}?partial=true' \
--header 'Authorization: Bearer {{service_access_token}}' \
--header 'Content-Type: application/json' \
--data-raw '{
"mixins":{
"productCustomAttributes":{
"taxClass":"FULL"
}
},
"metadata": {
"mixins":{
"productCustomAttributes":"https://res.cloudinary.com/saas-ag/raw/upload/schemata/productCustomAttributesMixIn.v29.json"
}
}
}'
```
Response example
```json
{
"code": "OK",
"status": 200,
"message": "Operation succeeded"
}
```
# Measurement Units
CE provides built-in unit management and conversion mechanism.
The Unit Handling Service provides built-in unit management and conversion capabilities for the Emporix Commerce Engine. The unit management concept allows you to create and manage measurement units, as well as convert units of the same unit type (such as mass or volume).
{% hint style="info" %}
* Looking for object descriptions and code tutorials? Check out the [Unit Handling Service guide](https://app.gitbook.com/s/d4POTWomuSS7d3dnh4Dg/api-guides/configuration/unit-handling-service/unit-handling).
* Looking for API reference? Check out the [Unit Handling Service](https://app.gitbook.com/s/d4POTWomuSS7d3dnh4Dg/api-guides/configuration/unit-handling-service) in the Emporix API Reference.
{% endhint %}
## Purpose
To reduce data redundancy, units are stored independently from the price model. With our unit management solution, it is possible to manage all measurement units through a separate service. The conversion of units is a very intuitive process, where a factor serves as a universal measure of values. The factors are always the same for the values, so their maintenance in the system does not require any additional actions on a daily basis.
## Features
Unit management comes with a set of features that make managing measurement units easier.
| Feature | Description |
| --------------------------------- | -------------------------------------------------------------------------------------------------------------------------------------------------------------------------------------------------- |
| **Customizable unit model** | Create custom measurement units depending on your business needs. Supports metric, imperial, US customary (USC), and custom unit systems. |
| **Default setup of common units** | Most common measurement units are pre-configured out of the box. See the [Default unit setup](#default-unit-setup) section for the complete list. |
| **Localization of unit names** | Unit names can be translated into different languages using language-code maps, enabling you to target global markets. Unit symbols and names are retrieved based on the `Accept-Language` header. |
| **Unit conversion** | Convert between units that share the same base unit type using conversion factors. Conversion factors are calculated automatically based on the relationship to the base unit. |
| **Unit validation** | Validate unit codes before using them in price models or cart items to ensure data consistency and prevent errors. |
| **Unit search and filtering** | Search for specific units and filter them with additional criteria, supporting sorting and paging for efficient unit management. |
{% hint style="warning" %}
Units need to be convertible by a factor — you can convert units of the same type only. Currently, it is not possible to convert units through shift (for example, Celsius to Fahrenheit).
{% endhint %}
## Default unit setup
The Emporix Commerce Engine automatically configures a set of most commonly used measurement units. The units can be organized by type, for example:
**Volume:**
* Centiliter (cl)
* Cubic centimeter (cm³)
* Cubic decimeter (dm³)
* Liter (l)
* Milliliter (ml)
* US fluid ounce (us-fl-oz)
**Length:**
* Centimeter (cm)
* Kilometer (km)
* Meter (m)
* Millimeter (mm)
**Quantity:**
* Dozen
* Piece (pc)
**Mass:**
* Gram (g)
* Kilogram (kg)
* Milligram (mg)
* Tonne (t)
These default units are immediately available for use in Product Service, Price Service, and Cart Service. You can create additional custom units as needed for your business requirements.
## Features and benefits for B2B commerce
The Unit Handling Service provides significant benefits for B2B commerce operations:
**Clear unit definitions and standardization**
* Clearly define allowed units and their codes to avoid mistakes or ambiguity across your organization
* Establish clear-cut rules and definitions of unit types, ensuring consistency in product data, pricing, and orders
* Reduce errors from unit code mismatches or inconsistent naming conventions
**Automatic unit conversion**
* Convert units automatically when prices or quantities need to be displayed in different units
* Price matching automatically handles unit conversions when requested units differ from price model units
* Cart calculations seamlessly convert unit prices to match item requirements
**Flexible product sales**
* Enable flexible product sales by defined units rather than by piece only
* Support diverse B2B scenarios, such as:
* 50 meters of steel tubing
* 250 liters of lubricant
* 250 grams of fresh-cut cheese
* Bulk quantities with precise measurement requirements
**Intuitive conversion process**
* Conversion factors serve as universal measures of values, ensuring consistent calculations
* Factors are always the same for the same unit relationships, requiring minimal maintenance
* Conversion calculations are performed automatically by the service, reducing manual errors
**Global market support**
* Localized unit names and symbols support multi-language and multi-region operations
* Display units in the language preferred by your customers
* Support different measurement systems (metric, imperial, US customary) in a single tenant
**Service integration**
* Centralized unit management ensures consistency across Product Service, Price Service, and Cart Service
* Changes to units propagate automatically across all services within \~5 minutes
* Validation prevents invalid unit codes from being used in price models or cart items
# Introduction
The Management Dashboard is a powerful application that provides you with backoffice tools to administer all types of settings for your online store. Learn what you achieve with MD.
The **Emporix Management Dashboard** is designed to help you manage your store's resources.
## Navigating the Management Dashboard
Emporix Management Dashboard allows you to smoothly navigate through the modules and manage your business configuration settings, customers, orders, catalogs, products, pricing, and other.
* The **navigation menu** on the left lists the available modules. Each module is a collapsible menu itself, grouping together specific sections.
* The **top bar** provides several options:
* change a perspective (if you have also access to the [VSM](https://app.gitbook.com/o/z8MNPigQv25NZe33g3AV/s/rSc4haeKWrTrOPHzdrMO/)),
* switch to another tenant (if you have access to more than one),
* choose the preferred currency,
* select the language that you want to use for your data and for the UI
Top bar
### Data and interface languages
There are two language choosers in the settings bar at the top:
* The **data language** chooser enables you to see localized values in the preferred language first. For example, when you switch to French data language and then open a product, the localized fields, such as name or description, show the the first displayed values in French. But the other content you see in the UI, like modules names, fields names, buttons etc, is not translated to French.
Data language selector
* The **interface language** under your account icon allows you to switch to a different UI language and to have everything translated. Emporix supports English and German as UI languages.
UI language selector
{% hint style="warning" %}
The possibility to view specific modules and available options that appear in particular views of Emporix Management Dashboard depend on the permissions set for users. If you don't see a specific module, can't see or perform an action described in the documentation, it might mean that you don't have enough permissions.\
To learn how to manage users and their rights and roles in the application, see [Users and Groups](https://developer.emporix.io/ce/management-dashboard/administration/usersandgroups).
{% endhint %}
## Modules
The Management Dashboard provides the following modules:
* [**Dashboard**](https://developer.emporix.io/ce/management-dashboard/dashboard) - monitoring commerce operations, sales rates and other KPIs.
* [**Agentic AI**](https://developer.emporix.io/ce/management-dashboard/agentic-ai) - configuring AI agents to facilitate operational worflows.
* [**Customer Management**](https://developer.emporix.io/ce/management-dashboard/customer-management) — managing data about the companies, contact persons, customers and coupons.
* [**Vendor Management**](https://developer.emporix.io/ce/management-dashboard/vendors) - managing vendors and their access.
* [**Quotes**](https://developer.emporix.io/ce/management-dashboard/quotes) — preparing and managing customers' quotes requests.
* [**Carts**](https://developer.emporix.io/ce/management-dashboard/carts) - monitoring the created carts lifecycle.
* [**Orders**](https://developer.emporix.io/ce/management-dashboard/orders-module) — managing orders.
* [**Catalogs**](https://developer.emporix.io/ce/management-dashboard/catalogs-module) — configuring catalogs and categories to which your products can be assigned.
* [**Products**](https://developer.emporix.io/ce/management-dashboard/products-module) — managing product data: create product templates, labels, manage brands, or gather supplier details.
* [**Pricing**](https://developer.emporix.io/ce/management-dashboard/pricing) — configuring the pricing models and price lists.
* **Supplier Management** — managing your suppliers' data.
* [**Settings**](https://developer.emporix.io/ce/management-dashboard/settings) — managing store settings, such as delivery options or fees.
* [**Administration**](https://developer.emporix.io/ce/management-dashboard/administration) — managing users, permissions and webhooks.
* [**Extensions**](https://developer.emporix.io/ce/management-dashboard/extensions) — additional custom extensions to the product.
* [**Custom Entities**](https://developer.emporix.io/ce/management-dashboard/custom-instances) - managing custom created types with associated mixins.
# Dashboard
The Dashboard view provides a flexible way to monitor commerce operations in the system and get insights into the sales KPIs.
Access to timely, site-specific performance insights enables faster, better-informed decision-making. This can directly contribute to improvements in revenue growth, margin optimization, and cost control at the individual site level.
The Dashboard also enhances transparency for multi-site operators, such as regional managers and franchise owners, by providing a consolidated yet granular view of performance across locations. This visibility supports proactive management, performance benchmarking, and more effective operational oversight.
Dashboard
### Overview
The Dashboard is **site-aware** and reflects the currently selected site. It includes a site switcher control where you can choose a particular site to view the related data for. By default, no site is preselected. When no site is selected, the dashboard displays aggregated KPIs across all sites. When a site is selected, the dashboard shows KPIs only for that specific site.
The Dashboard enforces **permission-based** access to ensure users only view data relevant to their assigned scopes. For employees with restricted access:
* They can view the KPIs only for the site(s) they have permissions to
* All KPIs and related data are limited to that specific site.
* No visibility or access is provided to data from other sites. This approach ensures data security, maintains operational boundaries, and aligns with organizational access policies.
The Dashboard supports a **customizable, user-centric layout** configuration. KPI widgets/cards can be freely arranged, added, or removed either at the individual user level or at the tenant level. An intuitive drag-and-drop interface enables users to easily reorder and organize widgets according to their preferences and priorities. The selected layout and configuration settings can be **persisted** in the Configuration Service at the tenant level and automatically restored upon subsequent access. As a result, all users within the same tenant share a consistent dashboard layout and configuration.
As an operational benefit of customizable Dashboard, you get one unified view for cross-site and single-site KPIs. This means less manual switching between tools or pages to compare site performance. Also, you get increased flexibility as you can adapt the Dashboard to the ways that different roles prefer to see the information and match it to their daily workflows.
### Example customization use cases
The example use cases where customization creates operational benefits:
Head of Operations, Regional Manager, Central Management
Usage
• Daily/weekly performance review across all sites. • Dashboard view with no site selected by default to view aggregated KPIs (for example, total revenue, orders, conversion, key operational metrics). • Optional adjustment of the layout so the most critical KPIs are at the top.
Outcome / business impact
• Quick overview of overall business health across all sites. • Faster identification of trends or anomalies that require drill-down.
:user-vneck-hair:
Per-site deep dive (site manager or regional lead)
Roles
Site Manager, Regional Manager, Category Manager
Usage
• Investigating performance of a specific underperforming or strategic site. • Using the site switcher to select a specific site. • Rearrangement of widgets to highlight KPIs that matter for that specific site, like for example, local promotions, specific assortments.
Outcome / business impact
• Focused, site-specific view to support root-cause analysis and local actions. • Better alignment of decisions with local conditions.
### Customizing the Dashboard
{% stepper %}
{% step %}
**Choose to edit the view**
Select the **Customize** option to enable edition mode.
Customize Dashboard
{% endstep %}
{% step %}
**Adjust the widgets**
As per your needs and preferences, adjust the view by adding, removing, rearranging the widgets and cards. Each widget can be resized and moved across the Dashboard using the drag and drop.
{% endstep %}
{% step %}
**Save the changes**
When done, choose how you want to save your configuration.
Save Dashboard configuration
* **Save custom** - Save your individual preference. The configuration is saved locally in the browser so the view is persisted until you clear the cache.
* **Save global** - Save the configuration for the tenant. This option is available for Admin roles and it persists the config for all users of the tenant.
{% endstep %}
{% endstepper %}
### Available widgets
The Dashboard is equipped with a set of widgets that you can freely add and arrange:
Revenue & Commercial Performance
Gross Revenue
Total Order Count
Basket Size (Ø)
Gross Quote Volume
Total Quote Count
Quote Value (Ø)
Total Coupons
Customer Activity & Conversion
Open Carts
Total Customers
Accepted Quotes
Cancelled Quotes
Catalog, Partners & Operations
Total Products
Total Vendors
Total Returns
Time-ranged charts
Revenue over time
Orders over time
Basket size over time (Ø)
Quote volume over time
Quotes over time
Quote value over time (Ø)
Geographic location
Orders and quotes by country map
Timelines
Last quotes
Last orders
Users tables
Total customers
Total employees
Recent operations tables
Abandoned carts
Last orders
Orders in progress
Last returns
Last quotes
{% hint style="success" %}
**Adding custom widgets/components**
The Dashboard is an MD extension, which is available in the [Emporix Extensions Library](https://github.com/emporix/md-extensions/tree/master/dashboard). You can further customize the Dashboard by adding your custom widgets or components. Fork the extension, build your custom components and widgets, and then register the extension following the standard steps.
For more details, refer to:
* creating a custom widget: [Create and Register a New Widget](https://github.com/emporix/md-extensions/blob/master/dashboard/WIDGETS.md)
* adding an extension to MD: [Extensions](https://developer.emporix.io/ce/management-dashboard/administration/extensions)
{% endhint %}
# Agentic AI
Simplify your business operations and unlock greater efficiency with the Emporix Agentic AI.
The **Agentic AI** module, with all its child nodes, enables you to create and govern AI Agents that can connect with Emporix resources, contributing to overall greater operational efficiency. The Agentic AI equips you with smart solutions that change your commerce platform into the intelligent commerce experience.
{% hint style="success" %}
* Learn more about Agentic AI features and configuration: [Agentic AI](https://app.gitbook.com/s/8GgoeZEZYjZrpjOU6w52/agentic-intelligence/agentic).
* Learn more about all the AI-related solutions available in Emporix: [Agentic Commerce Intelligence](https://app.gitbook.com/o/z8MNPigQv25NZe33g3AV/s/8GgoeZEZYjZrpjOU6w52/).
{% endhint %}
---
[Next Page](/llms-full.txt/1)
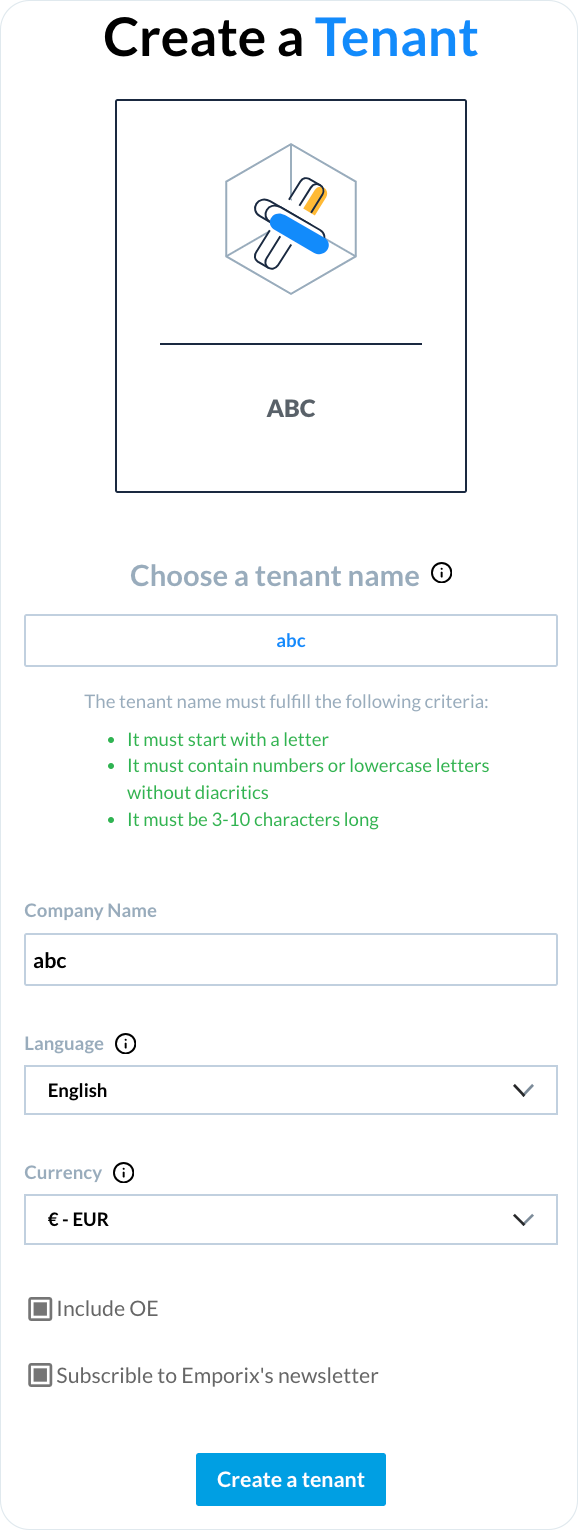
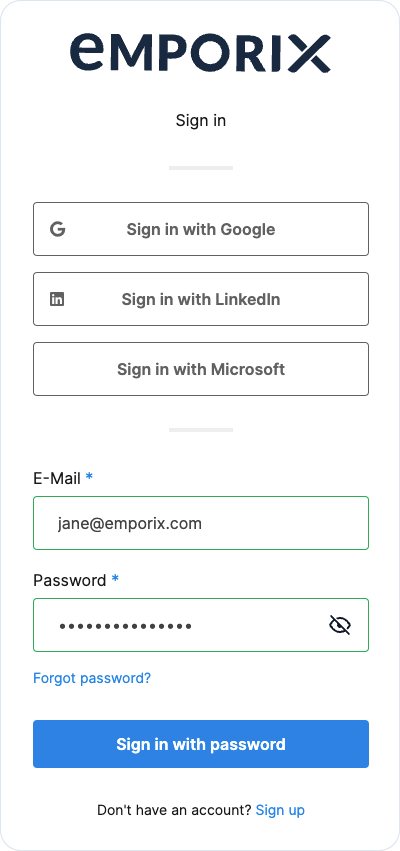
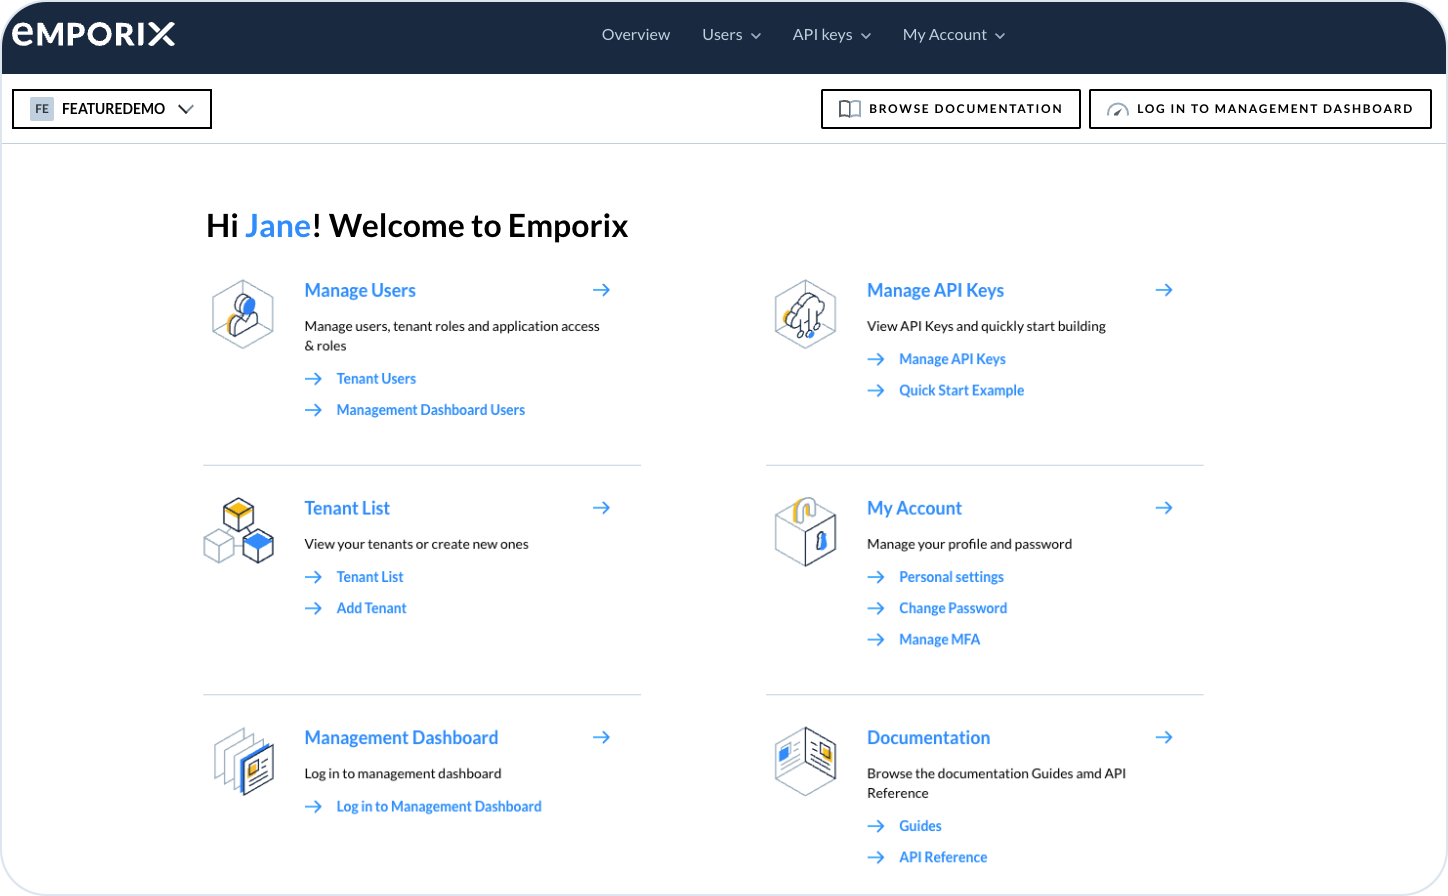
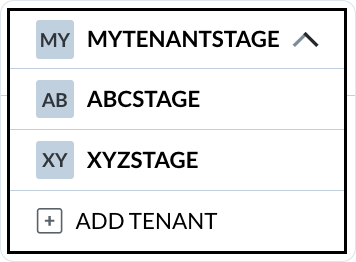
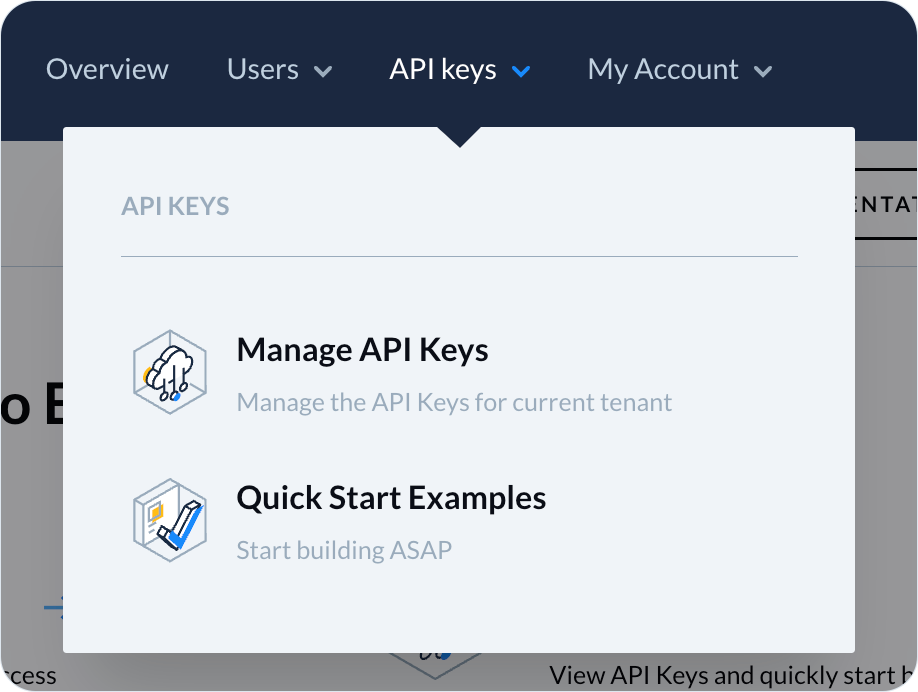

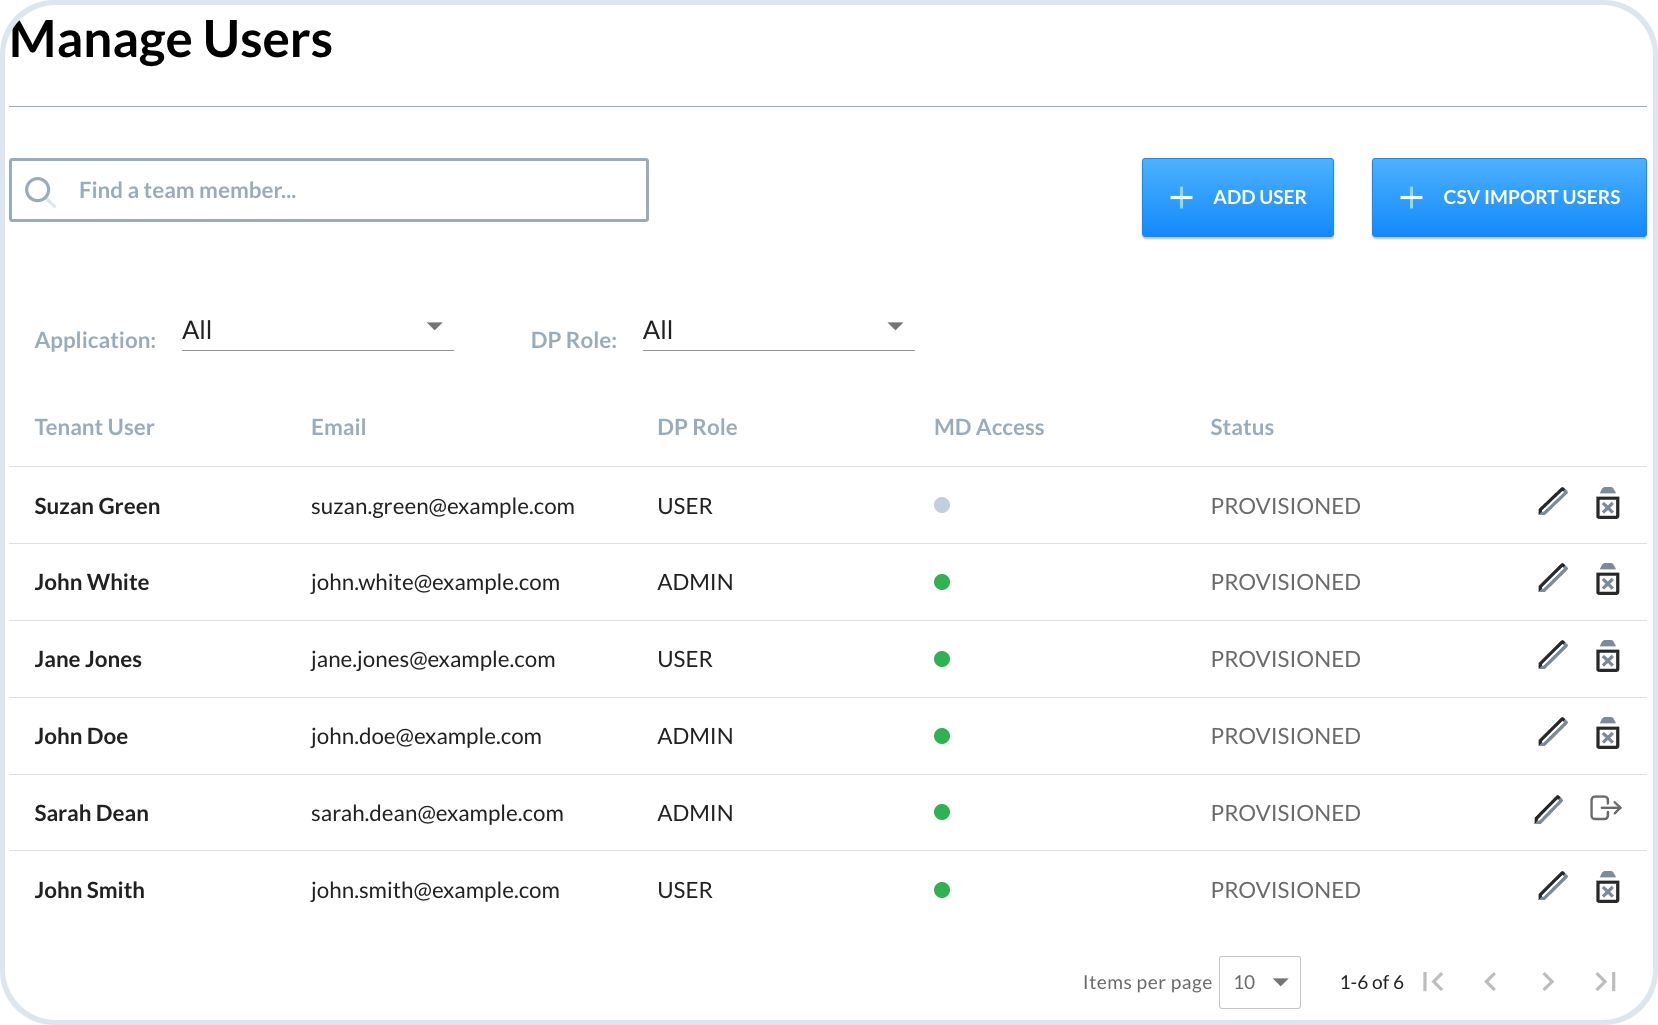
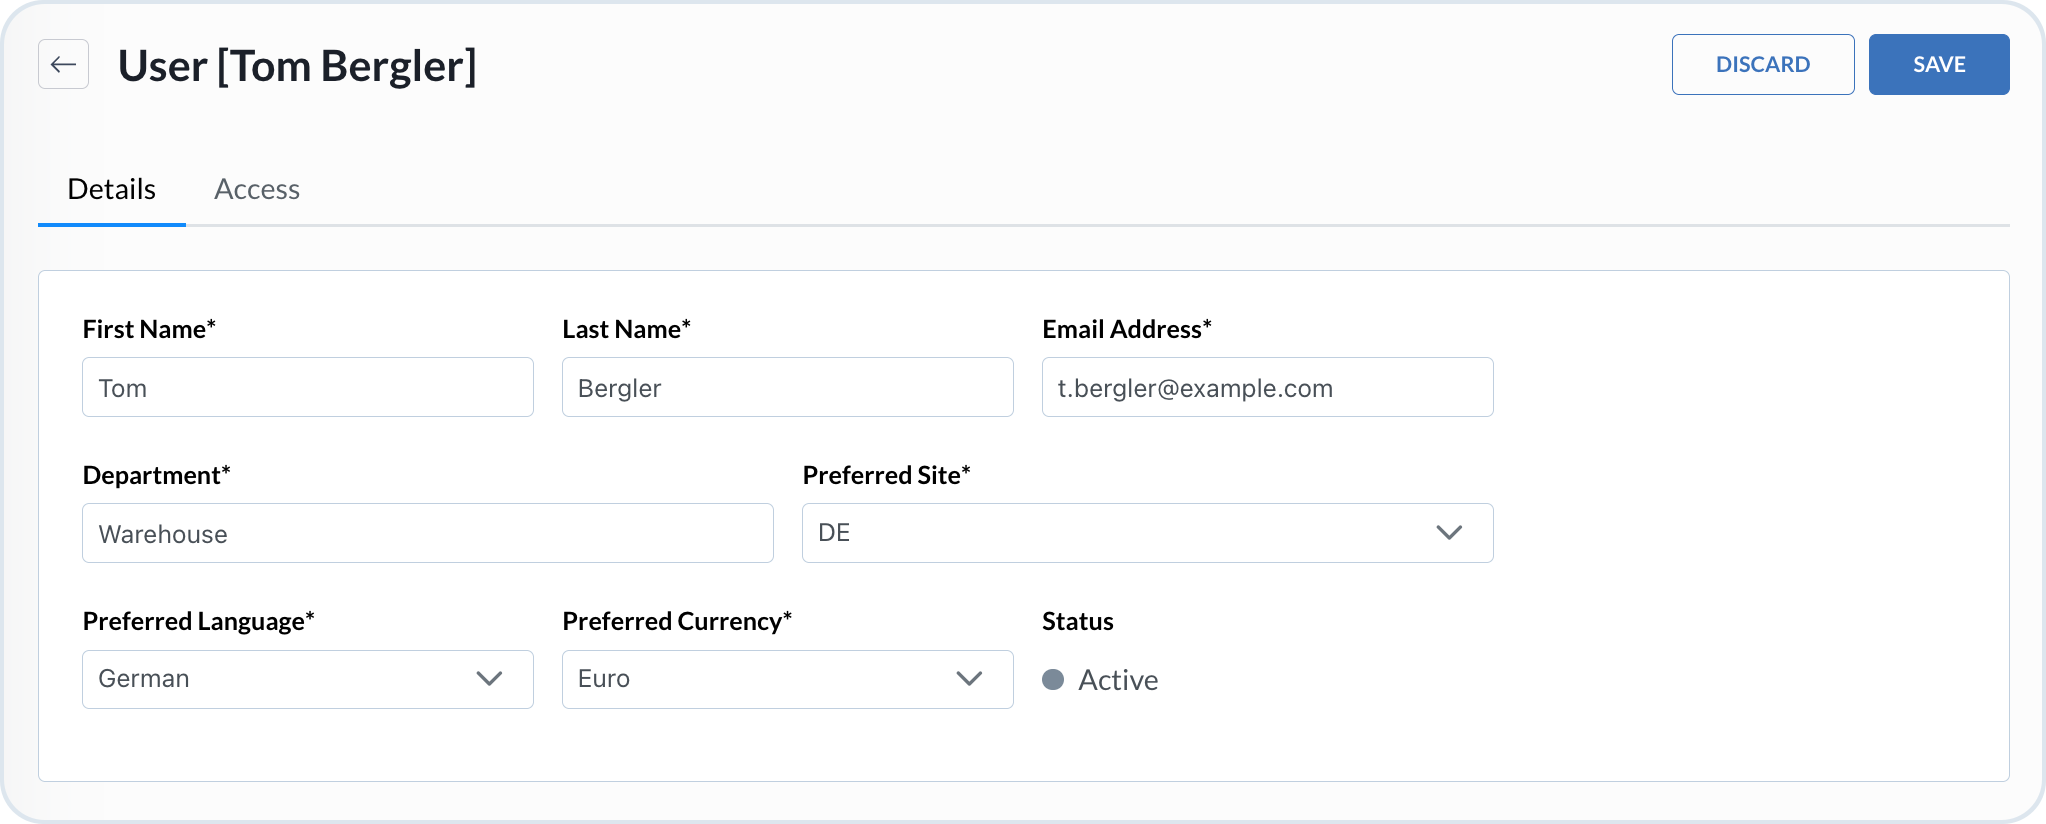
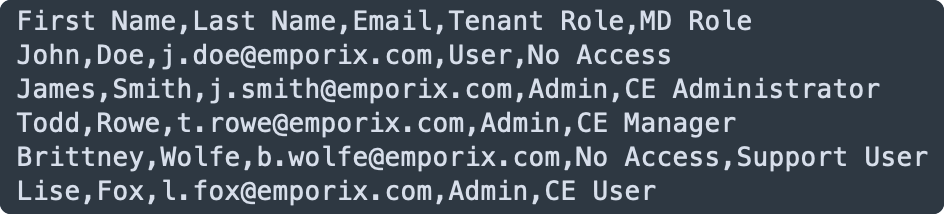


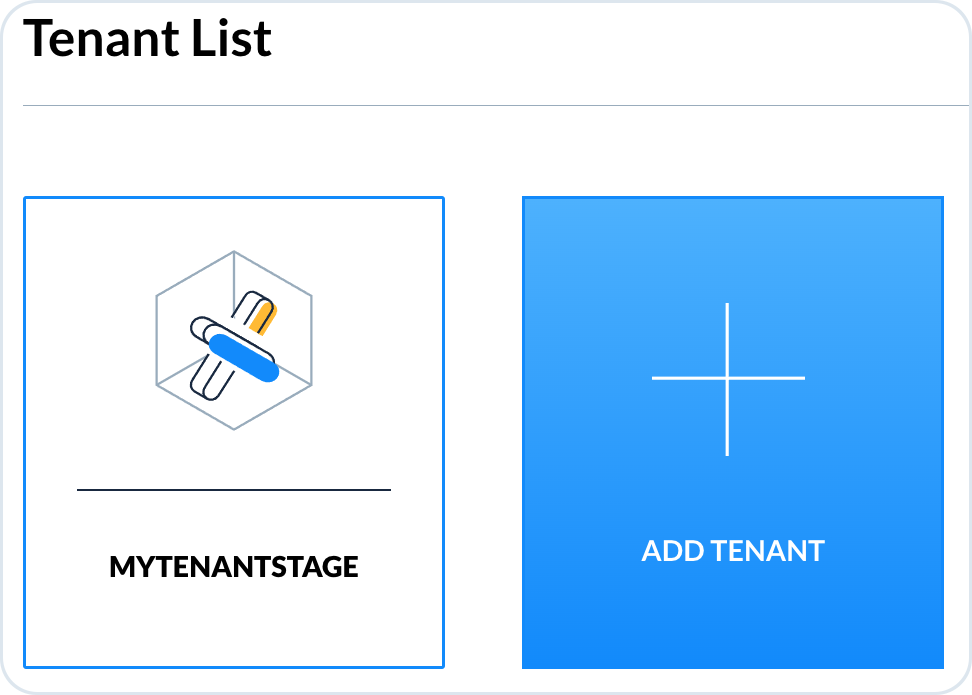
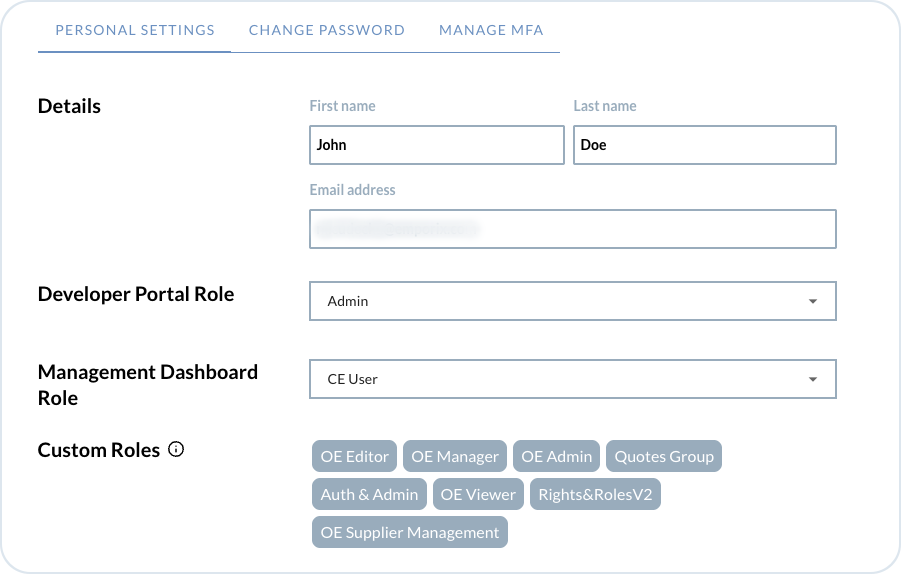

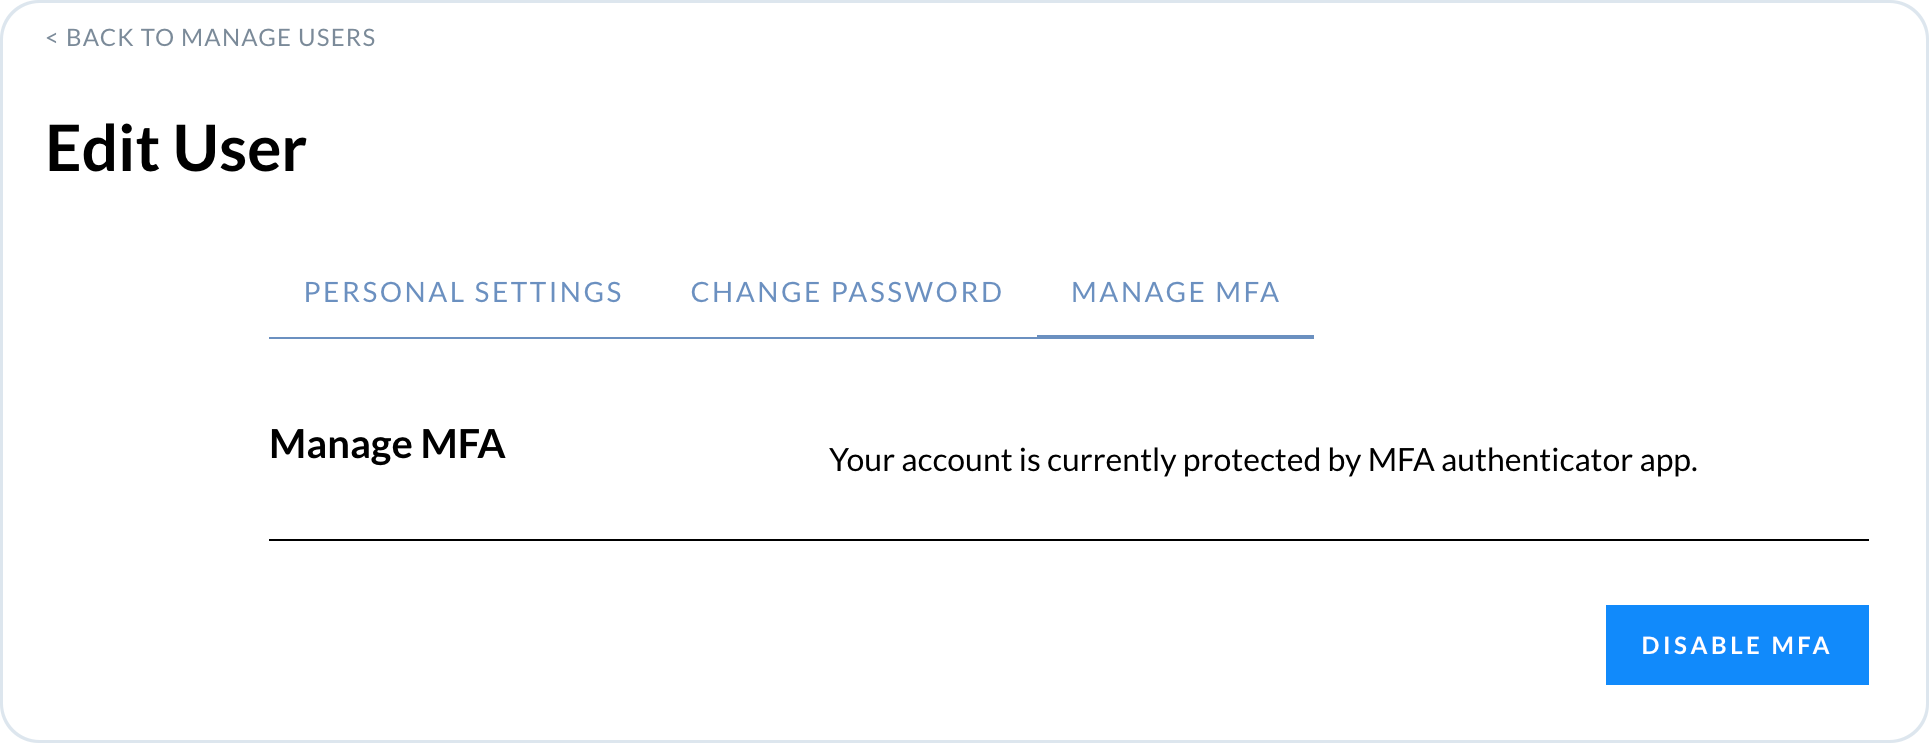
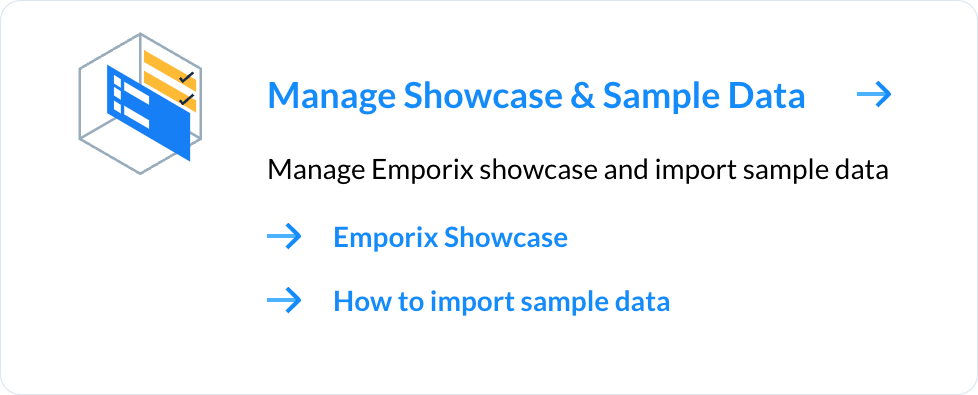

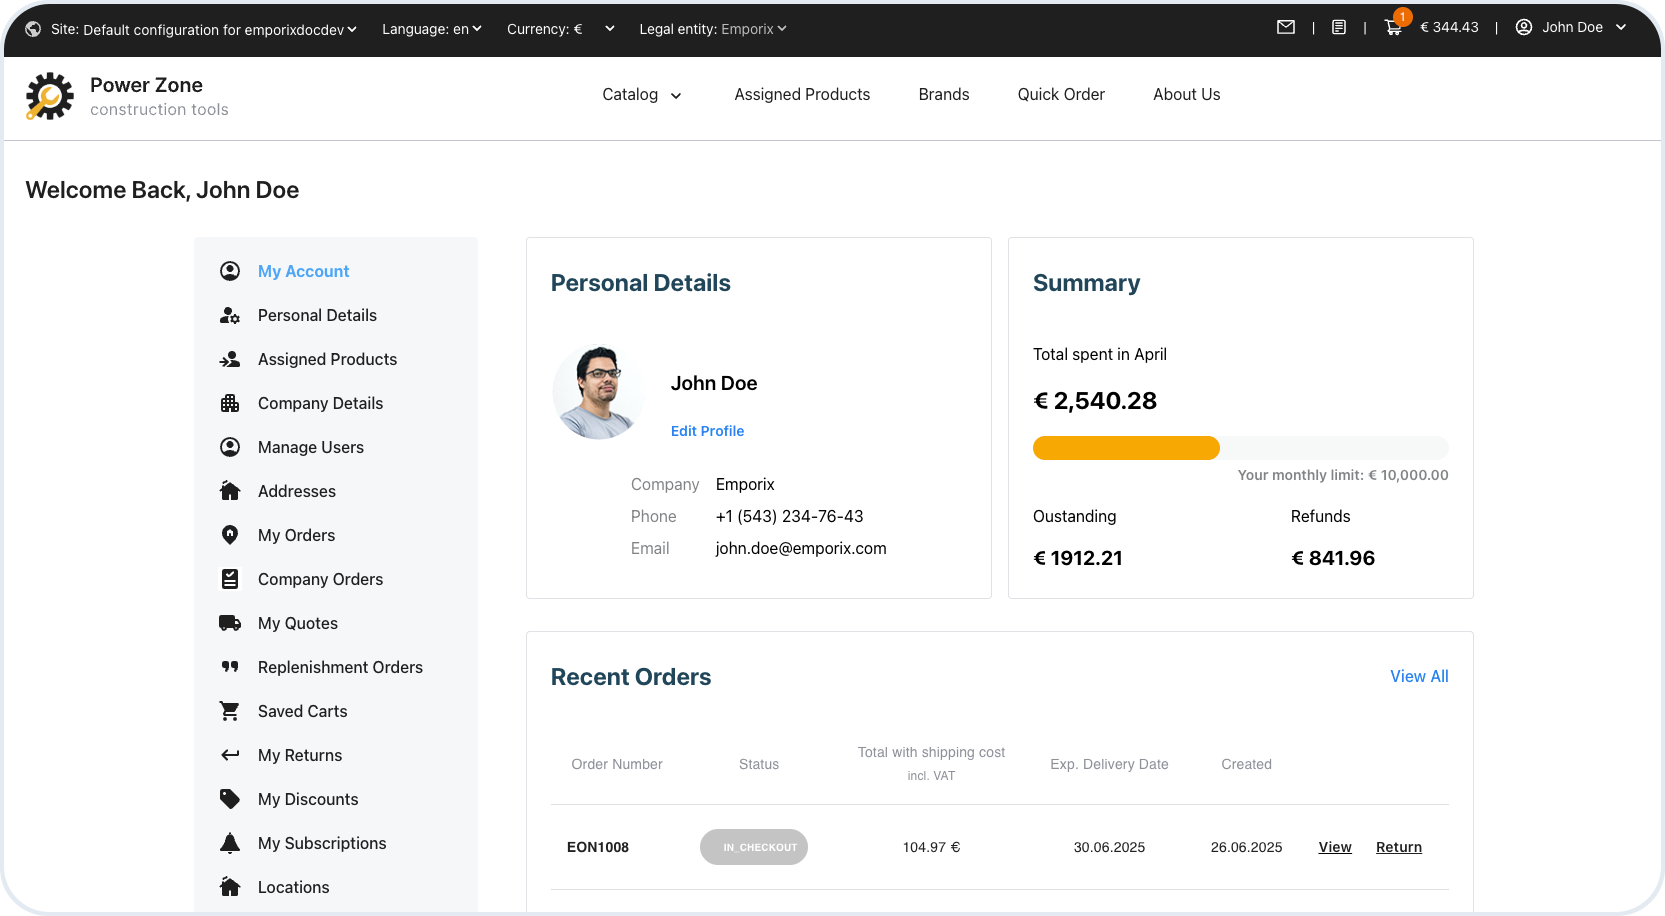
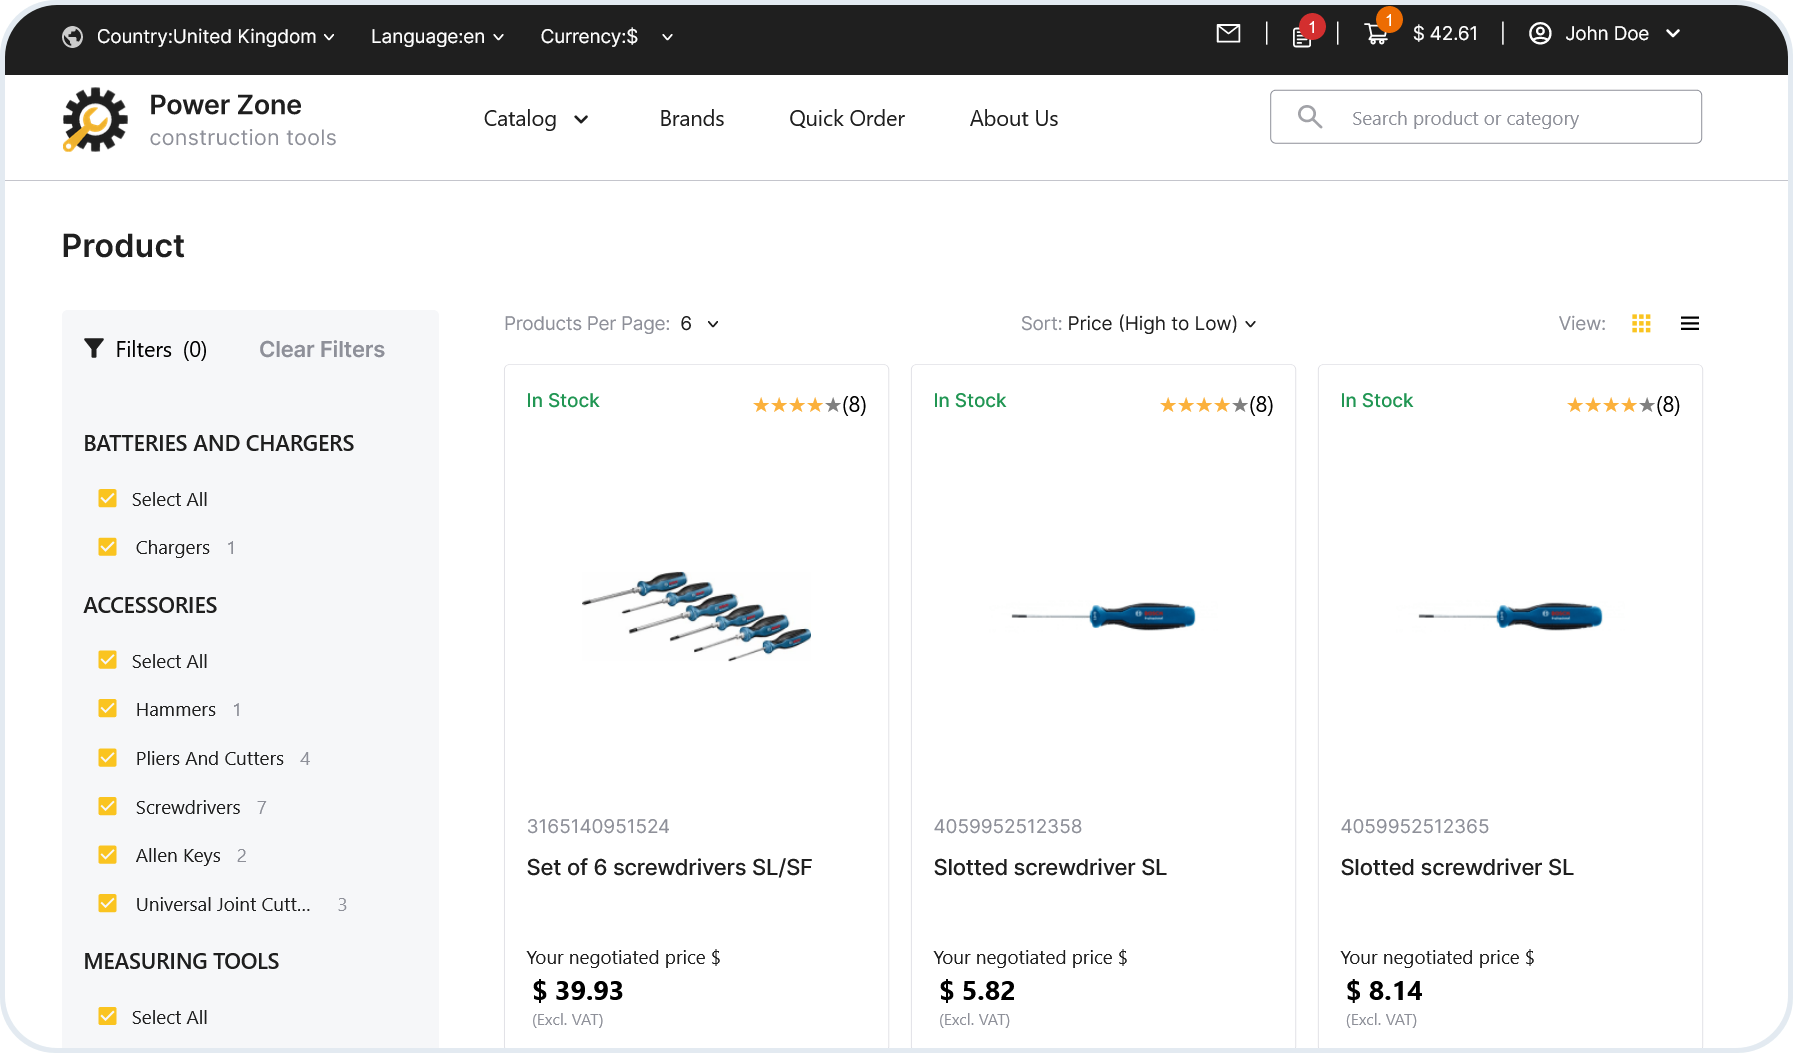
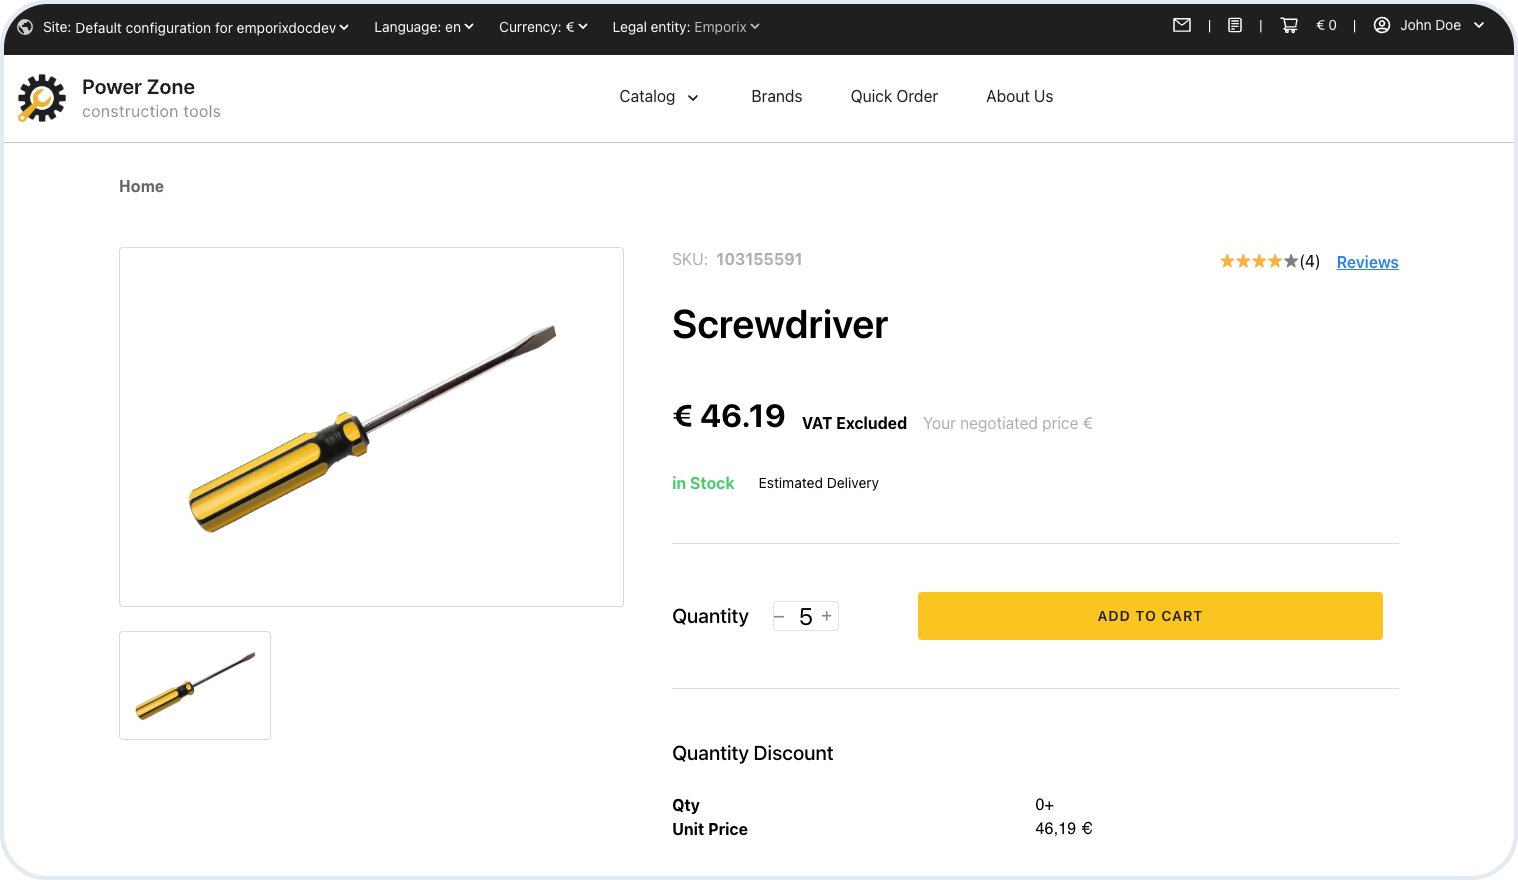
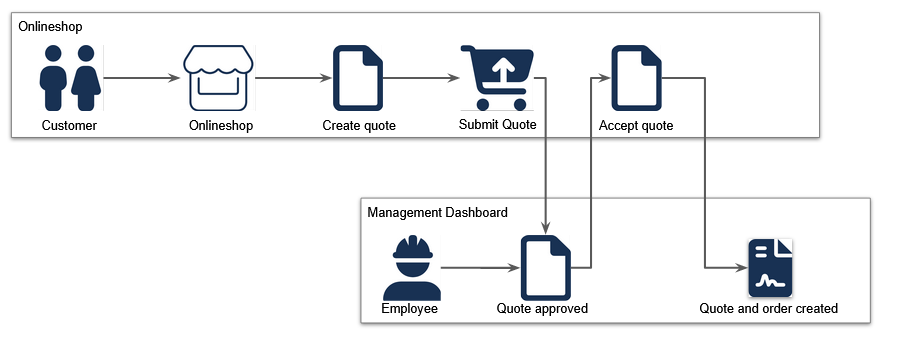
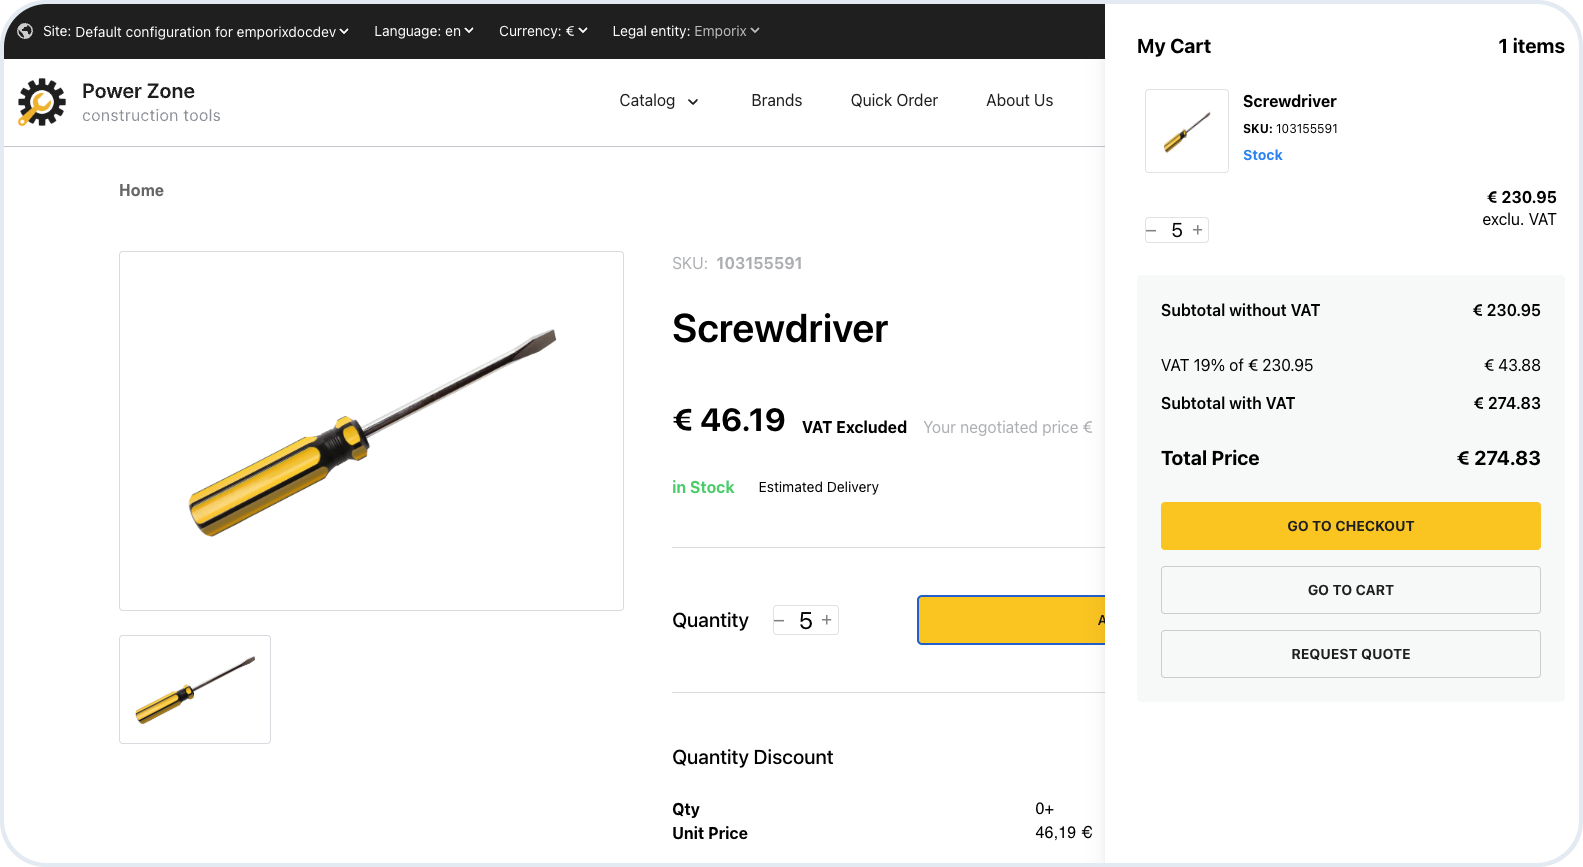
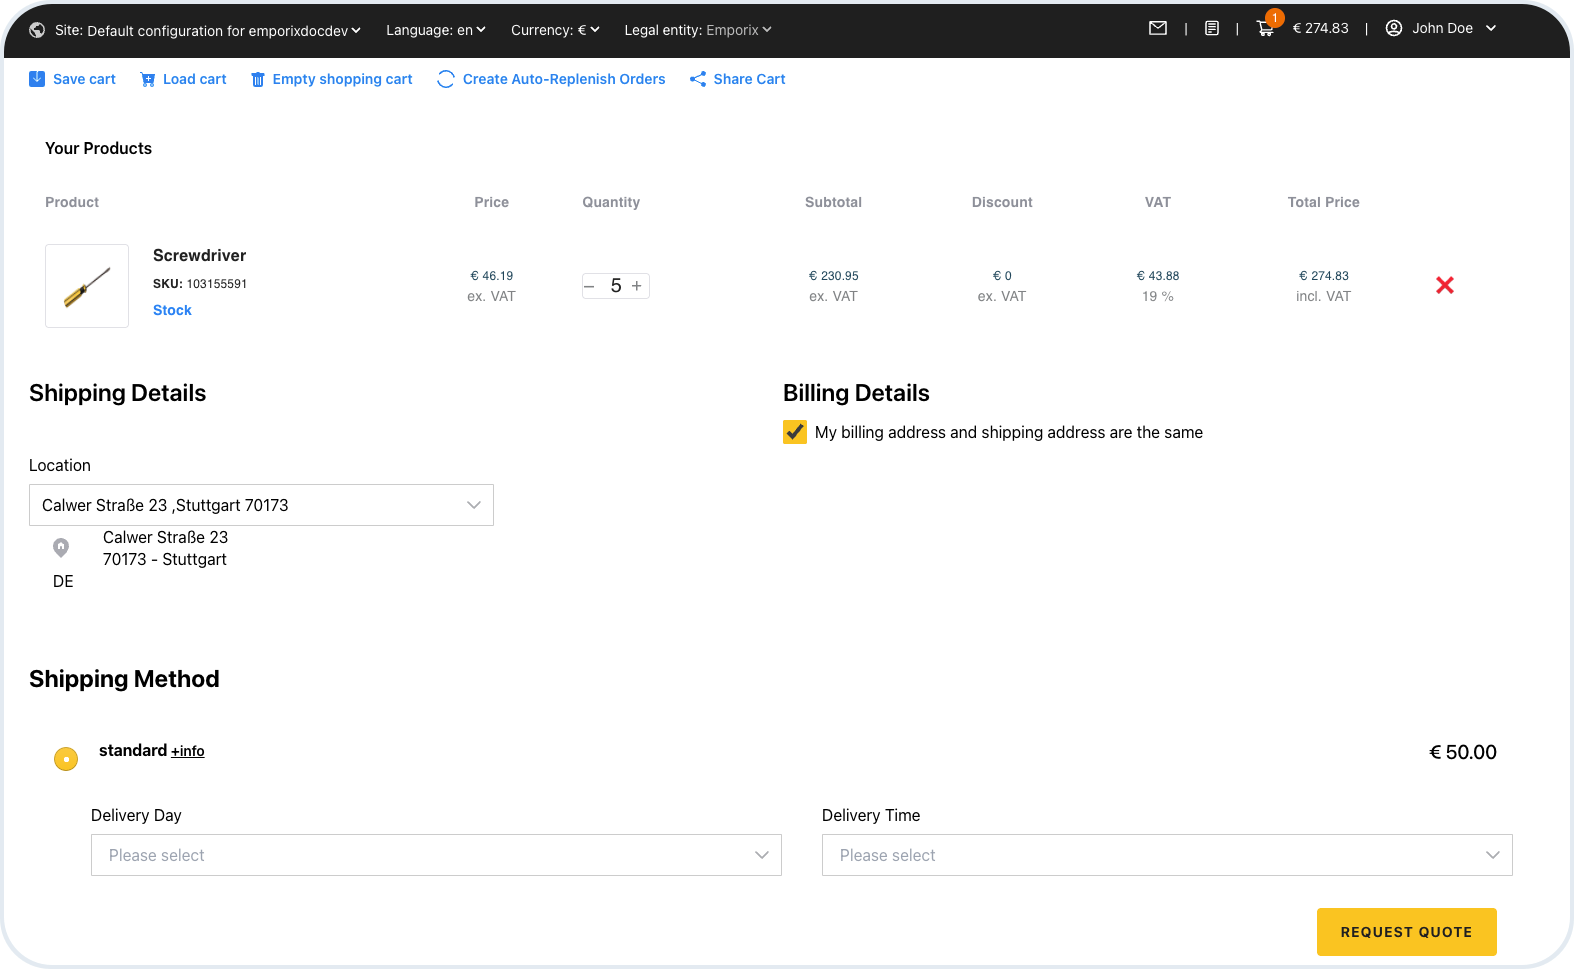
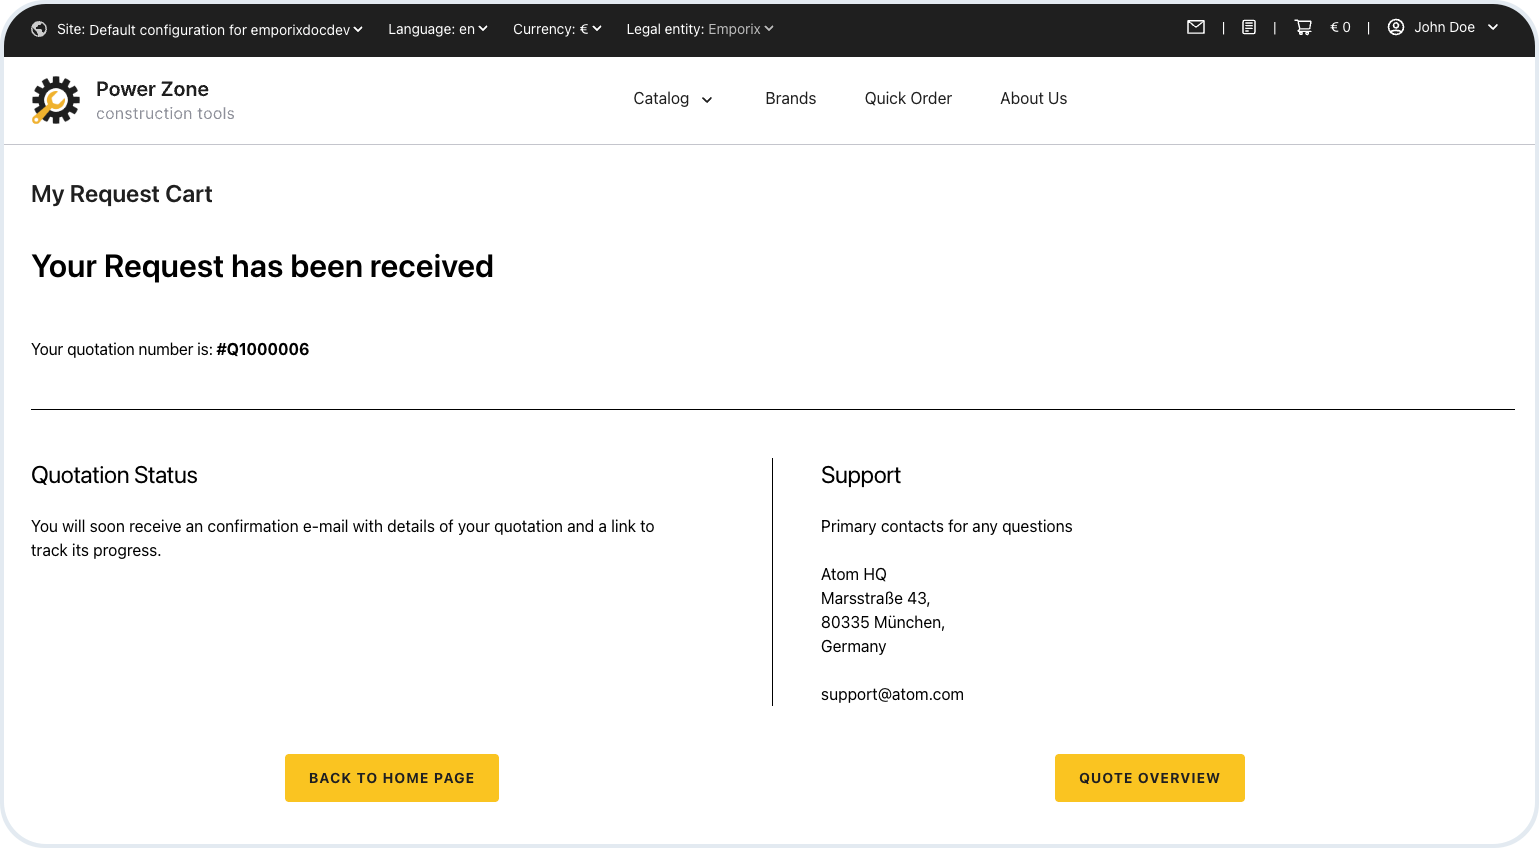
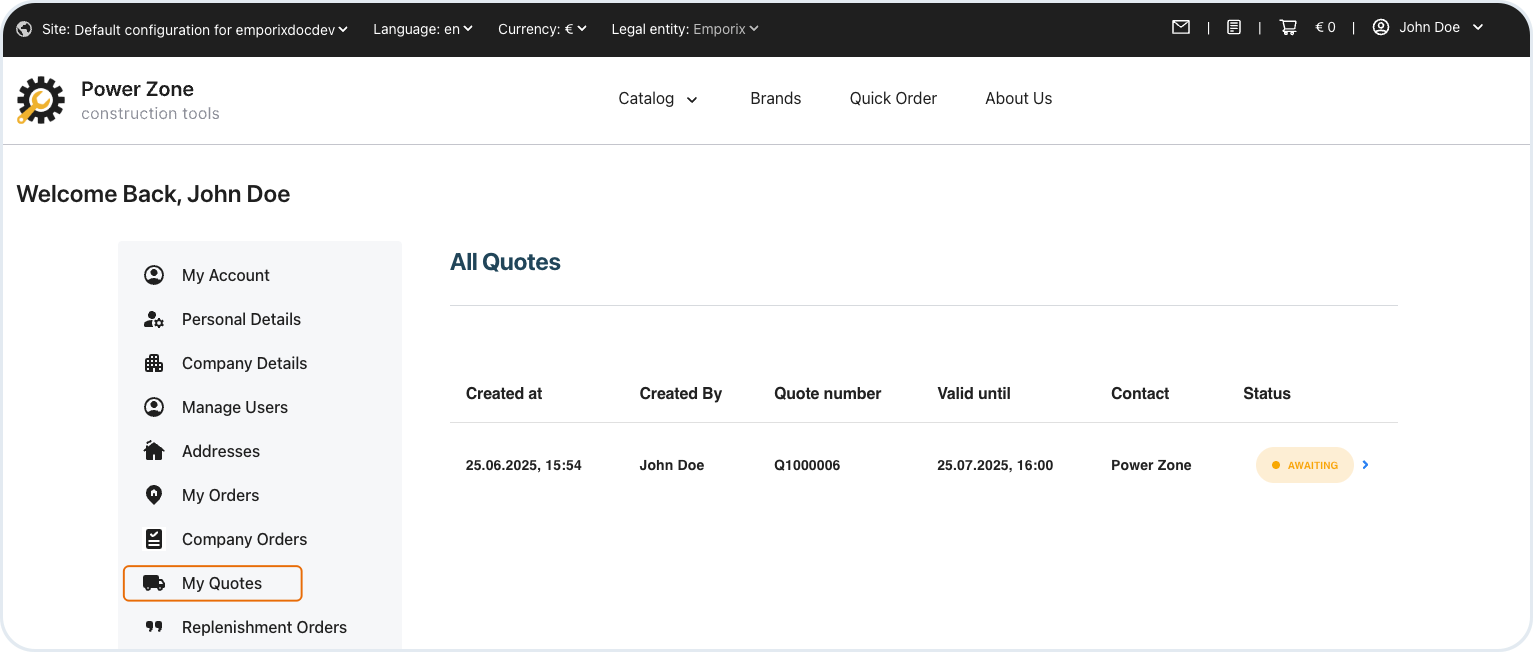
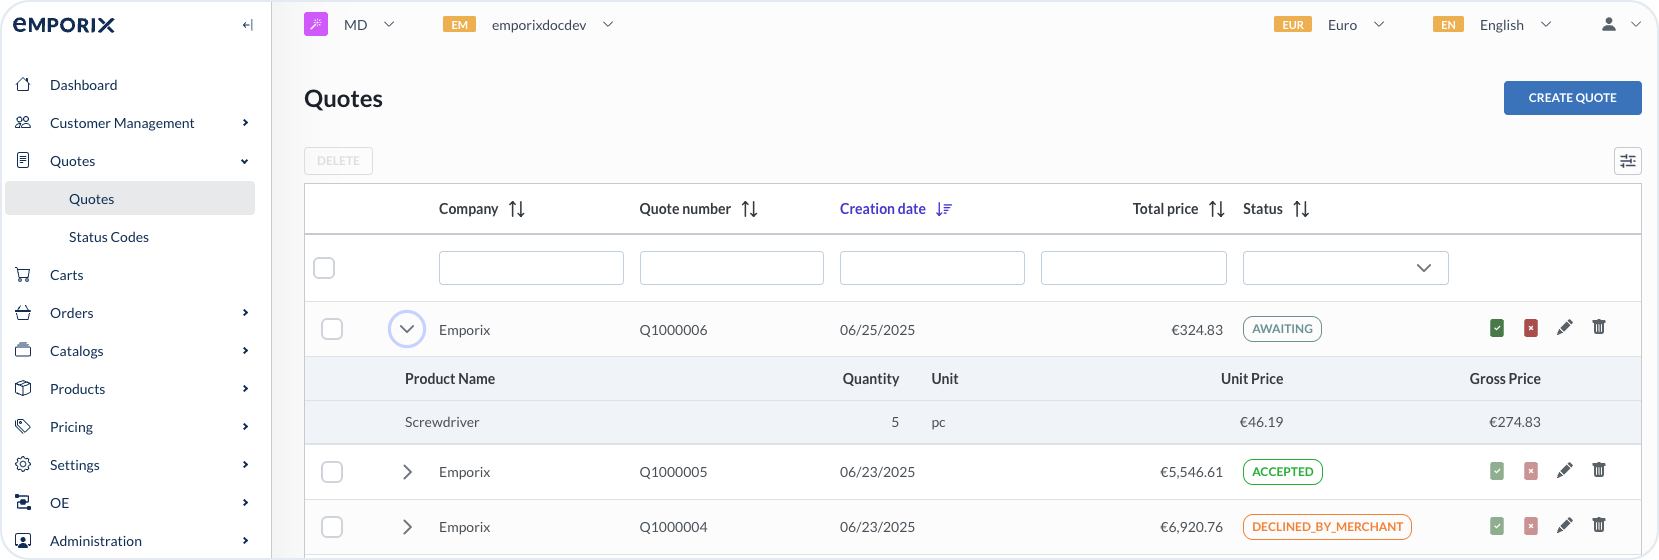
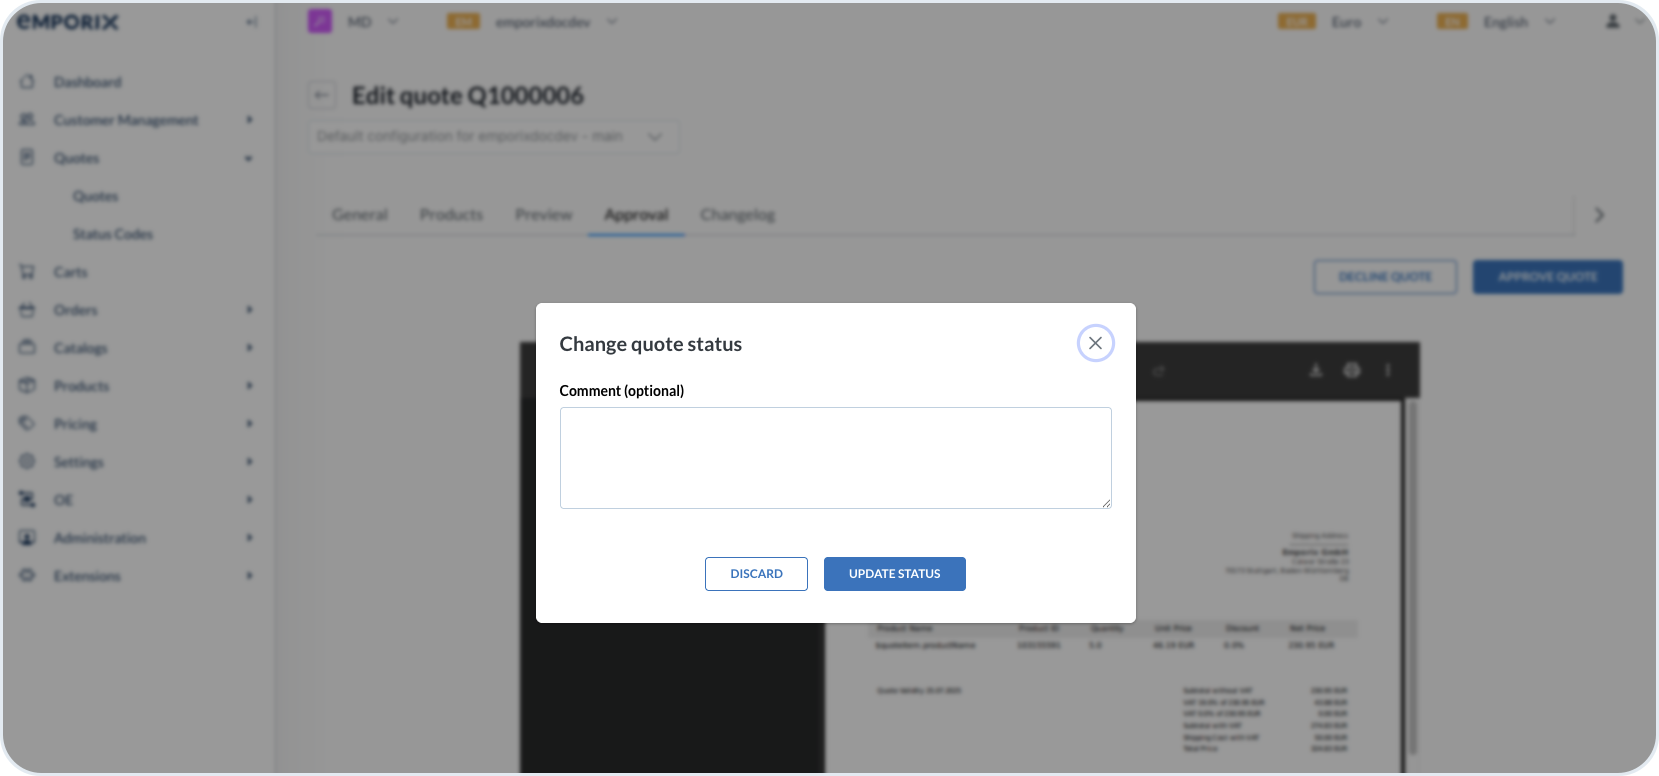
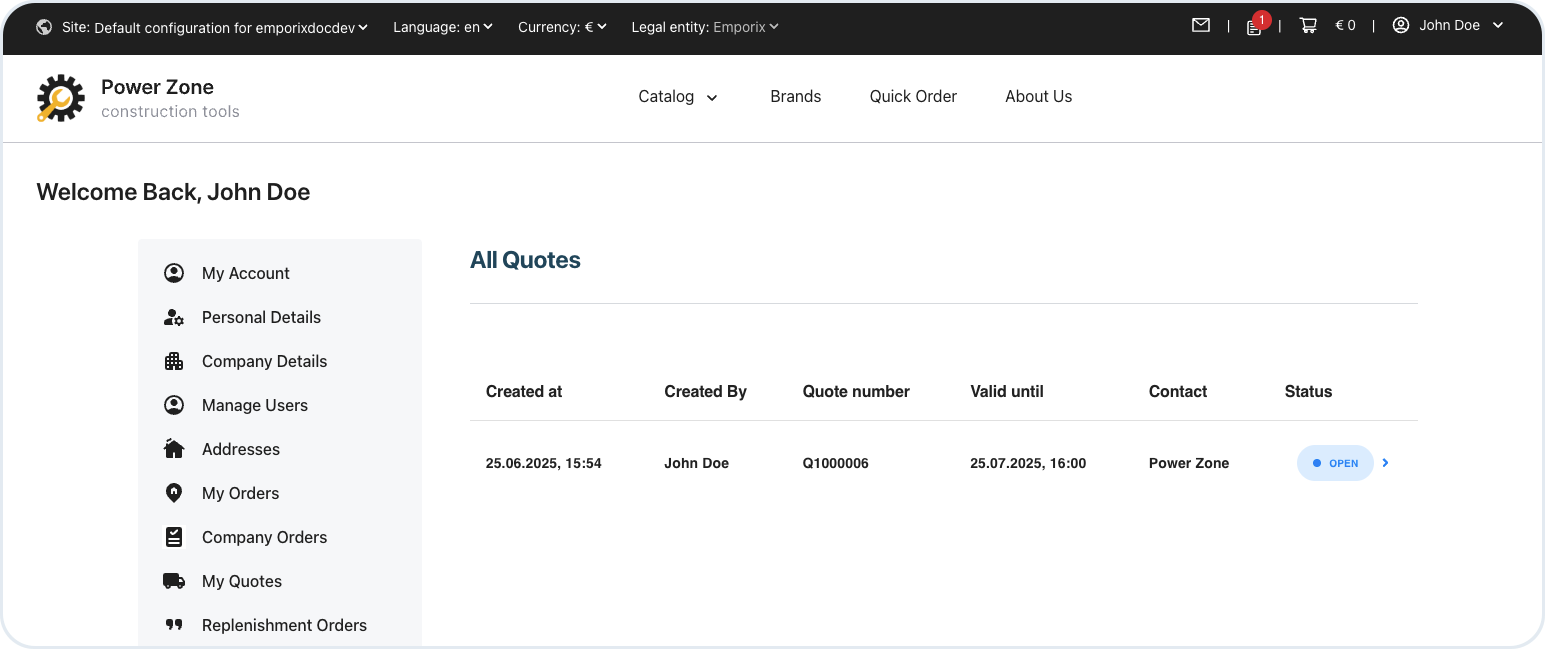
 {% endhint %}
11. Customer opens the details of the quote and can decide if they want to accept or decline the quote.
{% endhint %}
11. Customer opens the details of the quote and can decide if they want to accept or decline the quote.
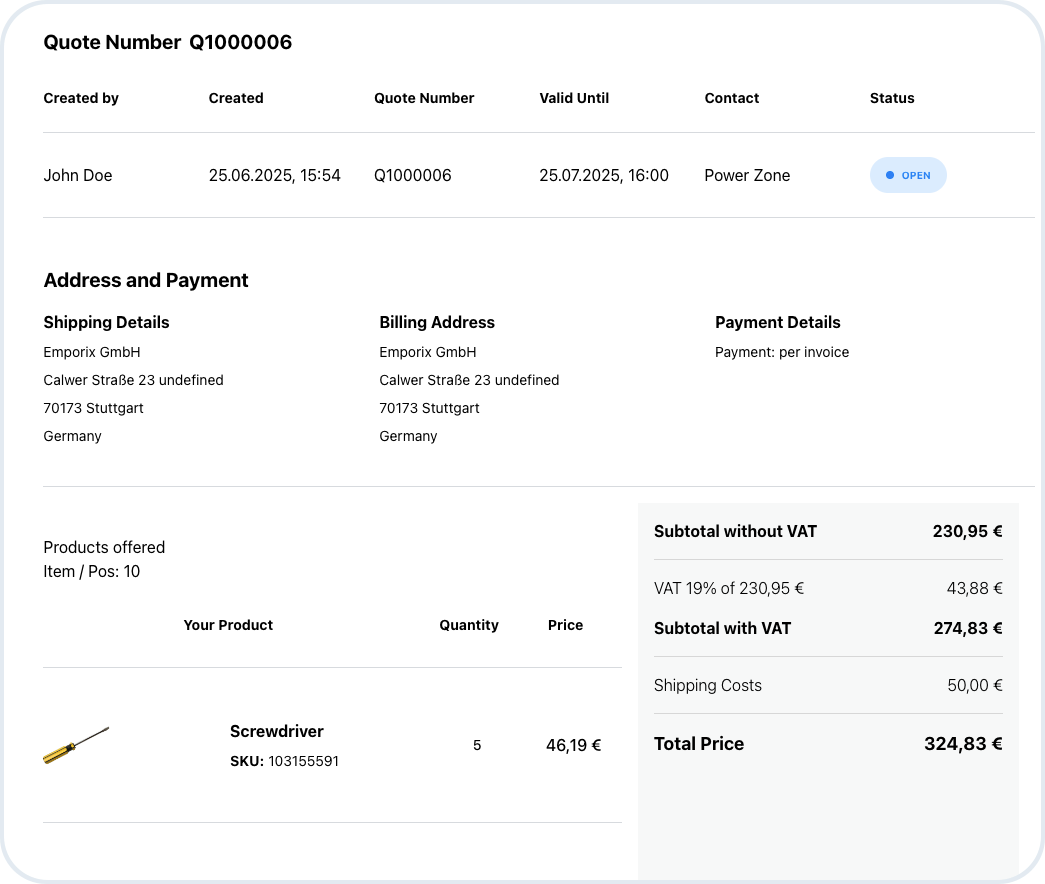
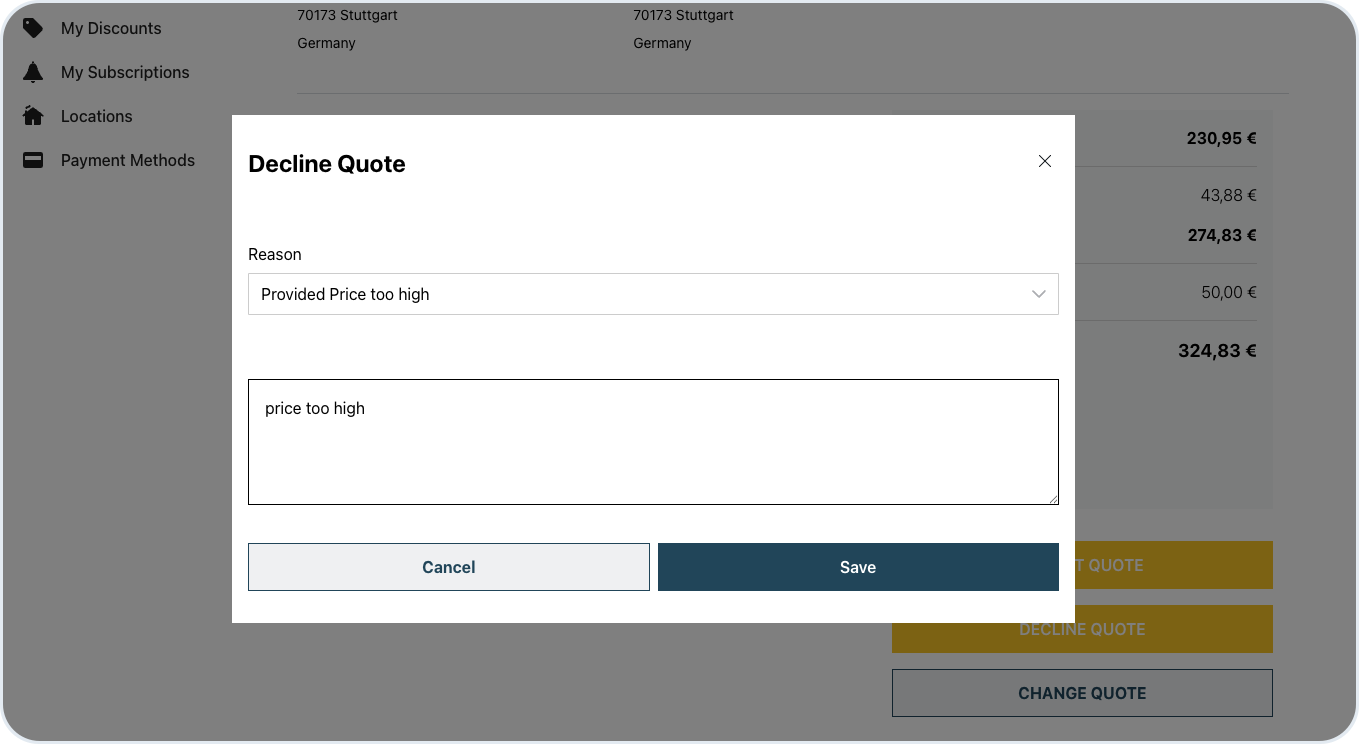
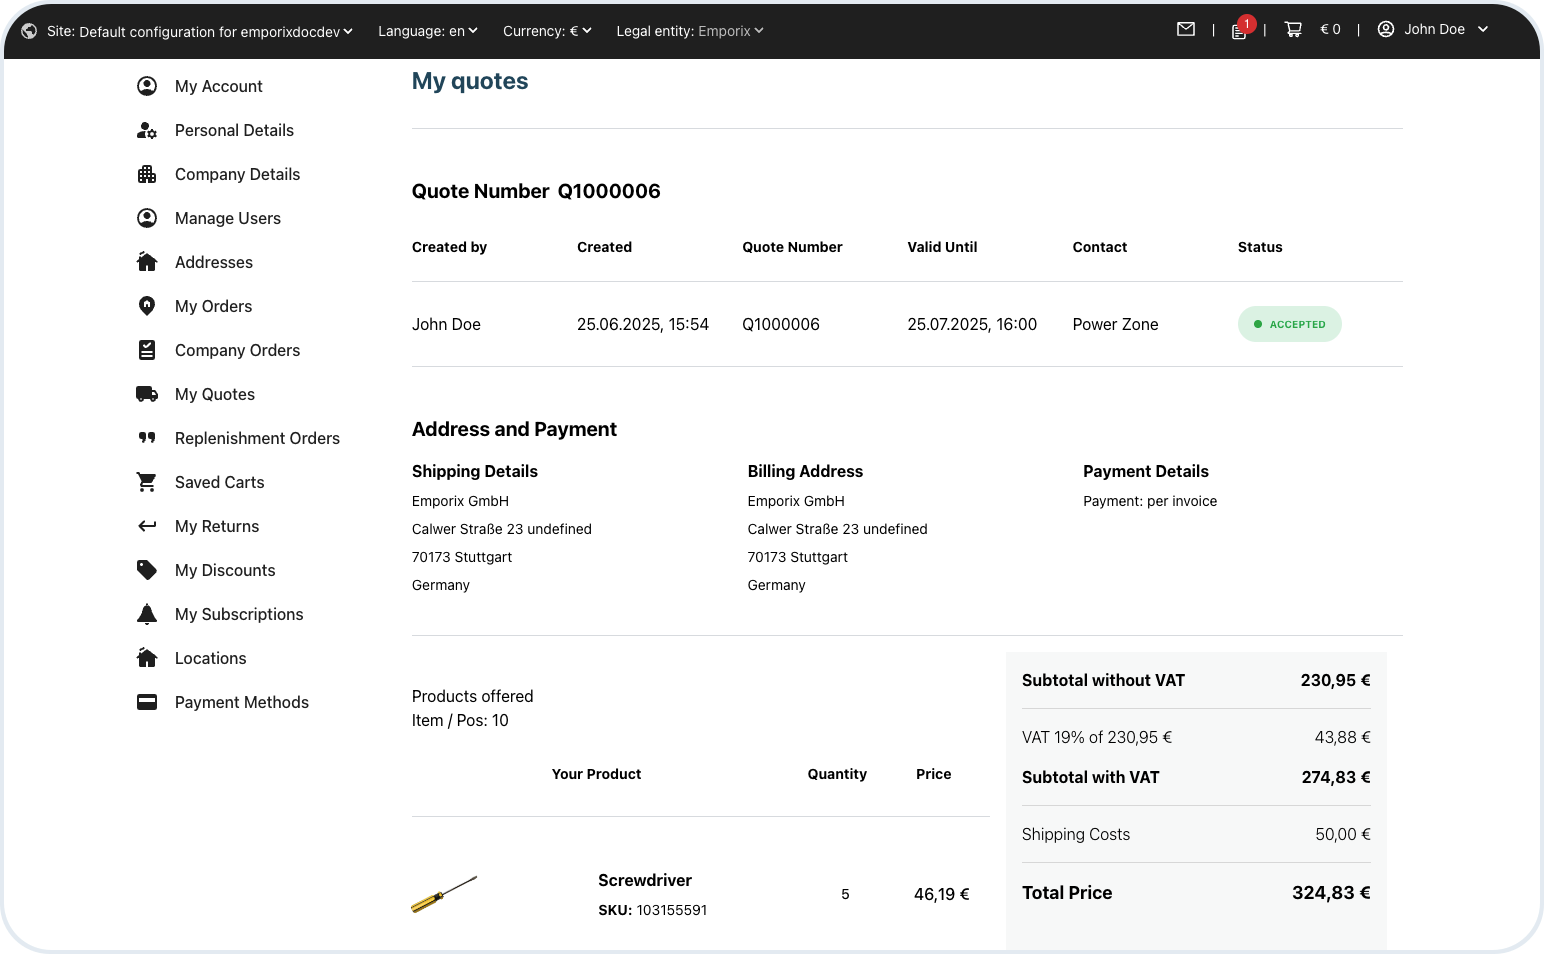
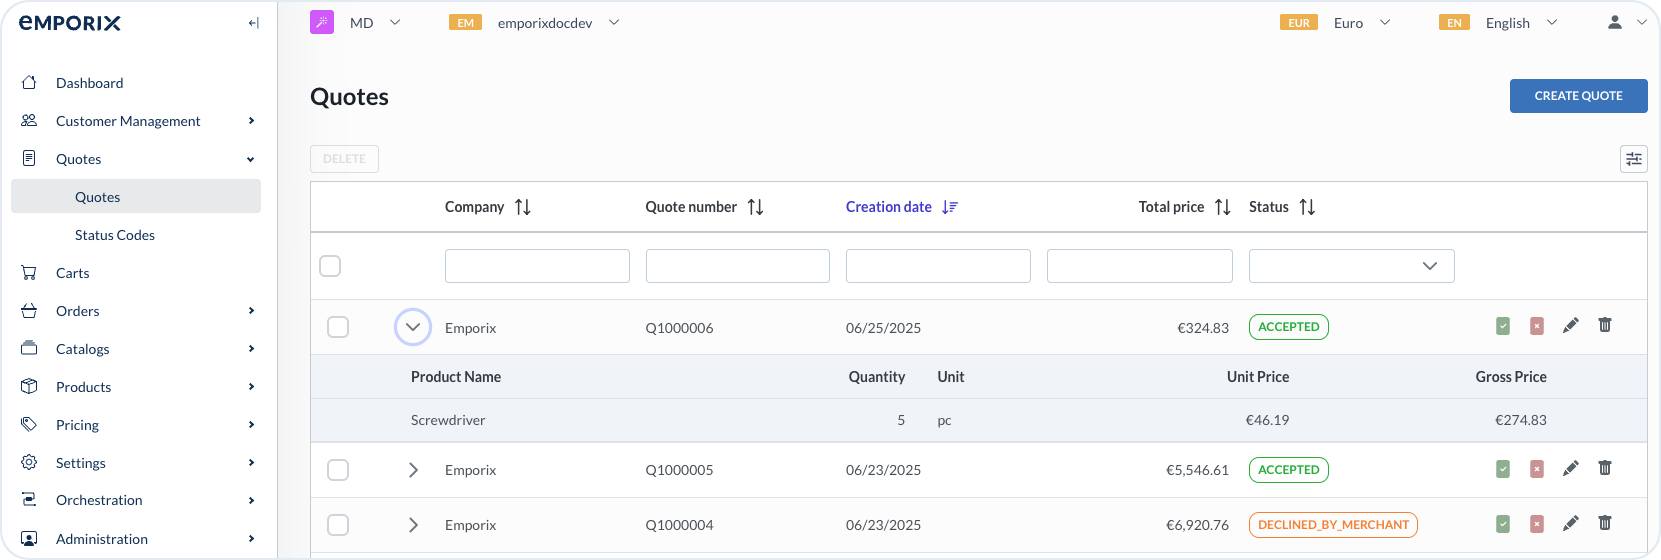
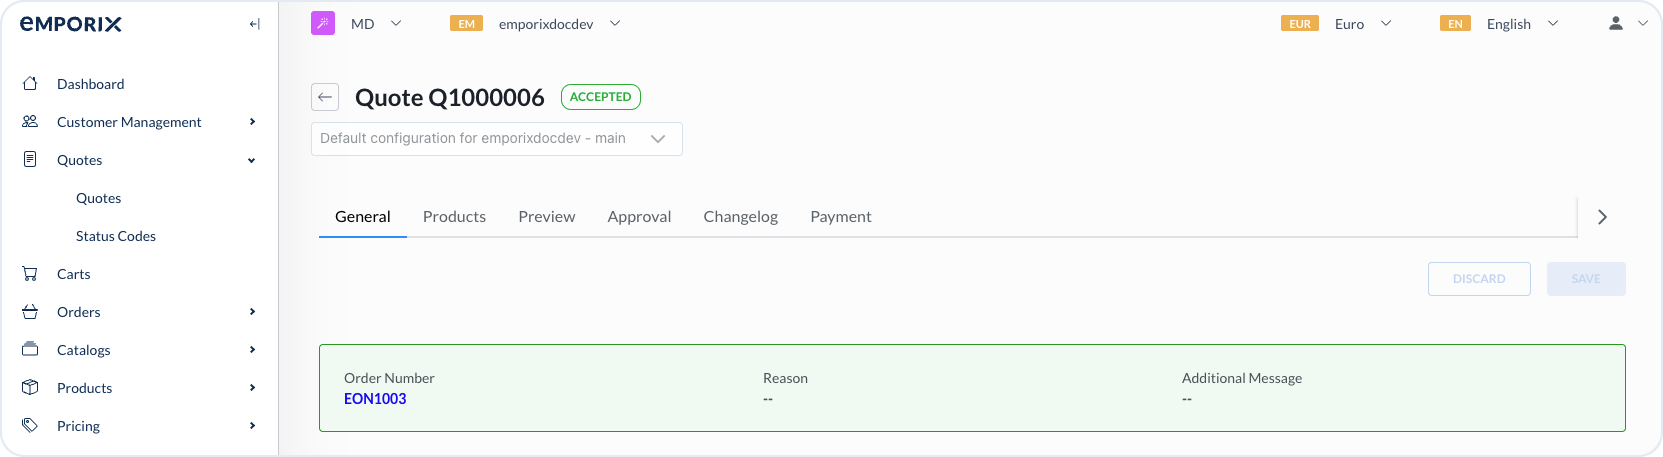
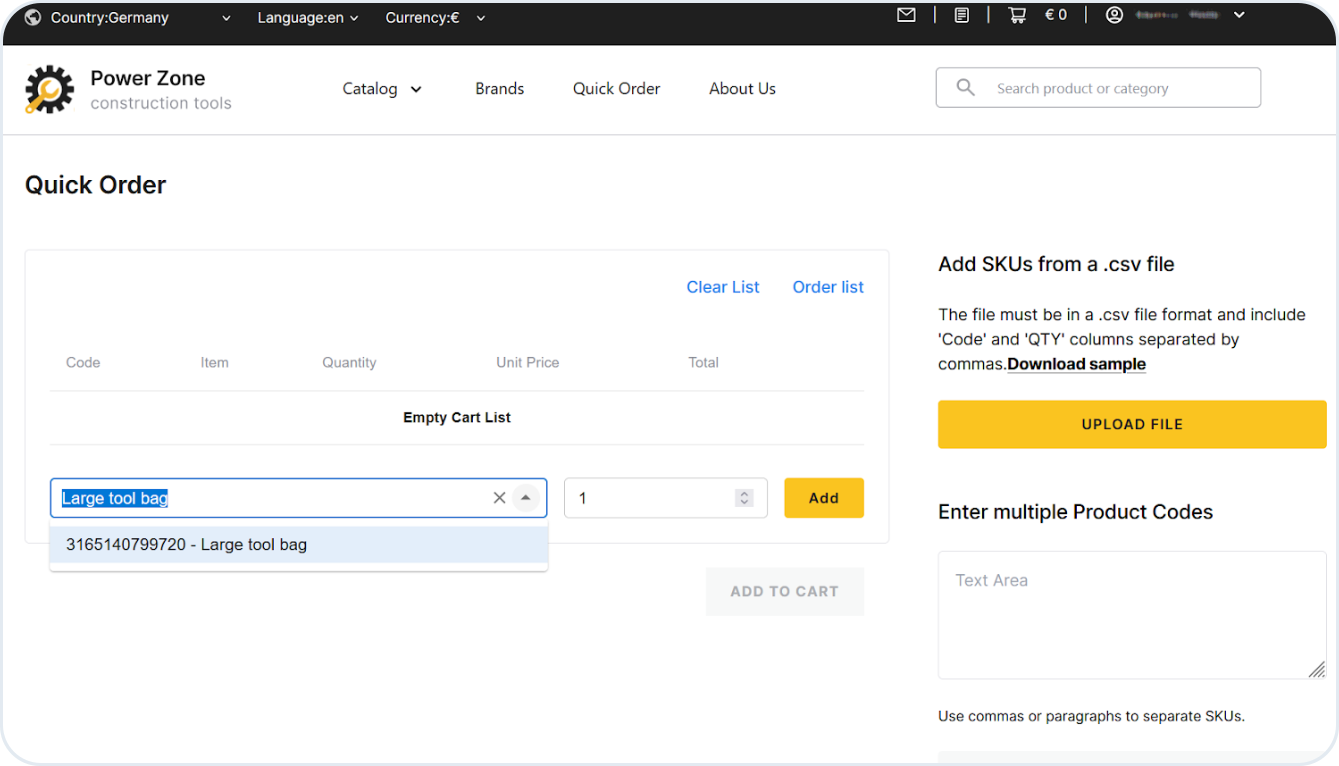
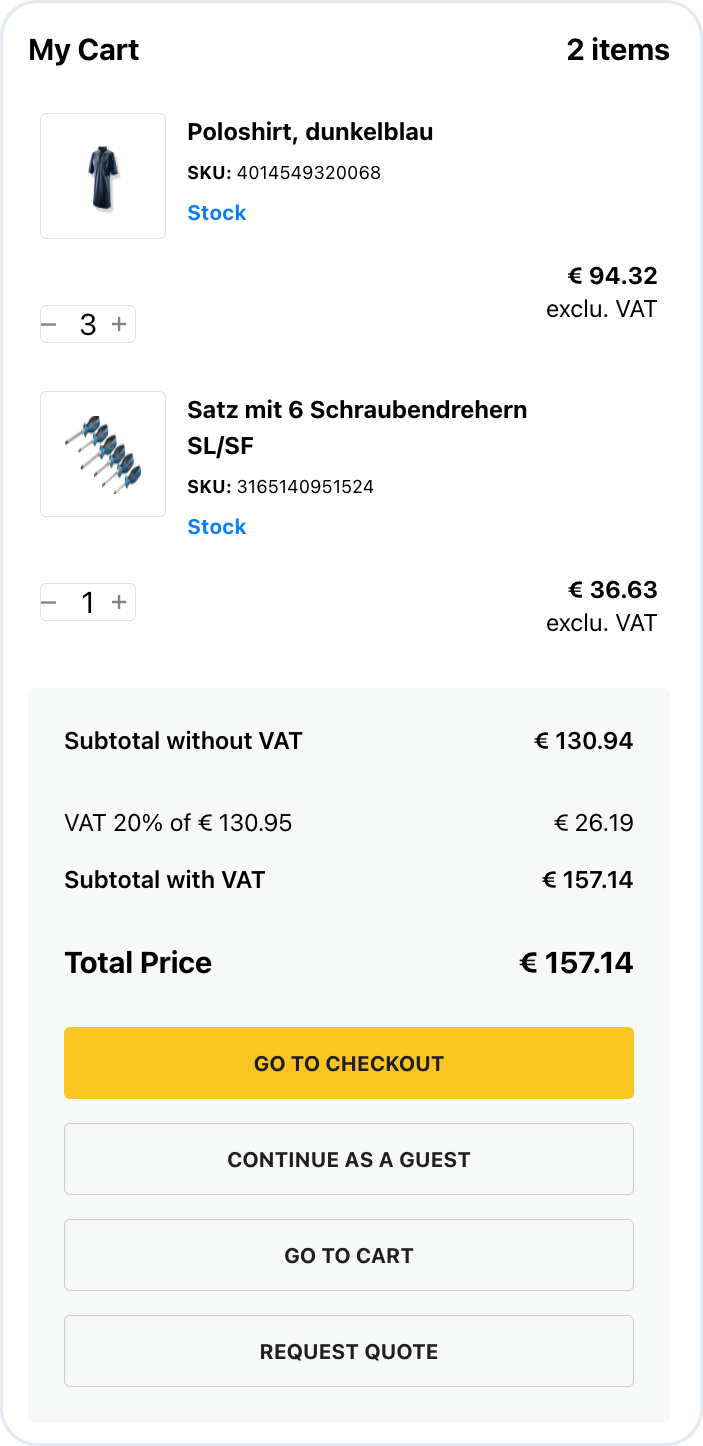
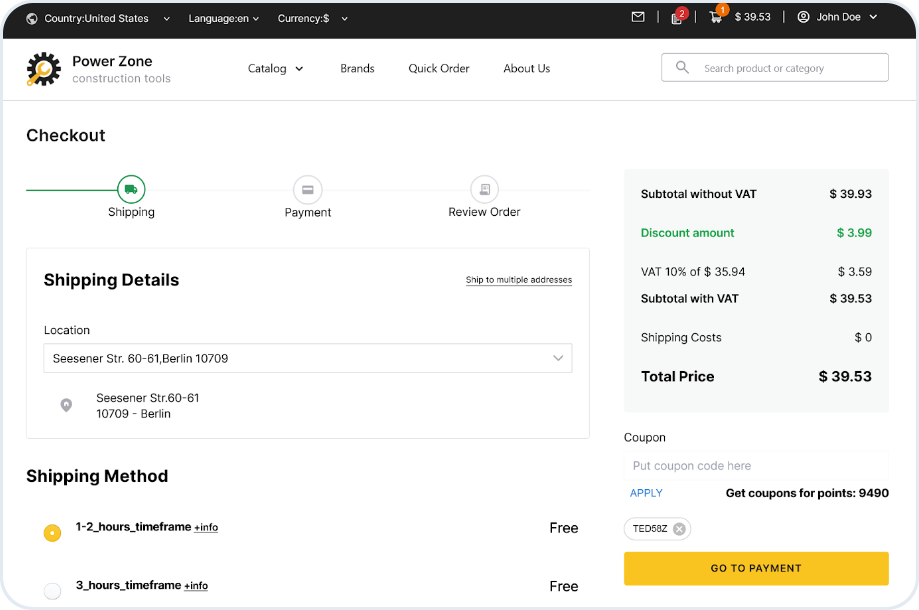
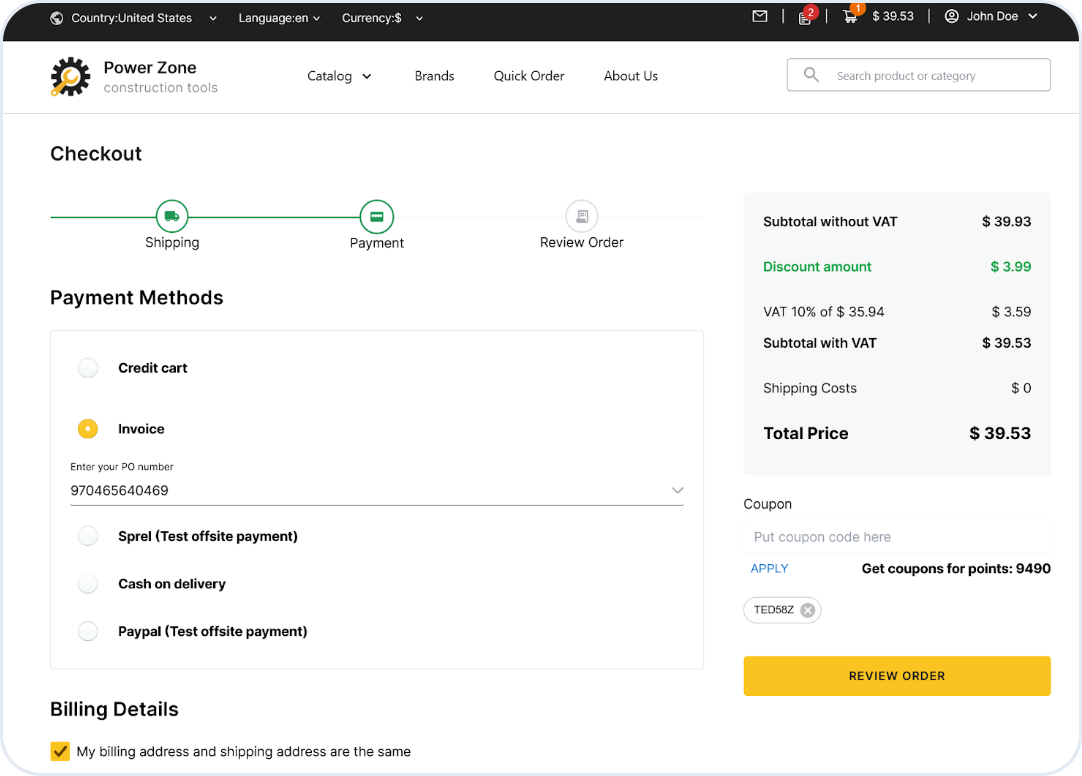
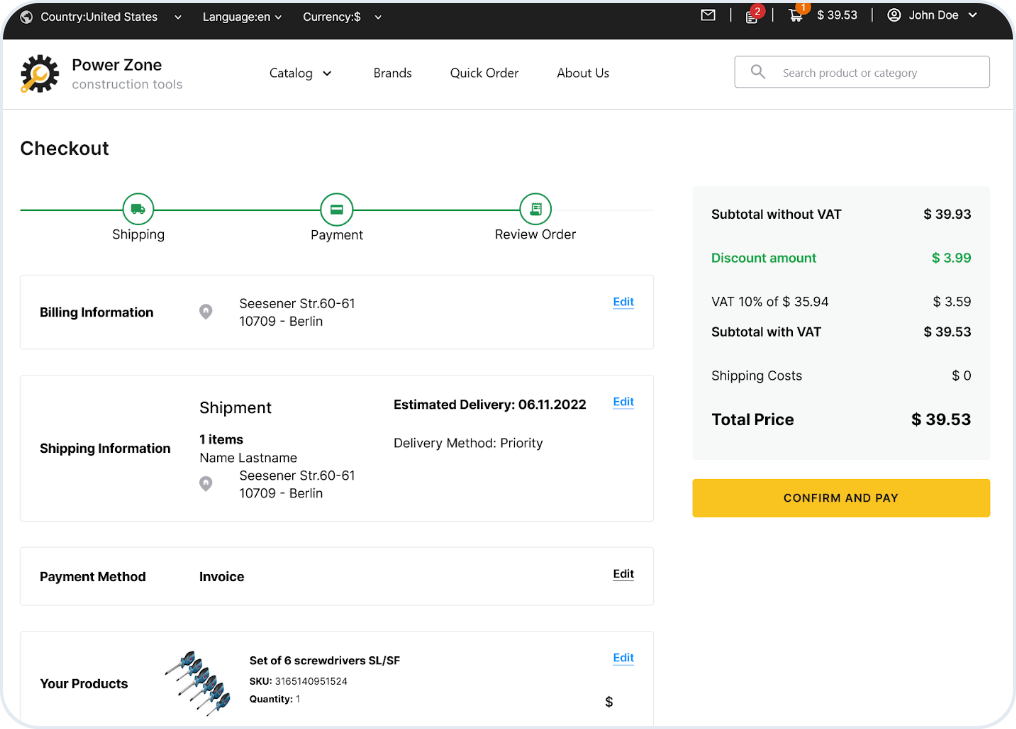
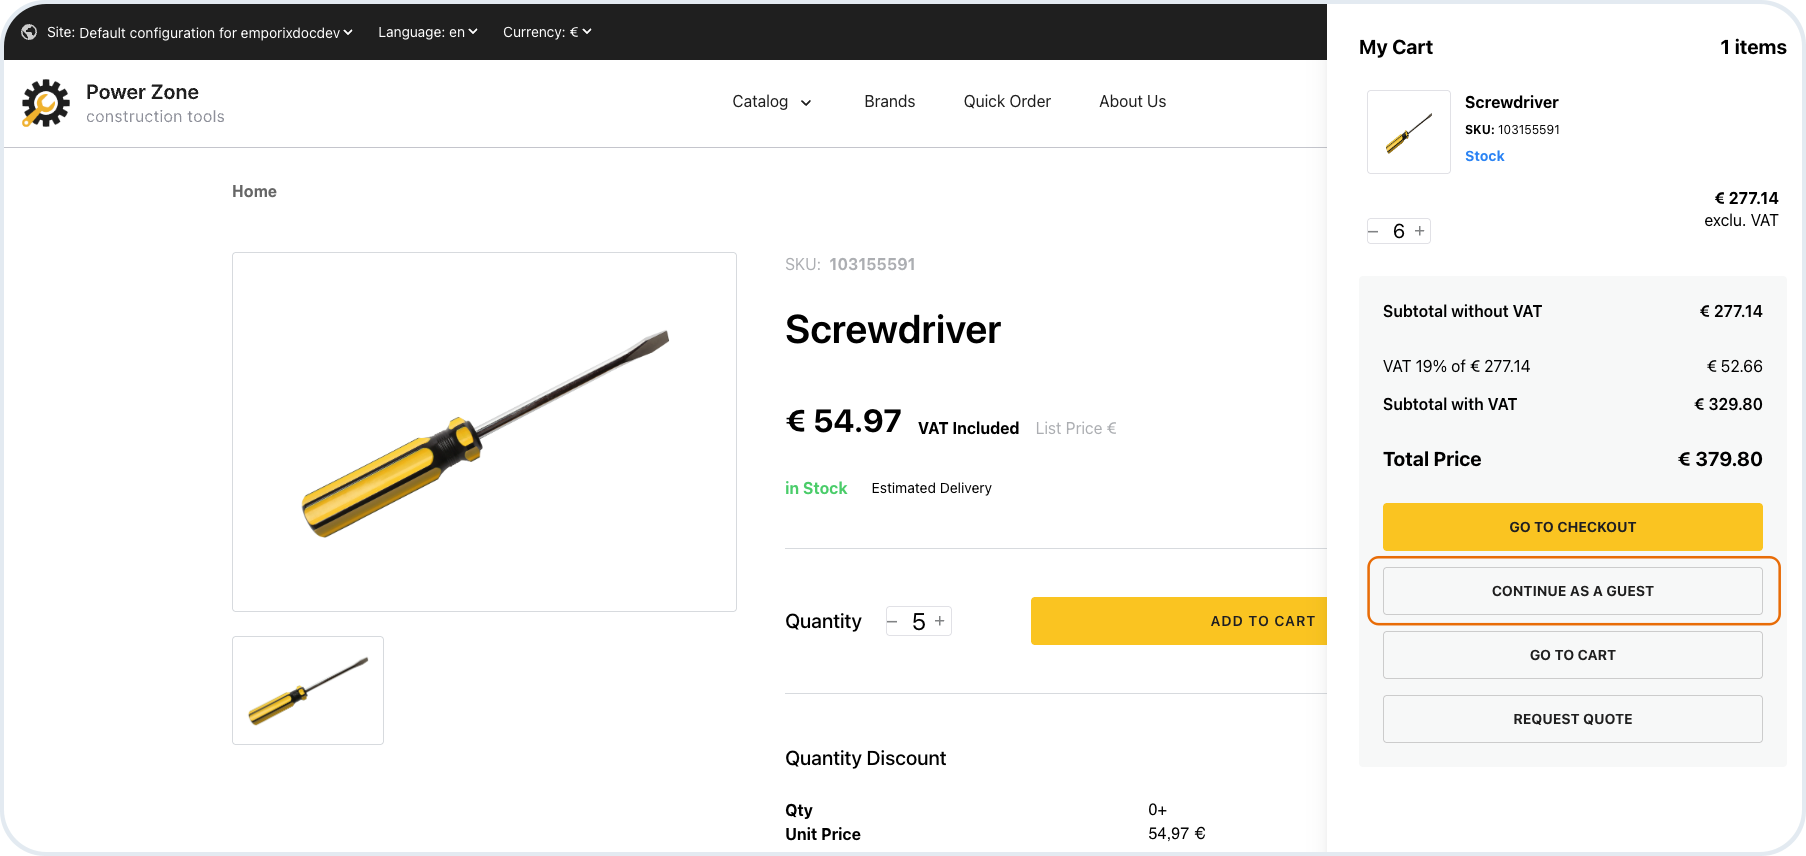
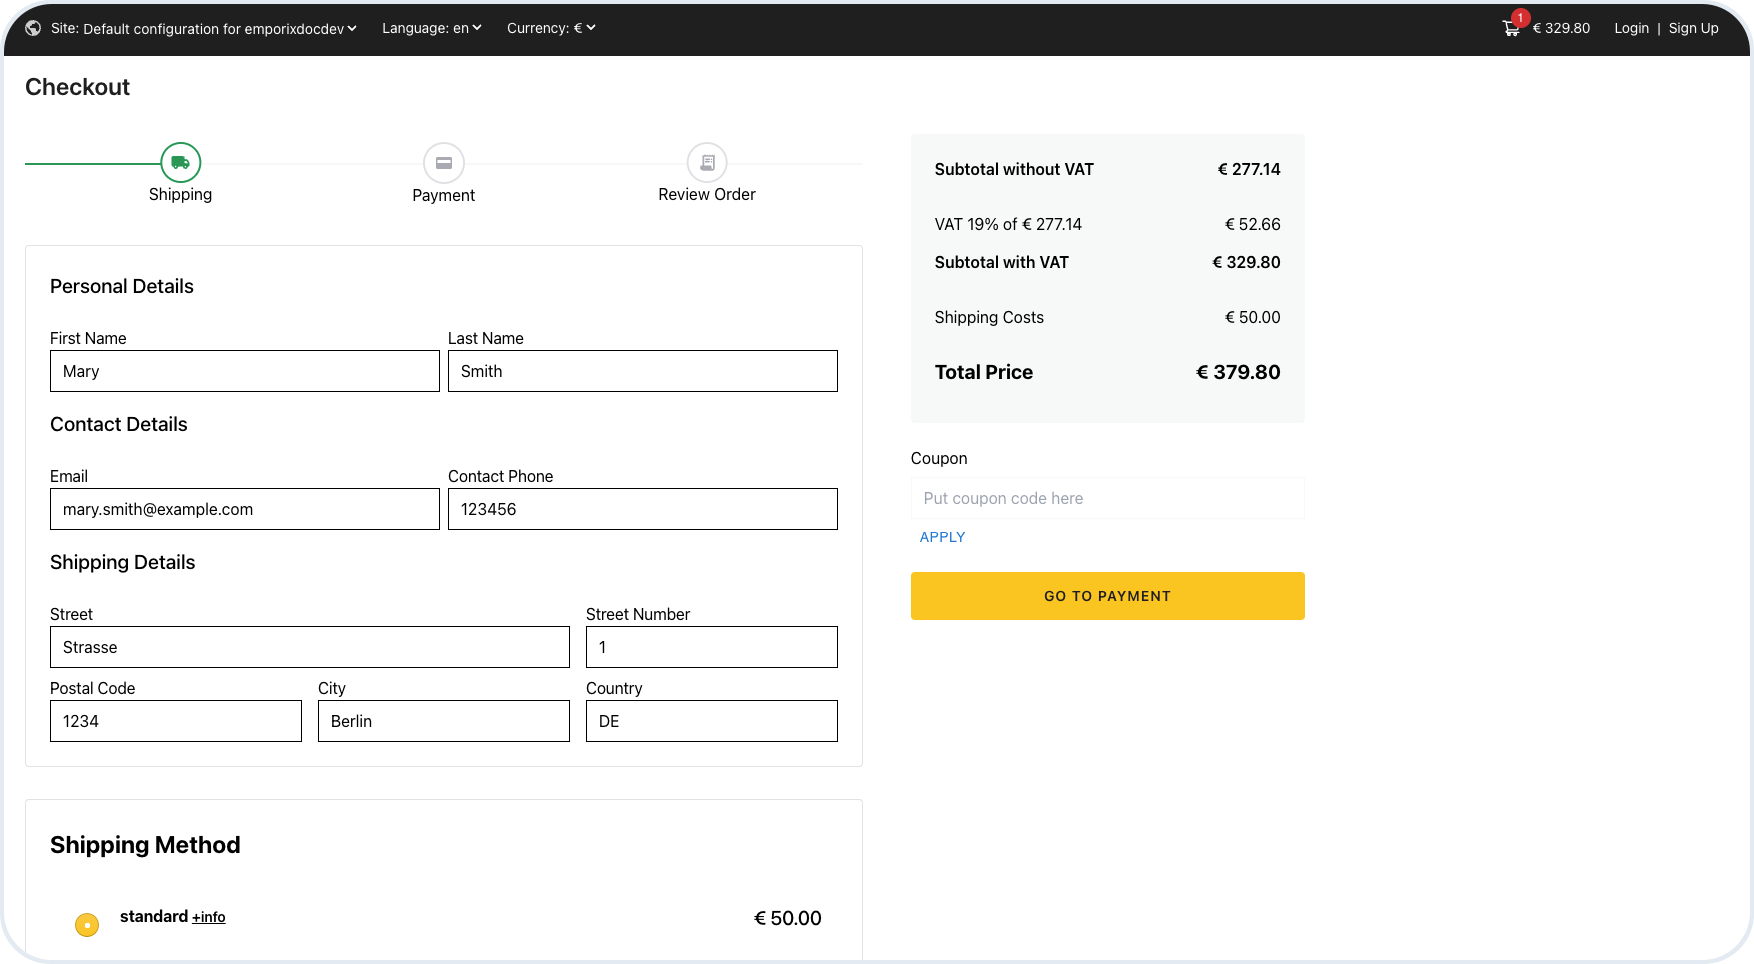
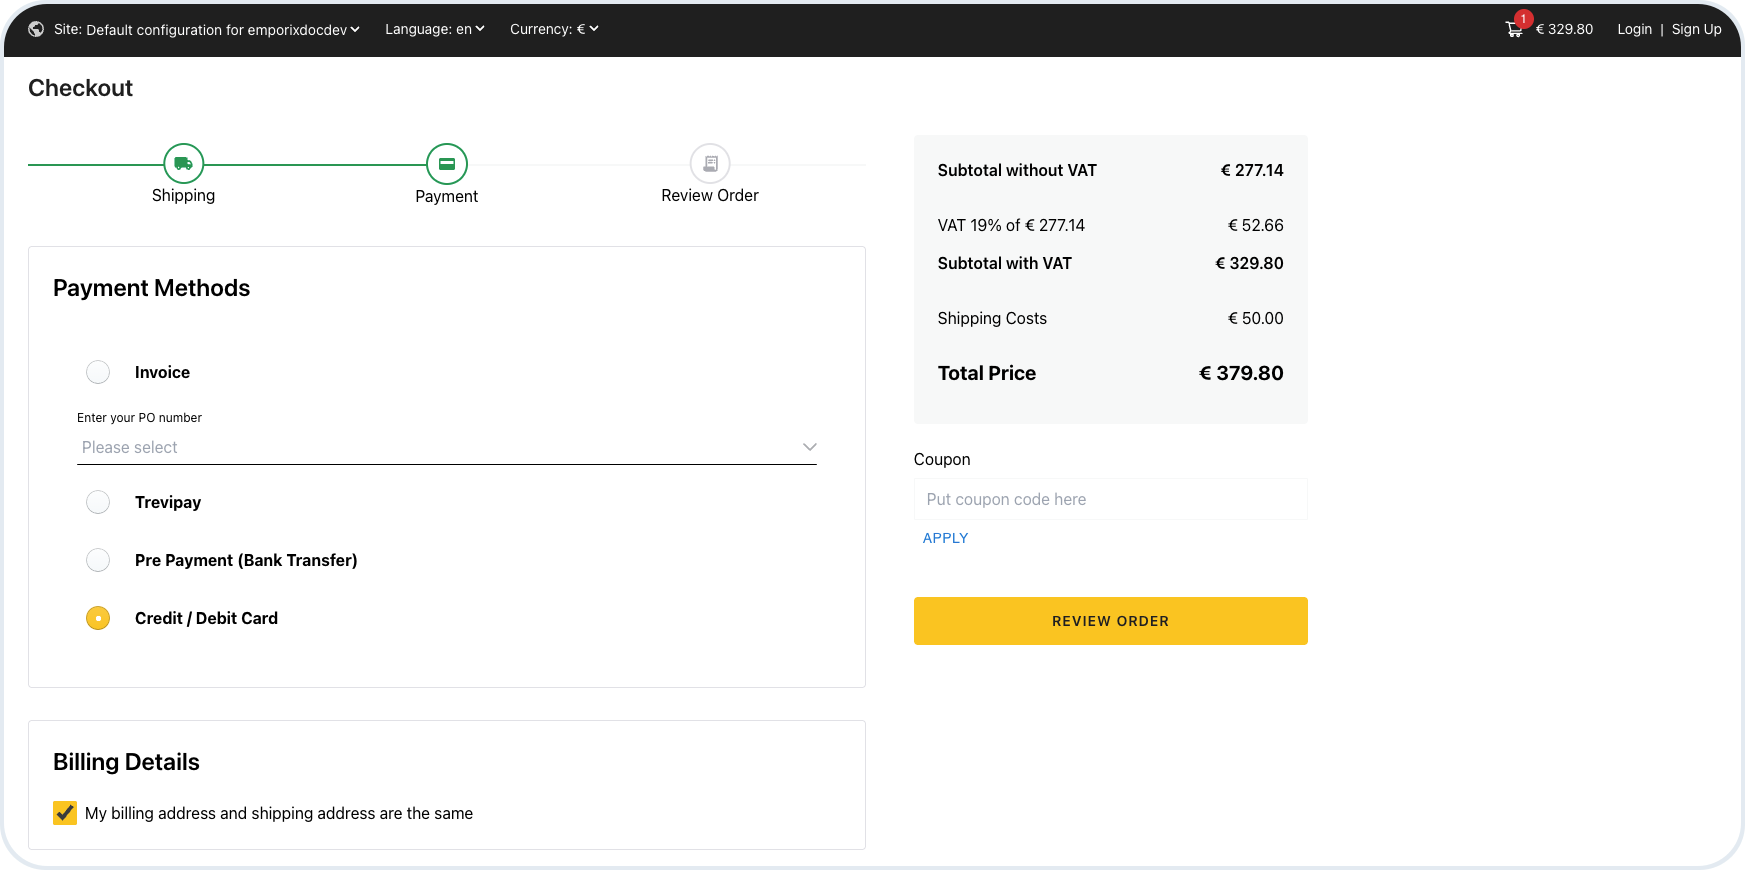
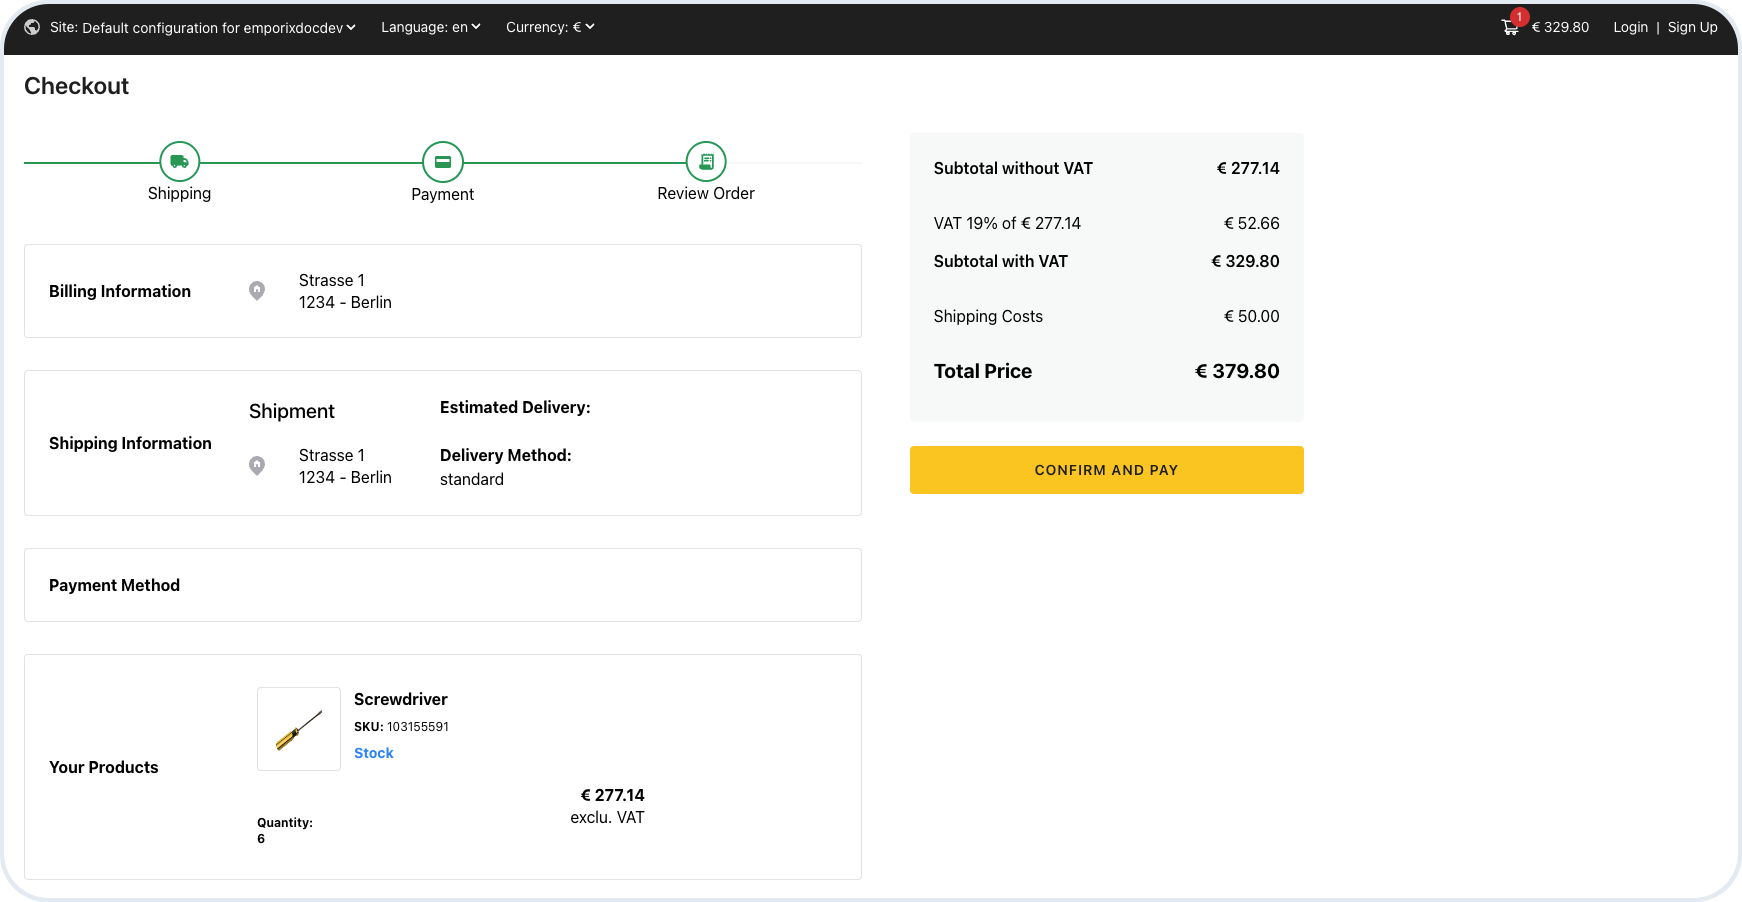
 {% endhint %}
Successful checkout creates an order in Emporix Management Dashboard.
{% hint style="warning" %}
In the case when a guest customer later wants to return the purchased item, they need to register with the email address provided at checkout and to create a customer account. After logging in, the customer can view the orders under the order history associated with the email.
{% endhint %}
{% hint style="info" %}
To learn more about API used in this use case see the [Order Service](https://app.gitbook.com/s/d4POTWomuSS7d3dnh4Dg/api-guides/orders/order) and for user guides check the [Order Fulfillment](https://developer.emporix.io/ce/management-dashboard/orders-module) documentation.
{% endhint %}
After the customer submits the order, it is created within the Management Dashboard. The employee can set the status of the order and the storefront is updated accordingly. In a real scenario, the updates are normally integrated from an ERP backend system.
In the Management Dashboard, for the orders that were created by guest users, the **Customer #** field is marked as **Anonymous**. If the guest customer later chooses to create an account, the value of the **Customer #** is replaced with the real customer ID.
{% endhint %}
Successful checkout creates an order in Emporix Management Dashboard.
{% hint style="warning" %}
In the case when a guest customer later wants to return the purchased item, they need to register with the email address provided at checkout and to create a customer account. After logging in, the customer can view the orders under the order history associated with the email.
{% endhint %}
{% hint style="info" %}
To learn more about API used in this use case see the [Order Service](https://app.gitbook.com/s/d4POTWomuSS7d3dnh4Dg/api-guides/orders/order) and for user guides check the [Order Fulfillment](https://developer.emporix.io/ce/management-dashboard/orders-module) documentation.
{% endhint %}
After the customer submits the order, it is created within the Management Dashboard. The employee can set the status of the order and the storefront is updated accordingly. In a real scenario, the updates are normally integrated from an ERP backend system.
In the Management Dashboard, for the orders that were created by guest users, the **Customer #** field is marked as **Anonymous**. If the guest customer later chooses to create an account, the value of the **Customer #** is replaced with the real customer ID.