> For the complete documentation index, see [llms.txt](https://developer.emporix.io/llms.txt). Markdown versions of documentation pages are available by appending `.md` to page URLs; this page is available as [Markdown](https://developer.emporix.io/vsm-guides/value-stream-designer/creating-value-stream.md).

# Creating a Value Stream

See how to design your custom process.

Using the Value Streams dashboard, you can create, edit, and monitor your processes. The value streams are made up of a combination of triggers and process steps. It is required to have at least one trigger in a value stream.

## Prerequisite

Before starting to build your value stream, get familiarized with the concept of the building blocks and how they work. See the [Value Stream Components](/vsm-guides/value-stream-designer/process-components.md) guide.

{% hint style="success" %}
As a best practice, build and validate your value streams on a **stage** tenant before deploying them to production. Once you're satisfied with the configuration, export the value stream from stage tenant and import it into your production tenant.
{% endhint %}

## Building a process - simple flow

The example shows how to build a basic flow with Value Stream Modeller.

{% stepper %}
{% step %}

#### Choose to create a value stream

Go to the Value Streams dashboard and choose **Create Value Stream**. The process creation is initiated, allowing you to either select **Start from a Template** or **Start from Scratch** for the design.

* If you choose **Start from a Template**, you can select the process template from the ones available in the [Value Stream Examples](/vsm-guides/value-stream-examples/pl-introduction.md). You can adjust the process to your needs based on the defined template triggers and steps.
* If you choose **Start from Scratch**, you start your configuration with no configured triggers or steps.

The next steps follow the **Start from Scratch** process creation.
{% endstep %}

{% step %}

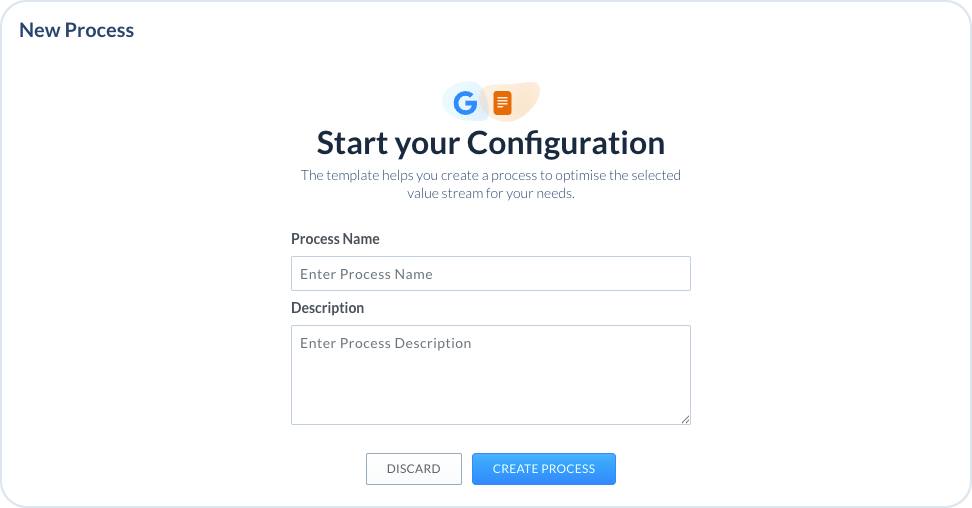
#### Add a process name

After choosing **Start from Scratch**, add a **Value Stream Name** and a **Description** for the process. The name is required for the process. The description is optional, but recommended as it may help you identify your processes when their number rises.

<figure><img src="https://1024162941-files.gitbook.io/~/files/v0/b/gitbook-x-prod.appspot.com/o/spaces%2FrSc4haeKWrTrOPHzdrMO%2Fuploads%2Fgit-blob-5bb9aa0287d02683168a6302880de1f3e67d6487%2Fstart_config.png?alt=media" alt=""><figcaption></figcaption></figure>
{% endstep %}

{% step %}

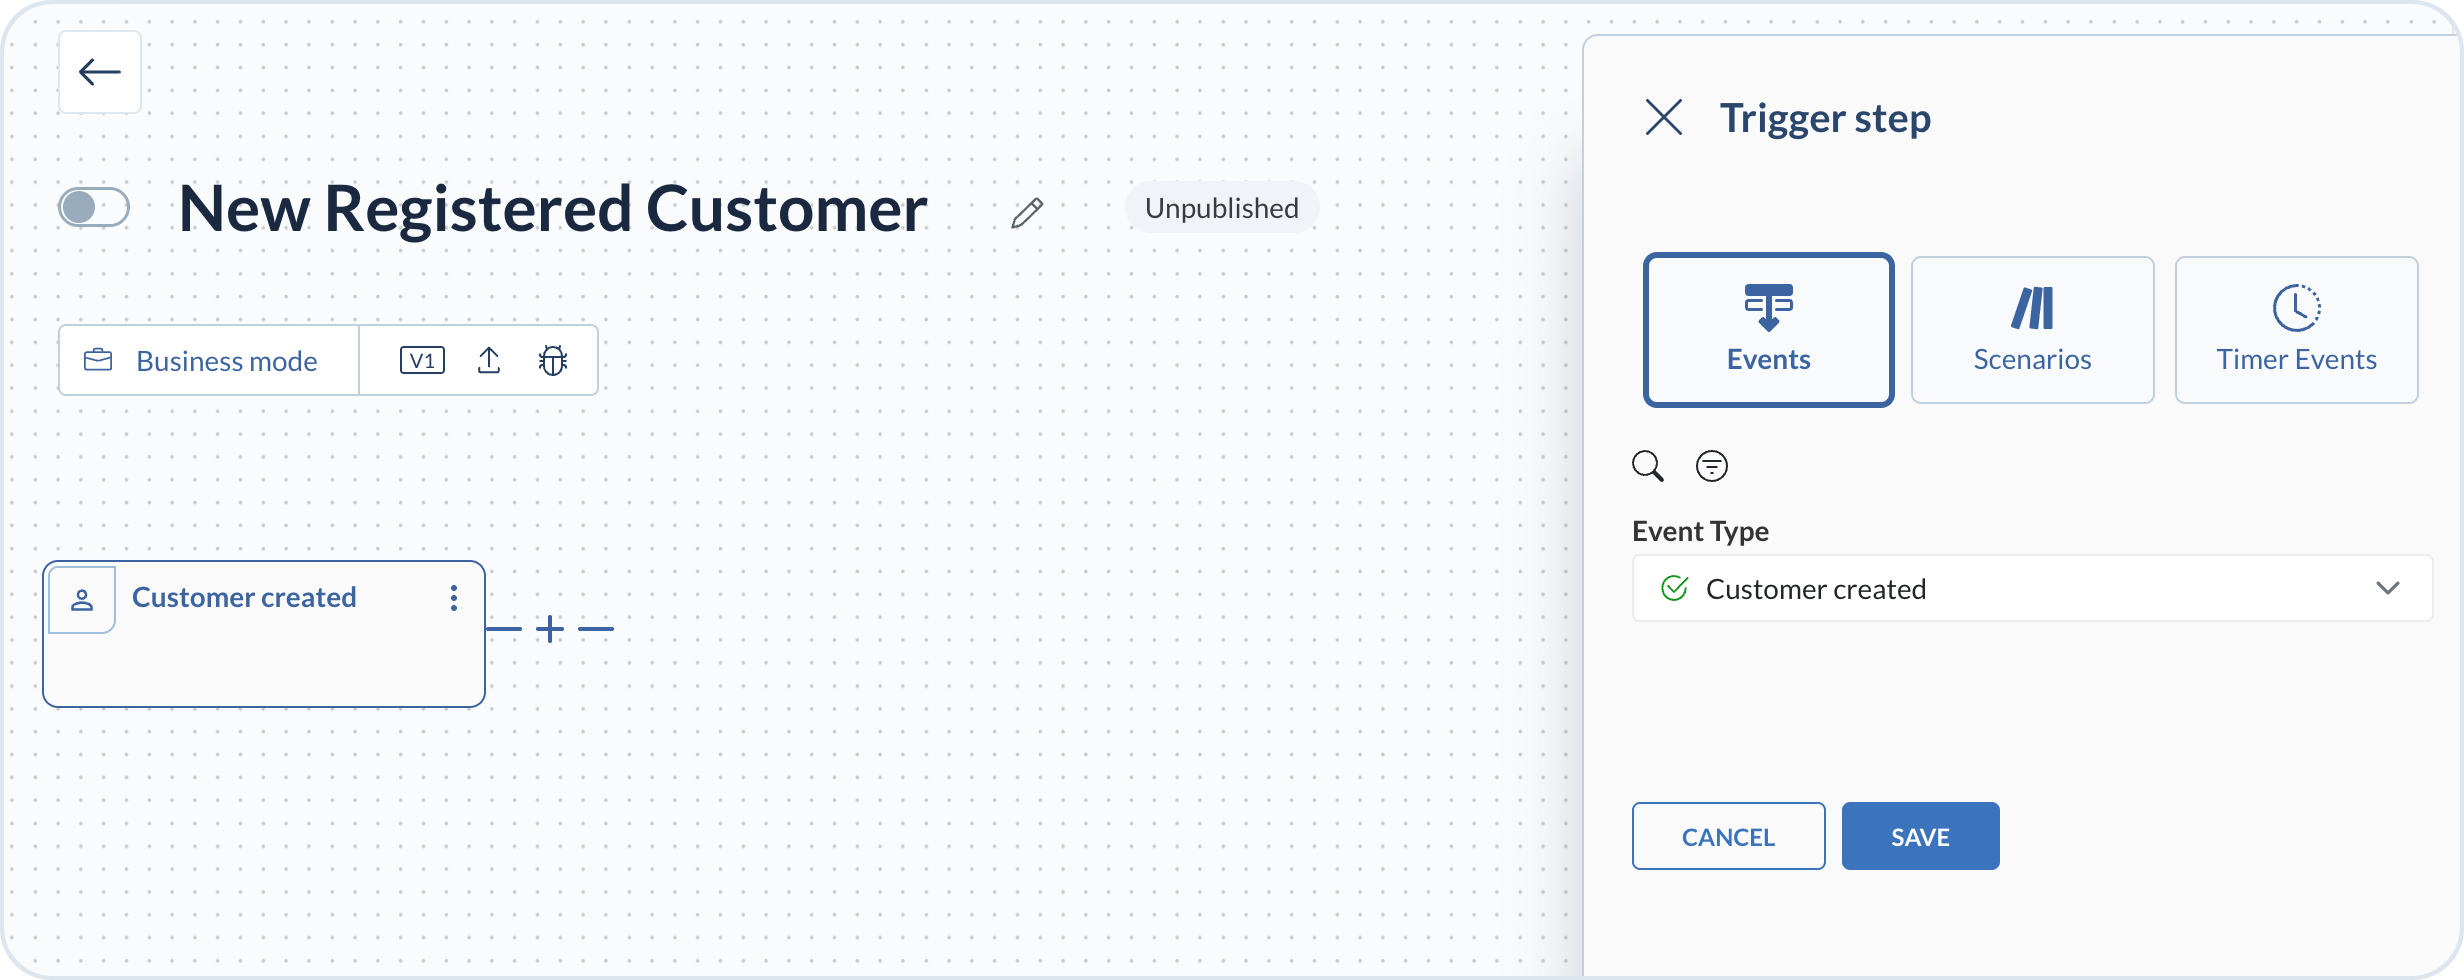
#### Choose a process trigger

Every process begins with a trigger event that starts the entire flow. A pre-configured list of events is available out-of-the-box to choose from. For example, the registration of a new customer can serve as such a trigger. The starting trigger can be both a CE event related to any commerce operation, or a custom event created in your tenant.

<figure><img src="https://1024162941-files.gitbook.io/~/files/v0/b/gitbook-x-prod.appspot.com/o/spaces%2FrSc4haeKWrTrOPHzdrMO%2Fuploads%2Fgit-blob-71803e8a1d2f80db414c57b63786875d06551e6b%2Fprocess_trigger.png?alt=media" alt=""><figcaption></figcaption></figure>
{% endstep %}

{% step %}

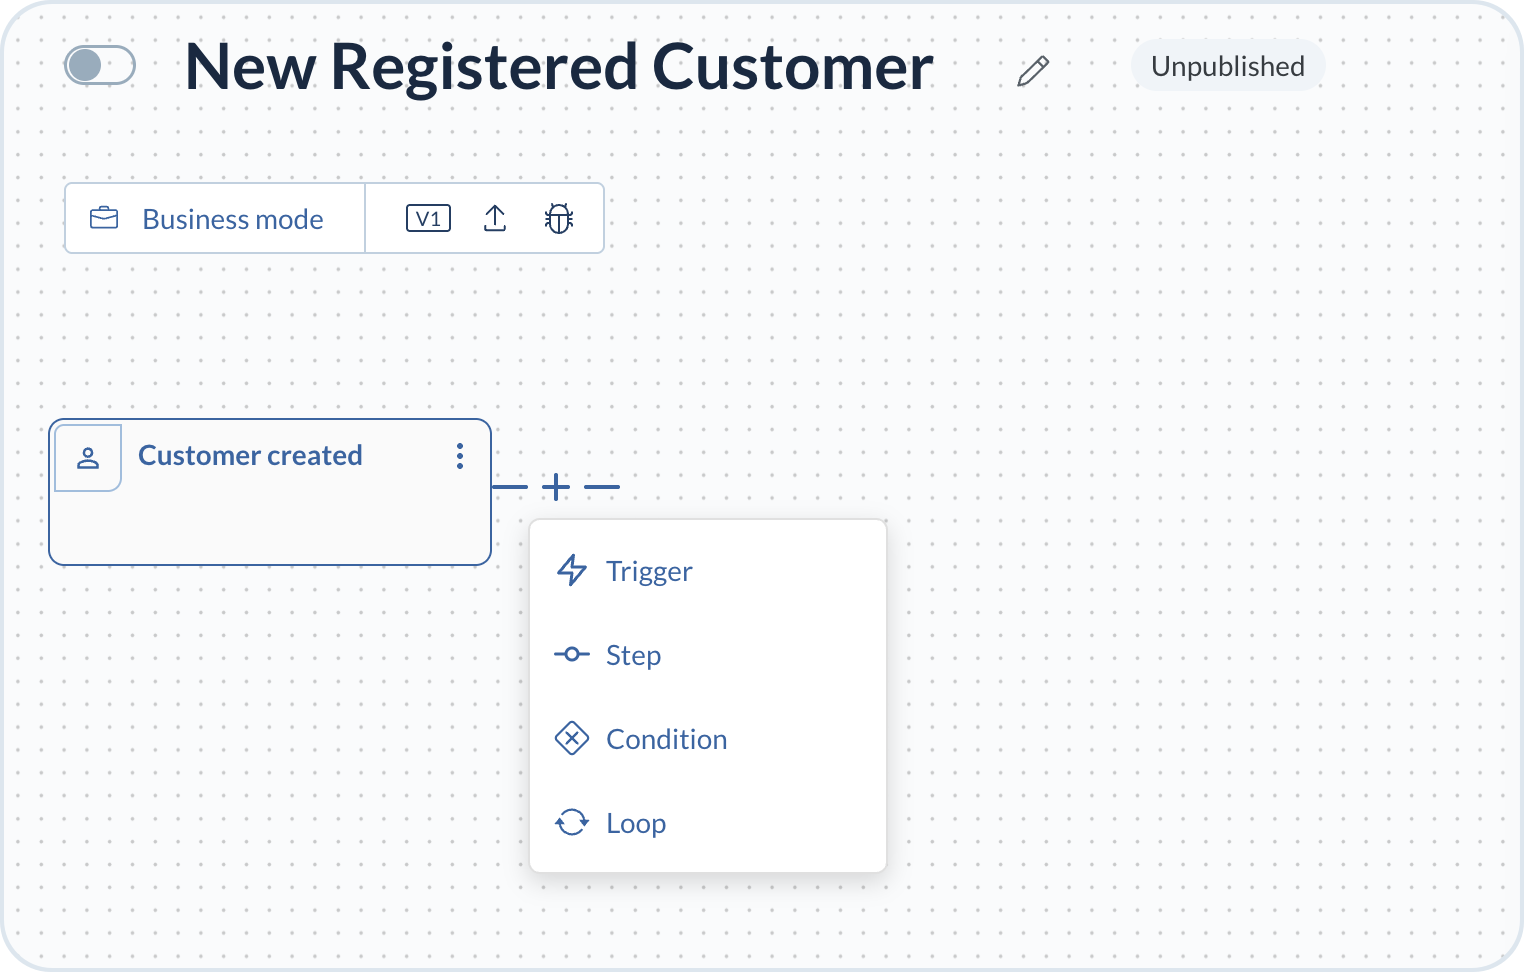
#### Add a process step

Once the trigger is defined, you can configure the subsequent steps in the workflow by selecting them from a list of available process actions. Use them to build the flow according to your business requirements. To start creating a new step, the **add** icon and then **step**.

<figure><img src="https://1024162941-files.gitbook.io/~/files/v0/b/gitbook-x-prod.appspot.com/o/spaces%2FrSc4haeKWrTrOPHzdrMO%2Fuploads%2Fgit-blob-0594e1d29c57e46ef83d538d9ca125c45a447e28%2Fprocess_step.png?alt=media" alt=""><figcaption></figcaption></figure>

* **Option 1: Add a Scenario**

  From the step type list, select **Scenario** - it represents an action to happen. For example, when a new customer is created you want to welcome them with an email with some first account information. In that case, you use a scenario build for your tenant.

  Decide whether to use a fixed scenario (a predefined setup) or a configurable one (one that allows further adjustments).

  Save your selection to include the scenario in your process.
* **Option 2: Add a Subflow**

  Select **Subflow** as the step type. From the drop-down list, choose one of the value streams already available in your tenant. For example, add a subflow that sends a coupon together with the welcome email for new customers.

  Save your selection to include the scenario in your process.
* **Option 3: Add an AI Agent**

  Choose an AI Agent as the step type. Select the agent that fits your value stream or business need. Available agents include:

  * Agentic Filters Creator Assistant – helps define step and trigger filters with AND/OR conditions on event types
  * Anti-Fraud Agent – detect and prevent fraudulent actions
  * Complaint Agent – handle customer complaints
  * Frontend Agent – assist customers on the storefront with natural language shopping and support
  * Support Agent – assist with customer requests or questions
  * Translation Agent – automatically translate content

  Configure the agent name, description and prompt as needed and save the step.
* **Option 4: Add a Cloud Function**

  Select **Cloud Functions** as the step type. Choose an existing function from **Select cloud function**, or select **New** to create a connection. Supported providers are Azure, AWS, GCP, and Emporix.

  Save your selection to include the cloud function in your process. For configuration details, see [Cloud Functions](/vsm-guides/value-stream-designer/process-components/process-steps.md#cloud-functions).
  {% endstep %}
  {% endstepper %}

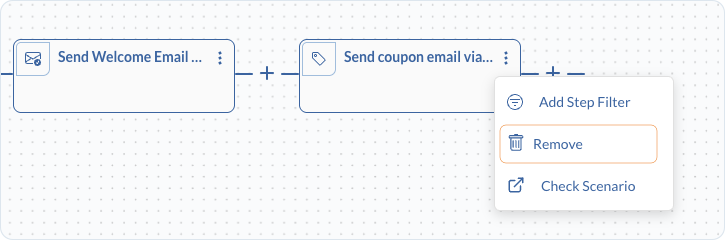
Whenever you want to remove a trigger or a process step, you can do so directly in the relevant block by choosing the **Remove** action under the three dots icon.

<figure><img src="https://1024162941-files.gitbook.io/~/files/v0/b/gitbook-x-prod.appspot.com/o/spaces%2FrSc4haeKWrTrOPHzdrMO%2Fuploads%2Fgit-blob-d9a683e7de6cf5beb5d4ba346558f6b35c1b6b30%2Fstep_removal.png?alt=media" alt=""><figcaption></figcaption></figure>

{% hint style="info" %}
Scenarios, subflows and triggers are normally predefined and are used directly within the Value Stream Modeller to build and execute process flows. They are set up using Make. For more detailed and technical information on how they are configured and prepared, see:

* [Triggers](/vsm-guides/value-stream-designer/process-components/triggers.md)
* [Process steps](/vsm-guides/value-stream-designer/process-components/process-steps.md)
* [VSM and CE Make Modules](/vsm-guides/value-stream-designer/integration-with-make/make-modules.md)
* [Configuring a connection between VSM and Make modules](/vsm-guides/value-stream-designer/integration-with-make/configuring-make-connection.md)
  {% endhint %}

## A process with multiple triggers

When creating a value stream, you can choose multiple triggers to start your processes. If multiple triggers are defined at the start, only one of them needs to occur for the process to begin. Once an event has been added as a start trigger, it cannot be added again. The triggers can be of a different type, for example a commerce event together with a timer trigger.

To create a process that starts with multiple triggers:

{% stepper %}
{% step %}

#### Add a first trigger in the process

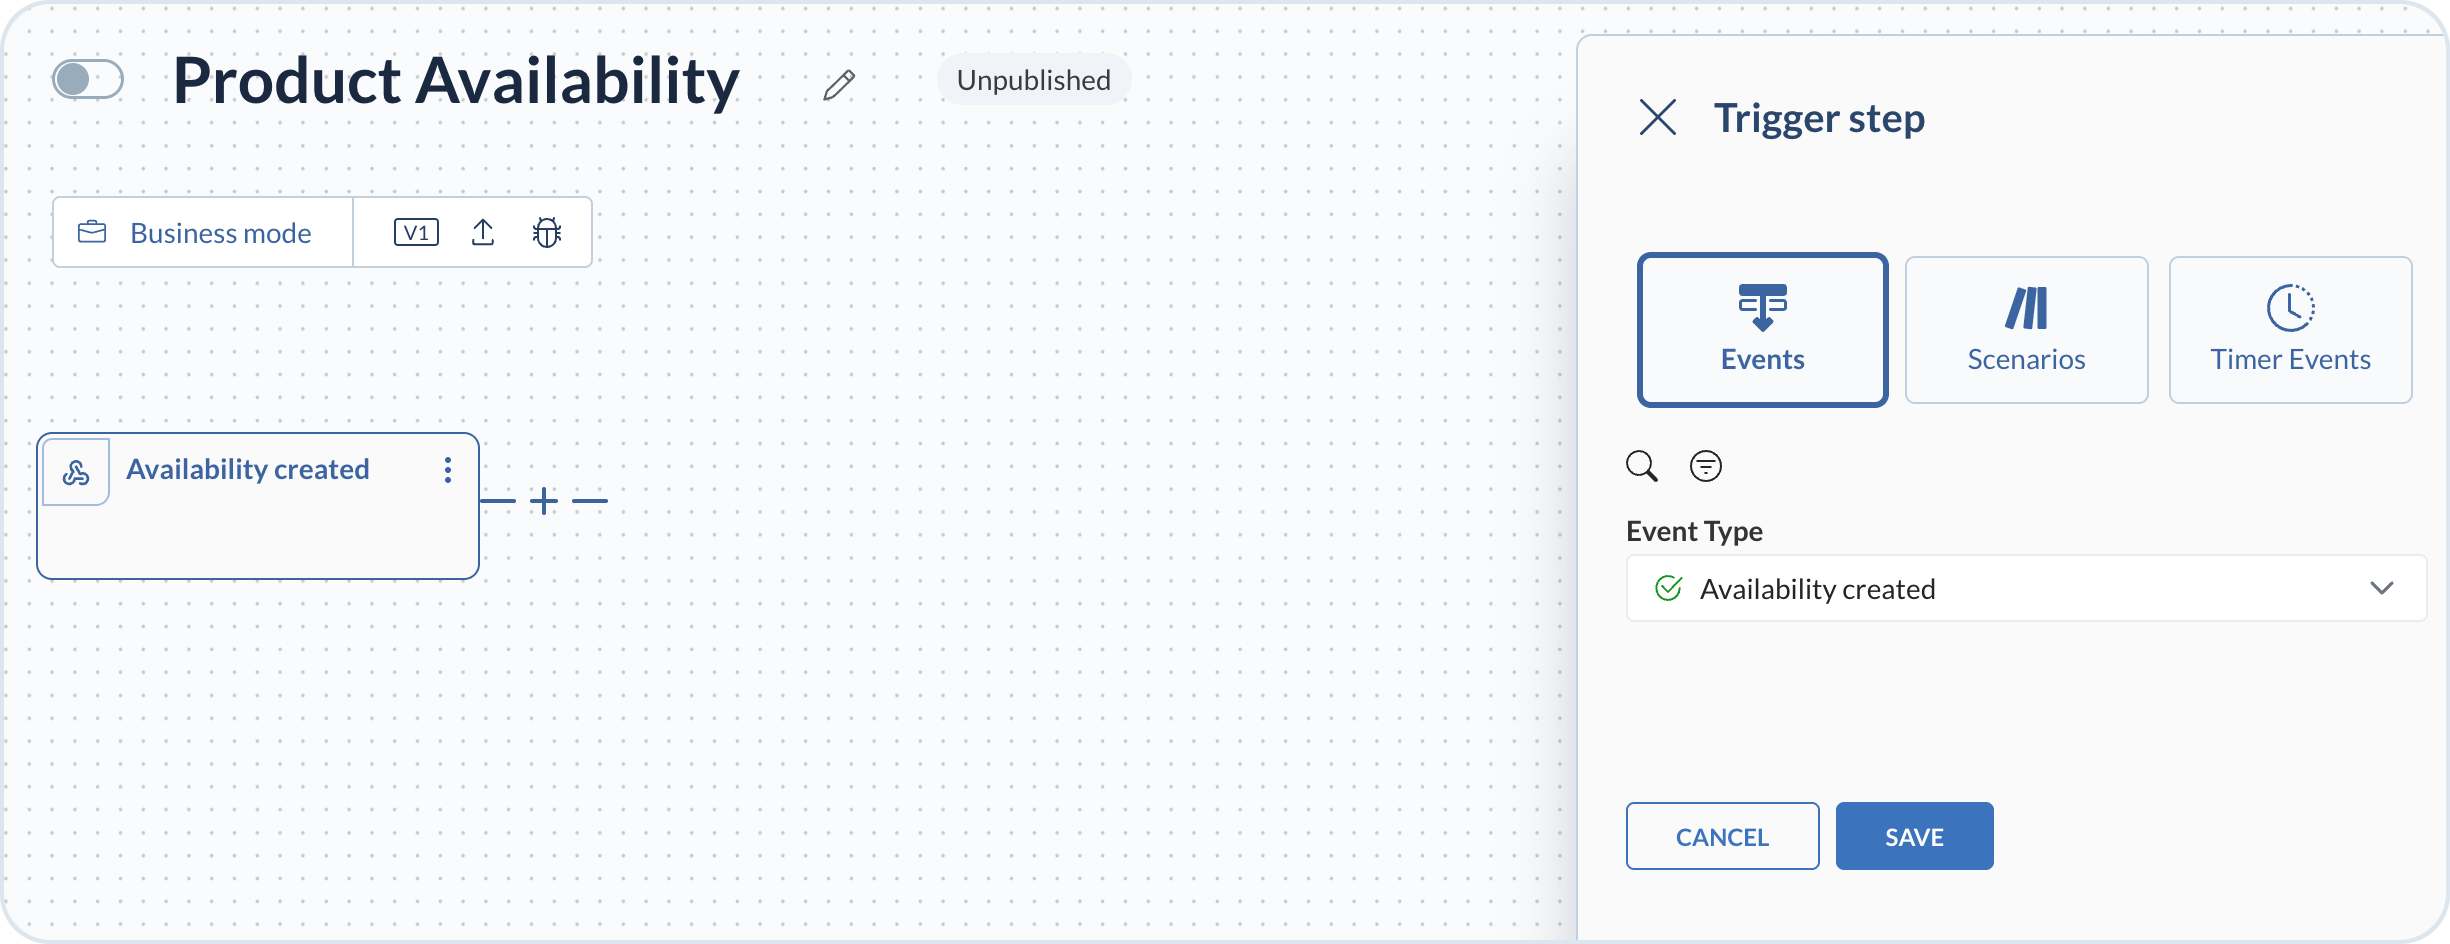
Configure it in the trigger step sidebar.

<figure><img src="https://1024162941-files.gitbook.io/~/files/v0/b/gitbook-x-prod.appspot.com/o/spaces%2FrSc4haeKWrTrOPHzdrMO%2Fuploads%2Fgit-blob-43bf2b09013df0616a59074e0fe5118eb0cd2509%2Ffirst_trigger.png?alt=media" alt="Value stream with the first trigger configured in the Trigger step sidebar" width="550"><figcaption><p>First trigger configured in the flow</p></figcaption></figure>
{% endstep %}

{% step %}

#### Add additional triggers for the same process

You can add an additional trigger in two ways—using the three dots icon in the first trigger, or the **Add** icon in the process flow:

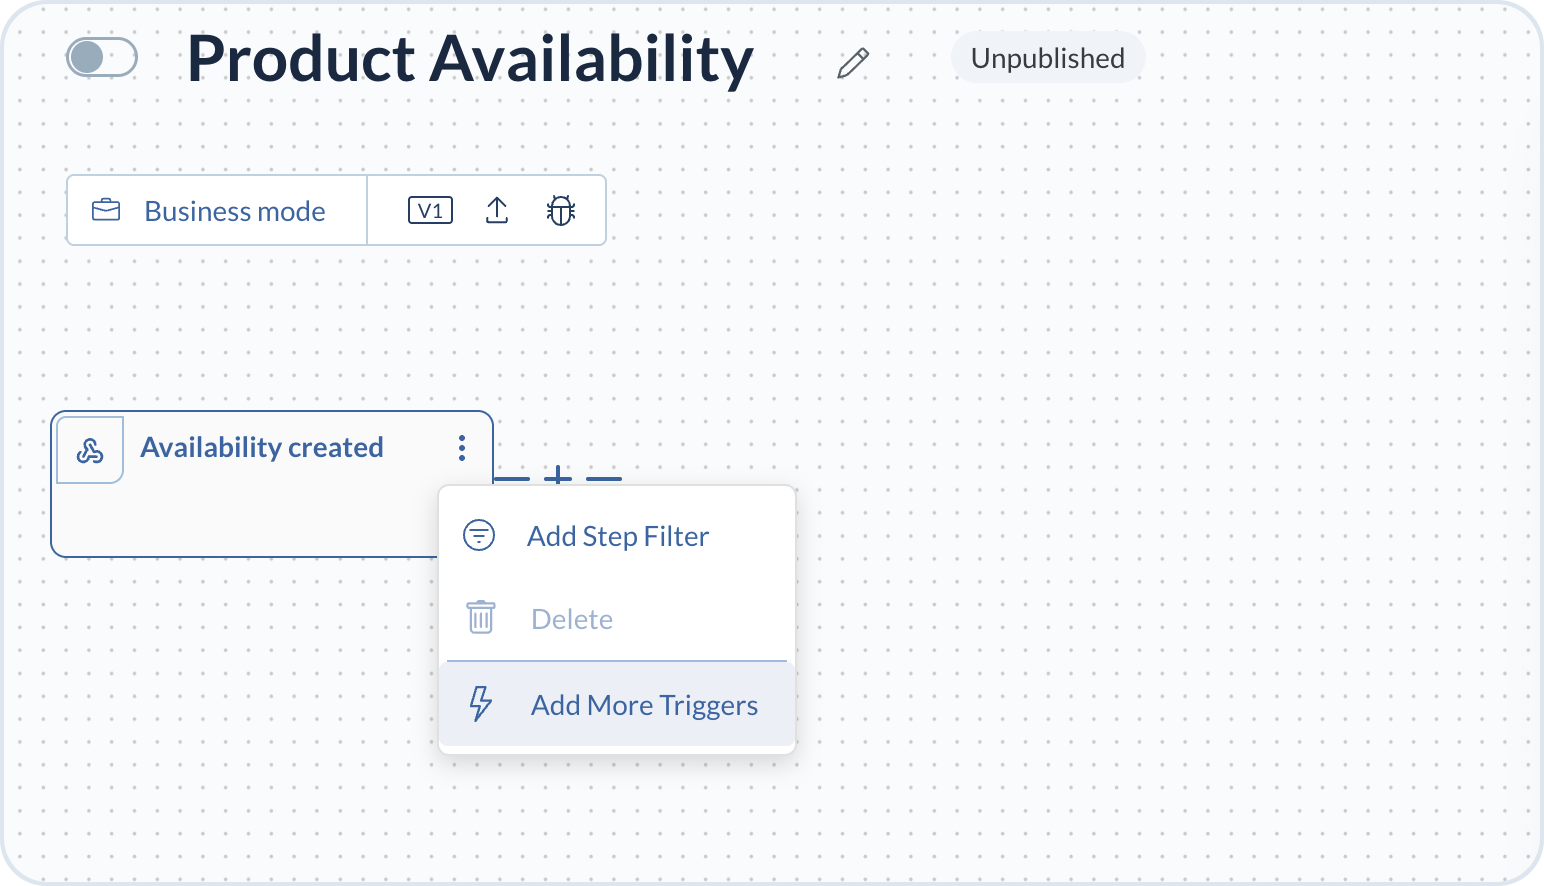
* Use the **three dots** icon: Select the three dots icon on the first trigger and choose **Add More Triggers**.

  <figure><img src="https://1024162941-files.gitbook.io/~/files/v0/b/gitbook-x-prod.appspot.com/o/spaces%2FrSc4haeKWrTrOPHzdrMO%2Fuploads%2Fgit-blob-e33db84ea26fa86e90160c8935c25d5fb2ec94a5%2Fmultiple_trigger.png?alt=media" alt="Trigger context menu opened from the first trigger with Add More Triggers selected" width="550"><figcaption><p>Add an additional trigger from the trigger menu</p></figcaption></figure>

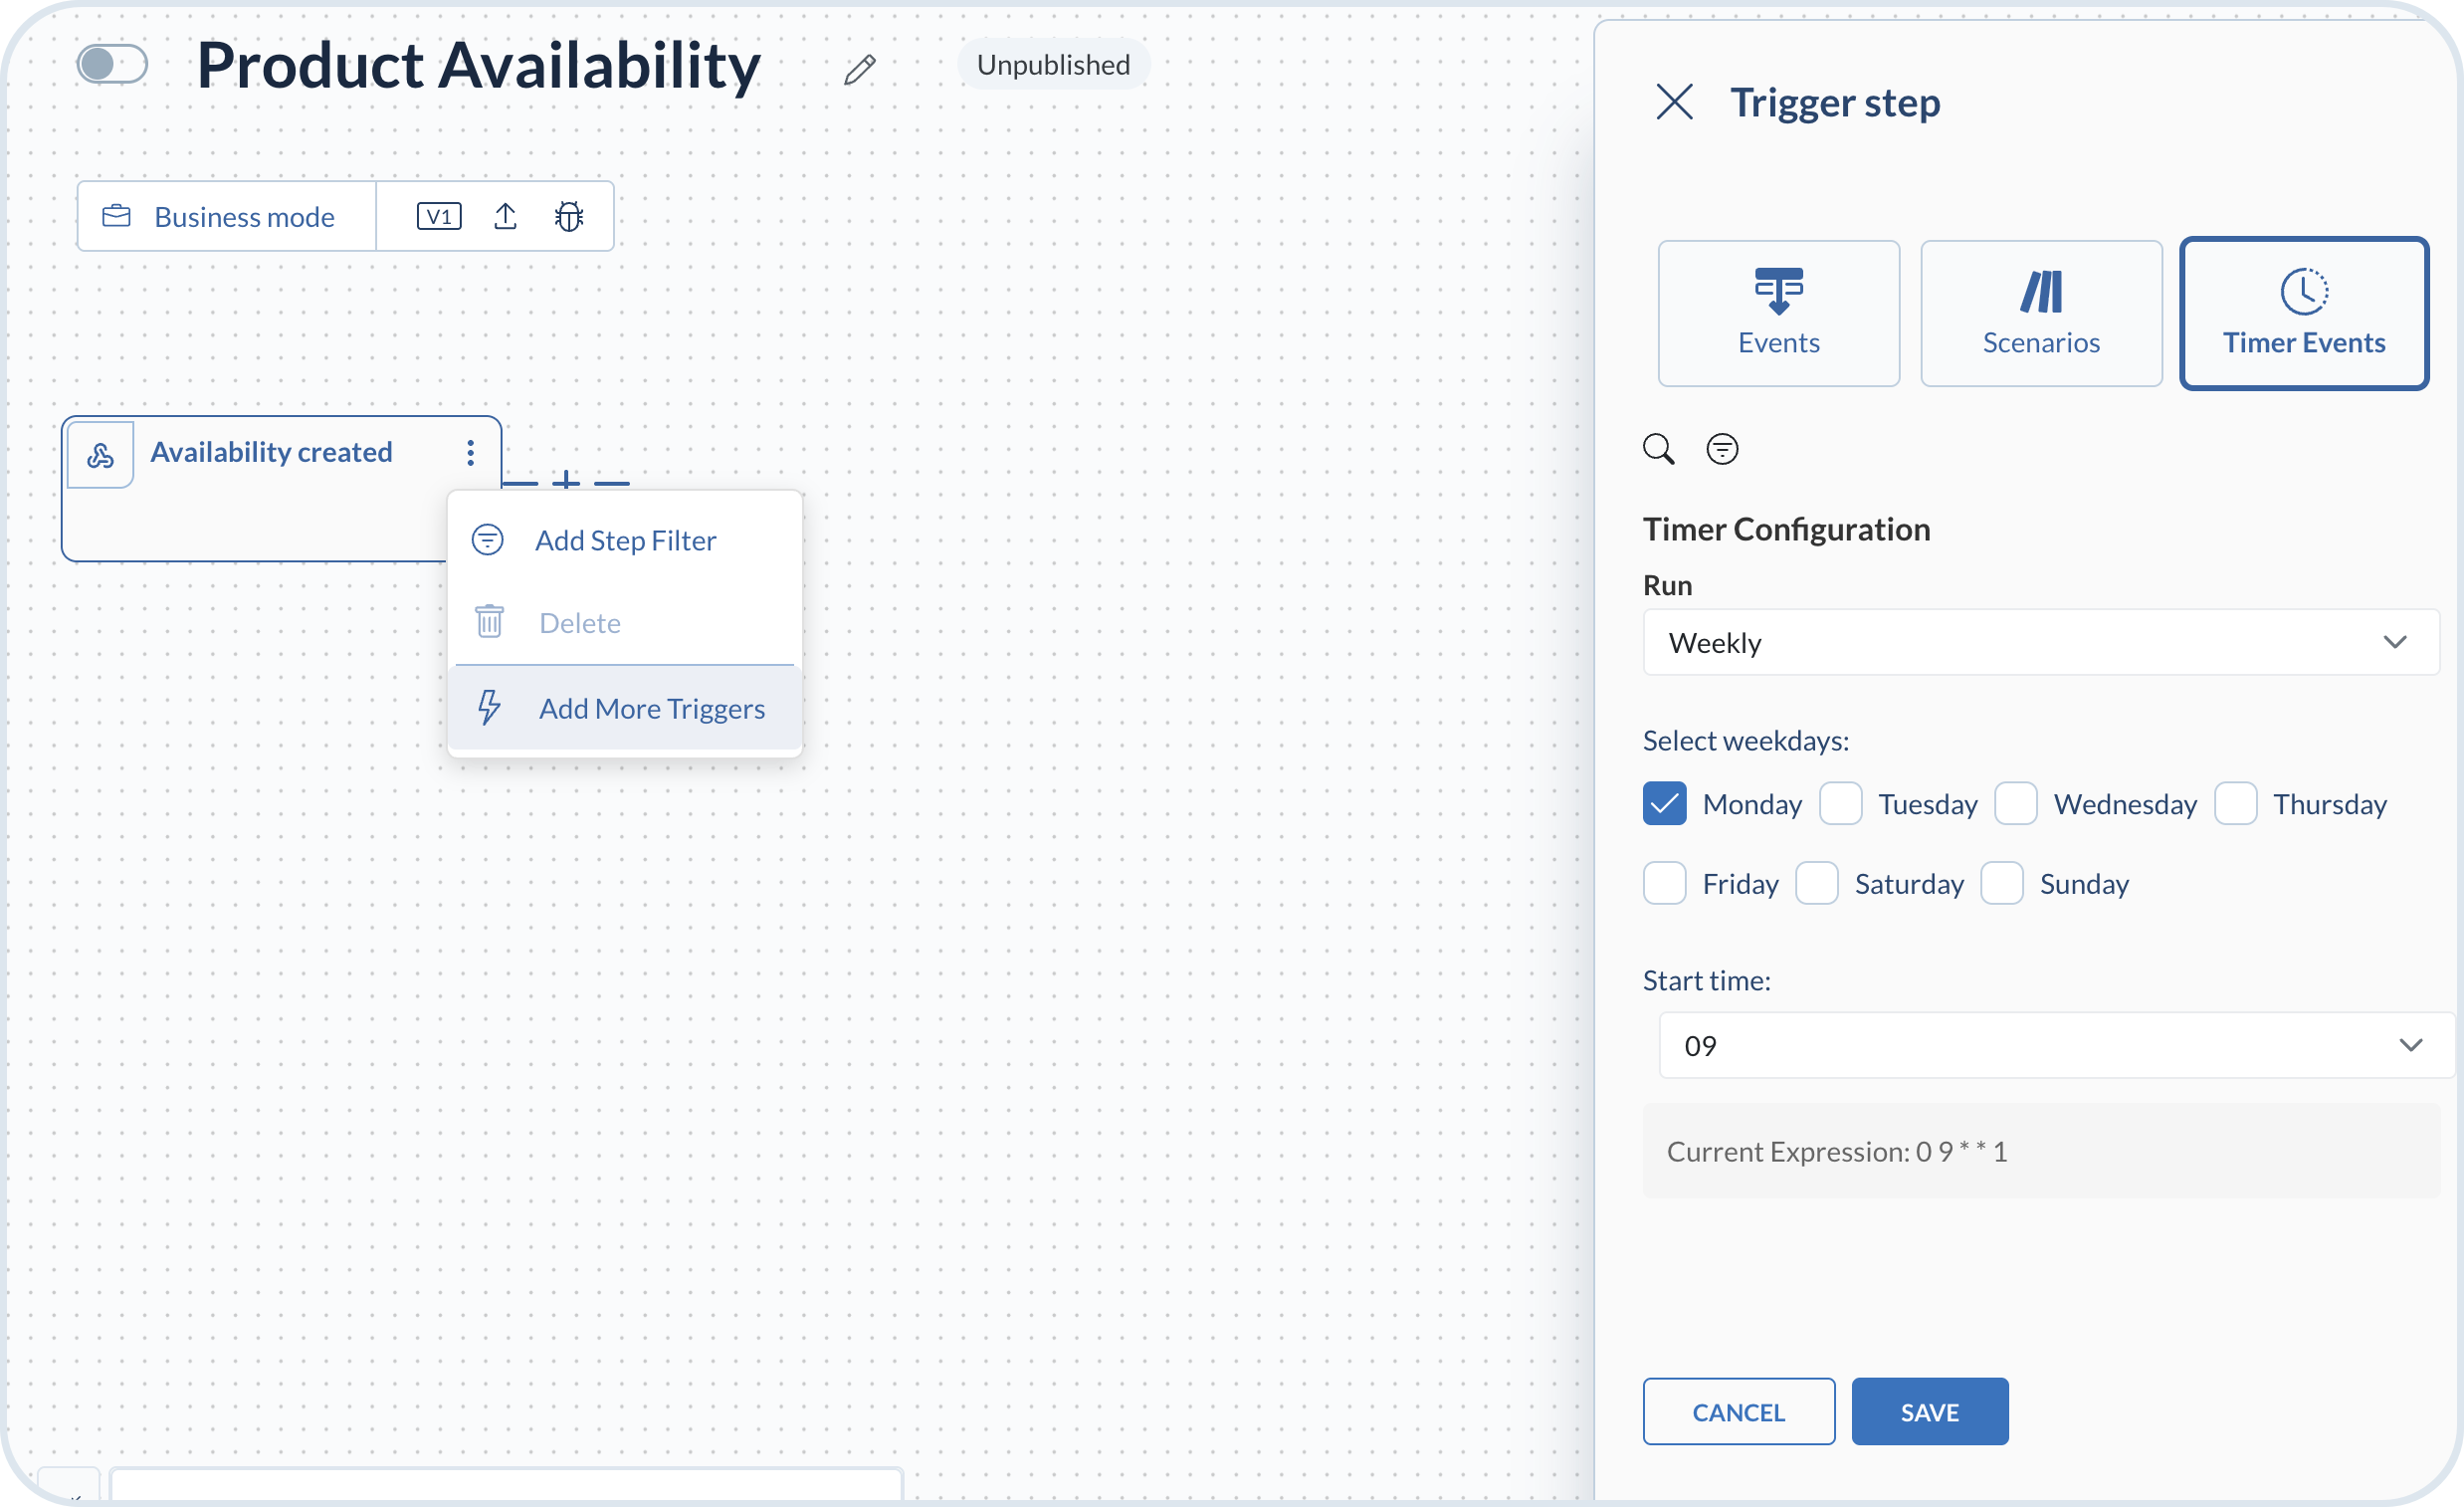
  This opens the sidebar, where you can configure the additional trigger type.

  <figure><img src="https://1024162941-files.gitbook.io/~/files/v0/b/gitbook-x-prod.appspot.com/o/spaces%2FrSc4haeKWrTrOPHzdrMO%2Fuploads%2Fgit-blob-6b48ad8ec1efd52ce83adc7dac0ee26716857e44%2Fmultiple_trigger1.png?alt=media" alt="Trigger step sidebar configuring an additional trigger with Timer Events selected" width="550"><figcaption><p>Configure the additional trigger in the sidebar</p></figcaption></figure>
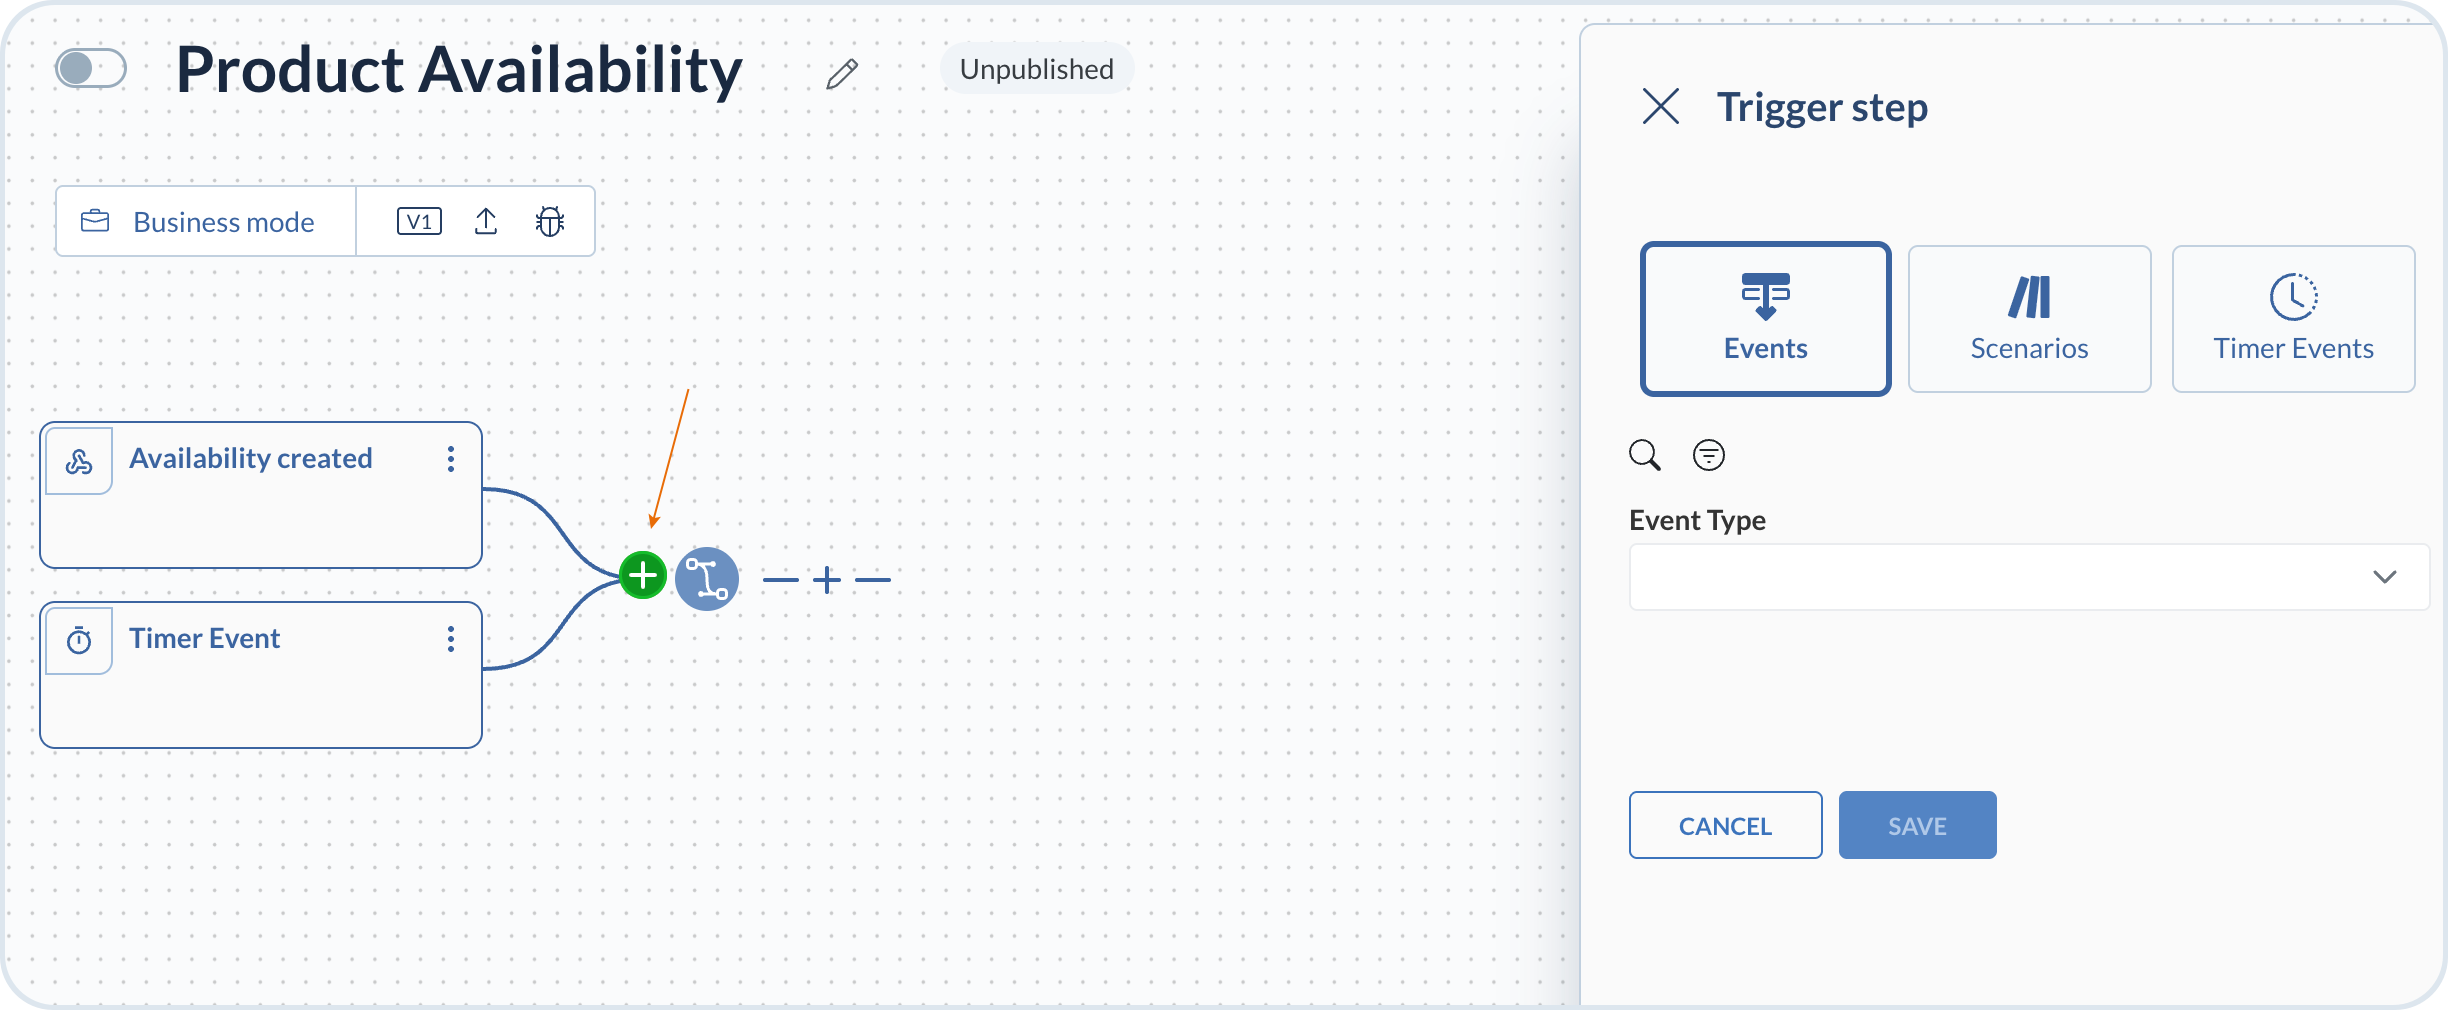
* Use the **Add** button by hovering over: Select the **Add** button in the process flow to open the configuration sidebar. You can only use this option if you have at least two triggers.

  <figure><img src="https://1024162941-files.gitbook.io/~/files/v0/b/gitbook-x-prod.appspot.com/o/spaces%2FrSc4haeKWrTrOPHzdrMO%2Fuploads%2Fgit-blob-ab0e3f26ab59f528440f568496d4cc371a731a2e%2Fmultiple_trigger2.png?alt=media" alt="Value stream with two start triggers and the Add button used to configure another trigger" width="550"><figcaption><p>Add another trigger from the flow canvas</p></figcaption></figure>

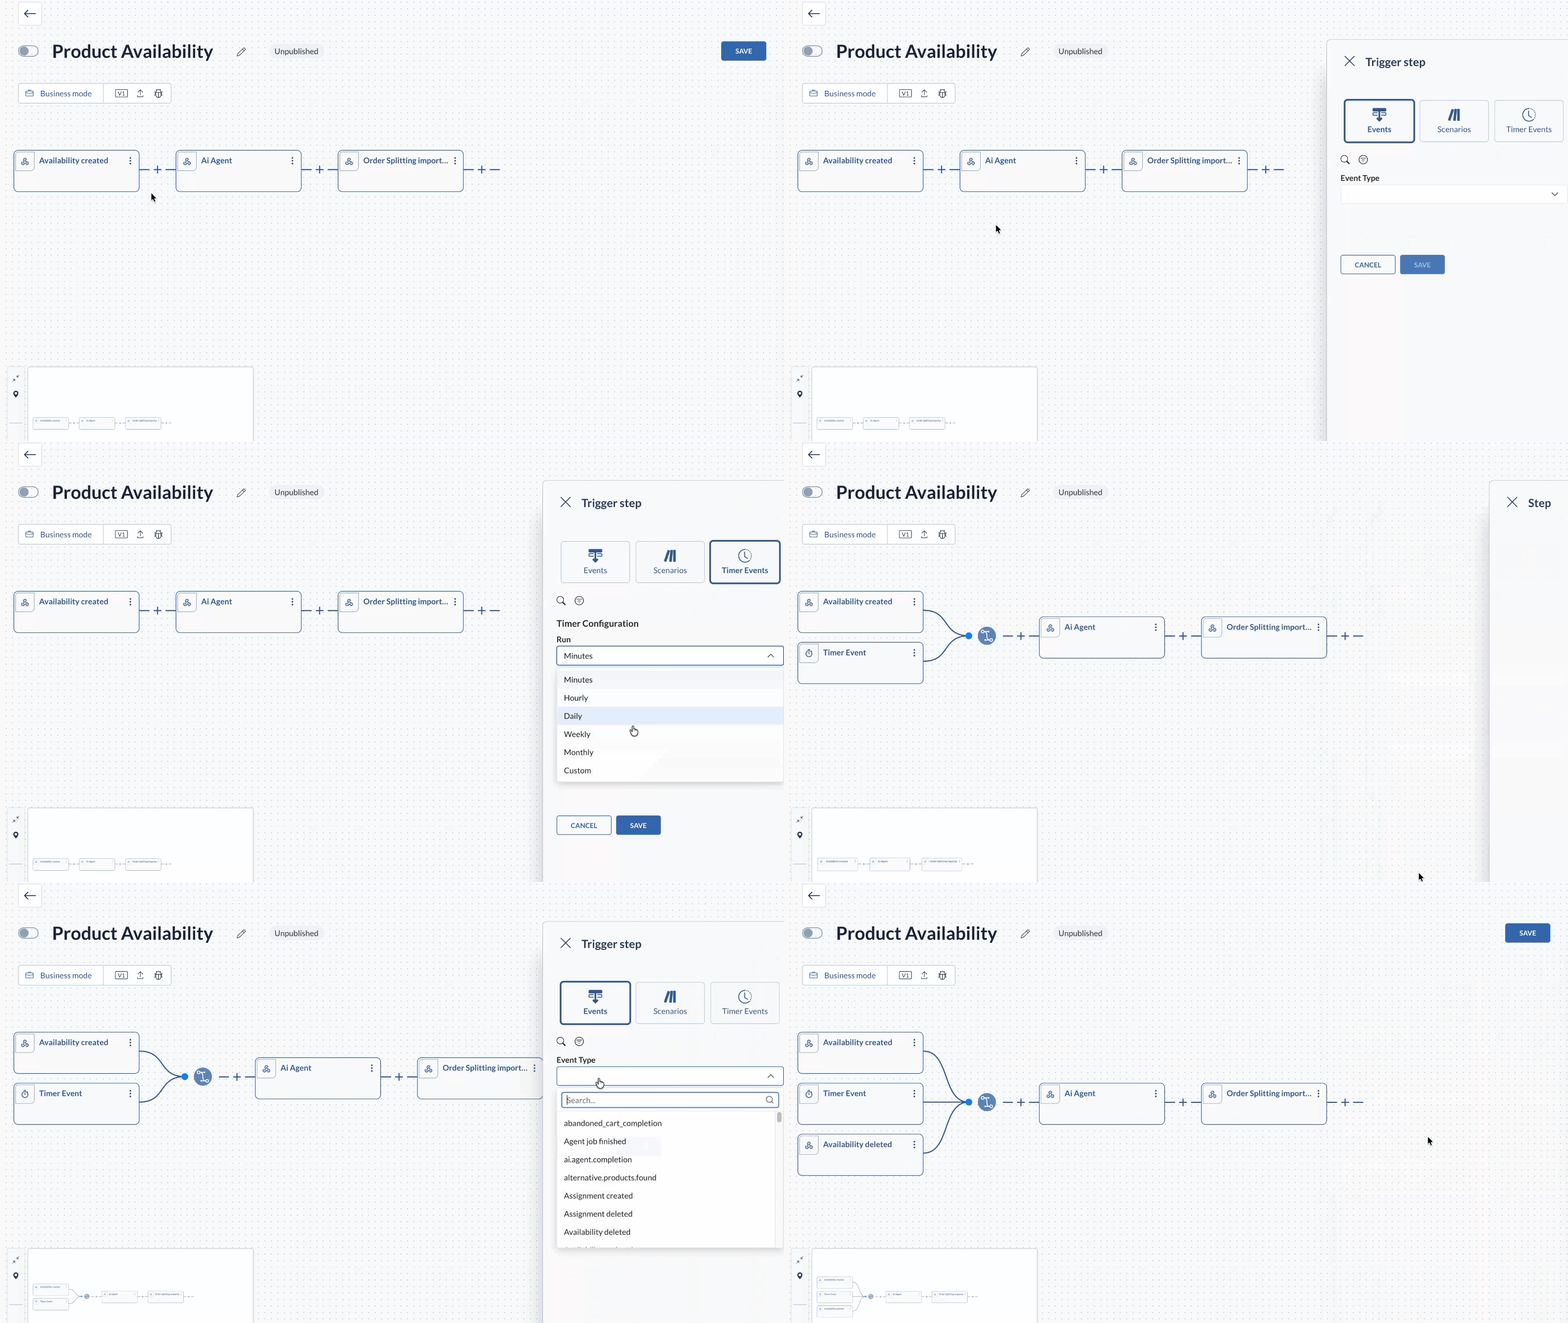
**Result**: After saving, the new trigger is added to the start of the value stream and appears in parallel with the other starting triggers.

<figure><img src="https://1024162941-files.gitbook.io/~/files/v0/b/gitbook-x-prod.appspot.com/o/spaces%2FrSc4haeKWrTrOPHzdrMO%2Fuploads%2Fgit-blob-03c23569eed7de613c3309c54af54ef0bf82df1c%2Ftriggers.gif?alt=media" alt="Value stream canvas showing a flow with multiple configured start triggers"><figcaption><p>Value stream with multiple configured triggers</p></figcaption></figure>
{% endstep %}
{% endstepper %}

## Setting a Trigger to Wake Up a Paused value stream

If your value stream needs to pause until a specific event occurs, it can enter a dormant or sleeping state. During this time, the process remains active in the background but does not continue to the next steps until a specific event happens.

To wake up a sleeping process instance, add a trigger that allows the process to continue when the expected event occurs. When you set up such a trigger, you can place it between process steps. Only custom events can serve as intermediate triggers. If you select an event from the drop-down list to configure the trigger, CE events are not visible.

You can add a middle trigger only after adding a step. Triggers cannot follow another trigger directly – only a single trigger or multiple triggers at the same level are supported.

### Instance ID as a wake-up trigger

To wake up a sleeping process instance, post an event with a `ce-instanceid` (Instance ID) header and the `ce-type` header that matches the event type configured for the process as a trigger.

* `ce-instanceid` – Routes to the correct instance
* `ce-type` – Routes to the trigger

The Instance ID is the ID of a running instance of a value stream. Every time a trigger event is received for a value stream, VSM generates a new instance with an Instance ID. If the value stream is triggered 100 times, VSM creates 100 unique instances, each with their own ID.

{% stepper %}
{% step %}

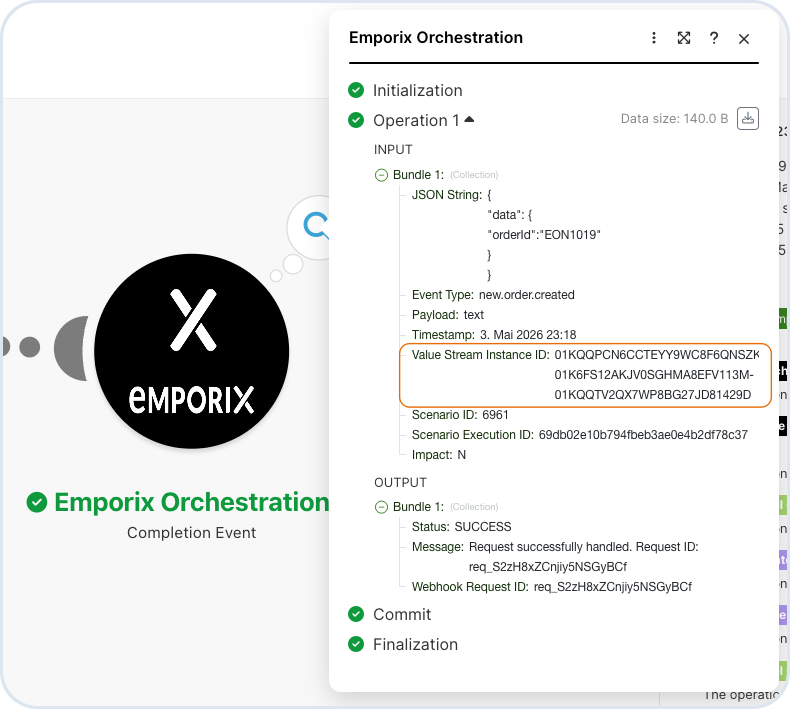
#### Find the Instance ID in Make

Go to your scenario and check the completion summary of the process that has already run. Copy the Instance ID value.

<figure><img src="https://1024162941-files.gitbook.io/~/files/v0/b/gitbook-x-prod.appspot.com/o/spaces%2FrSc4haeKWrTrOPHzdrMO%2Fuploads%2Fgit-blob-8c7b845337723d7ec6f6534deb5fd4523cbf8a9b%2Fvs_instanceid.png?alt=media" alt="Make scenario completion summary showing the Instance ID" width="563"><figcaption><p>Instance ID in the Make scenario completion summary</p></figcaption></figure>
{% endstep %}

{% step %}

#### Add the Instance ID to the request

Enter the copied value for the `ce-instanceid` header in your request.

If you send the request with the `ce-instanceid` and `ce-type` headers, VSM saves the payload and then passes it through to the next Make scenarios that are configured as next steps in your value stream. The event type is used as a key. The payload grows with every event that is generated.
{% endstep %}
{% endstepper %}

### Notification module in Make as a wake-up trigger

You can also wake up a value stream with a Make scenario that ends with a **Completion Event** module configured to send notifications about the completed scenario to VSM. If such a Make scenario is part of your value stream steps, it causes the process to wake up and move to the next process steps.

{% hint style="info" %}
To learn more about Make modules, see [VSM and CE Make Modules](/vsm-guides/value-stream-designer/integration-with-make/make-modules.md).
{% endhint %}

## Process conditions

You can control when and how steps run in three ways: **step filters** (run a step only when the event type matches), **conditional steps** (branch into different paths based on conditions), and **looping** (repeat steps until a condition is met). For how to configure and use each option, see [Conditions](/vsm-guides/value-stream-designer/process-components/conditions.md).


---

# Agent Instructions
This documentation is published with GitBook. GitBook is the documentation platform designed so that both humans and AI agents can read, navigate, and reason over technical content effectively. Learn more at gitbook.com.

## Querying This Documentation
If you need additional information that is not directly available in this page, you can query the documentation dynamically by asking a question.

Perform an HTTP GET request on the current page URL with the `ask` query parameter, and the optional `goal` query parameter:

```
GET https://developer.emporix.io/vsm-guides/value-stream-designer/creating-value-stream.md?ask=<question>&goal=<endgoal>
```

`ask` is the immediate question: it should be specific, self-contained, and written in natural language.
`goal` is optional and describes the broader end goal you are ultimately trying to accomplish on behalf of the user. GitBook uses it to tailor the answer towards what is most useful for that goal.

The response will contain a direct answer to the question and relevant excerpts and sources from the documentation.

Use this mechanism when the answer is not explicitly present in the current page, you need clarification or additional context, or you want to retrieve related documentation sections.